Heatit WiFi6 Bruksanvisning
Les nedenfor 📖 manual på norsk for Heatit WiFi6 (9 sider) i kategorien Termostat. Denne guiden var nyttig for 57 personer og ble vurdert med 4.1 stjerner i gjennomsnitt av 29 brukere
Side 1/9

1. INTRODUCTION
Heatit WiFi6 is an electronic thermostat designed for electrical
heating and water based heating control. The thermostat
can be controlled using the ”MyHeatit” App via Wi-Fi, or via
the buttons on the front of the thermostat. You can also
use Bluetooth (BLE) during the setup of the thermostat. The
thermostat has a user friendly interface.
Heatit WiFi6 has 3 modes; Heat - Cool and Eco.
The thermostat fits in standard European junction boxes and
may be used with most System 55 frames. It has a sturdy metal
frame for secure fastening in the junction box. The thermostat
has a built-in room temperature sensor. Two additional external
temperature sensors may also be connected. The device has
an open API and supports Amazon Alexa and Google Home
(open API, Amazon Alexa and Google Home is pending).
The installer configures the system via Wi-Fi. If Wi-Fi is not
available, the system can be configured via Bluetooth. After
the system is set up, the installer can add the property to the
customer. The customer can then add the system to their local
Wi-Fi network.
All our new Heatit products with Wi-Fi support will be
supported through our app; “MyHeatit”. In the “MyHeatit” App,
you can create your own profiles such as “Home – Away –
Night – Holiday” and thus control, monitor and organize all the
connected devices, or control them via weekly schedule.
The thermostat can communicate over a local API, where
the user can make integration with a local gateway, server or
controller that oers such a service.
Heatit WiFi6 has active power metering, and it gives you the
real time information about the power consumption. It also
allows you to set the power metering value manually in case
of connection with a contactor.
The device has implemented ZeroX™ technology. This
technology makes sure the relay switches at 0V when turning
on and o. With this technology the thermostat will have a
much longer lifetime.
The device can withstand a load of max. 16A/3600W at
230VAC. We recommend a contactor for loads above 13A.
2. INSTALLATION DISCLAIMER
Installation must be done by a qualified electrician in
accordance with national building codes. Before installation,
disconnect the power to the device from the mains. During
installation of the device, power to the device must be
disconnected AT ALL TIMES!
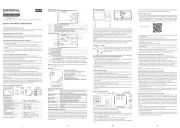
3. QUICK START
Upon connecting the device to power, it will automatically
enter add mode for a duration of 60 minutes.
1. Switch o the mains voltage (disable the fuse).
2. Open the junction box.
3. Connect the wires according to the description in chapter
“Connections”. Optional: Connect external wired sensors.
GET THE MYHEATIT APP HERE
HEATIT
WIFI6
Installers manual
Firmware version Document version
FW 1.0 Ver B
Article no. Document date
54 305 41
54 305 42
54 305 43
15.11.2024
Org. doc. date 02.04.2024
White RAL 9003 White RAL 9010
54 305 42 54 305 41
Black matt
54 305 43
PRODUCT
DOCUMENTS
TABLE OF CONTENTS
1. Introduction
2. Installation disclaimer
3. Quick start
4. Connections
5. Installation
6. Add/Remove
7. Factory reset
8. Startup
9. Principles of regulation
10. Local settings menu
11. Display menu structure
12. Temperature shown in
display
13. Standby and main screen
14. KWh value in menu
15. Choice of sensor
16. Selecting sensor value
17. Calibration
18. Brightness
19. Display on/o
20. Display icons
21. Child lock
22. Open window detection
23. Error codes
24. Safety features
25. Associations (pending)
26. Configuration parameters
27. Indicator
28. Thermostat dimensions
29. Thermostat controls
30. Placement in junction box
31. Chart - display menu
Product info
Produkspesifikasjoner
| Merke: | Heatit |
| Kategori: | Termostat |
| Modell: | WiFi6 |
Trenger du hjelp?
Hvis du trenger hjelp med Heatit WiFi6 still et spørsmål nedenfor, og andre brukere vil svare deg
Termostat Heatit Manualer

4 Januar 2025

27 Oktober 2024

27 Oktober 2024

27 Oktober 2024

16 Oktober 2024

16 Oktober 2024

16 Oktober 2024

16 Oktober 2024

15 Oktober 2024

15 Oktober 2024
Termostat Manualer
Nyeste Termostat Manualer
19 Oktober 2025
19 Oktober 2025
9 Oktober 2025
8 Oktober 2025
6 Oktober 2025
6 Oktober 2025
6 Oktober 2025
24 September 2025

24 September 2025
24 September 2025