Hotpoint HIC 3C24 Bruksanvisning
Hotpoint
Oppvaskmaskin
HIC 3C24
Les nedenfor 📖 manual på norsk for Hotpoint HIC 3C24 (8 sider) i kategorien Oppvaskmaskin. Denne guiden var nyttig for 2 personer og ble vurdert med 4.5 stjerner i gjennomsnitt av 2 brukere
Side 1/8

1
EN
DAILY REFERENCE
GUIDE
THANK YOU FOR BUYING A HOTPOINT-ARISTON
PRODUCT. In order to receive a more complete
assistance, please register your appliance on:
www.hotpoint.eu/register
You can download the Safety Instructions and the Use
and Care Guide, by visiting our website
docs.hotpoint.eu and following the Instructions on the
back of this booklet.
Before using the appliance carefully read Health and Safety guide.
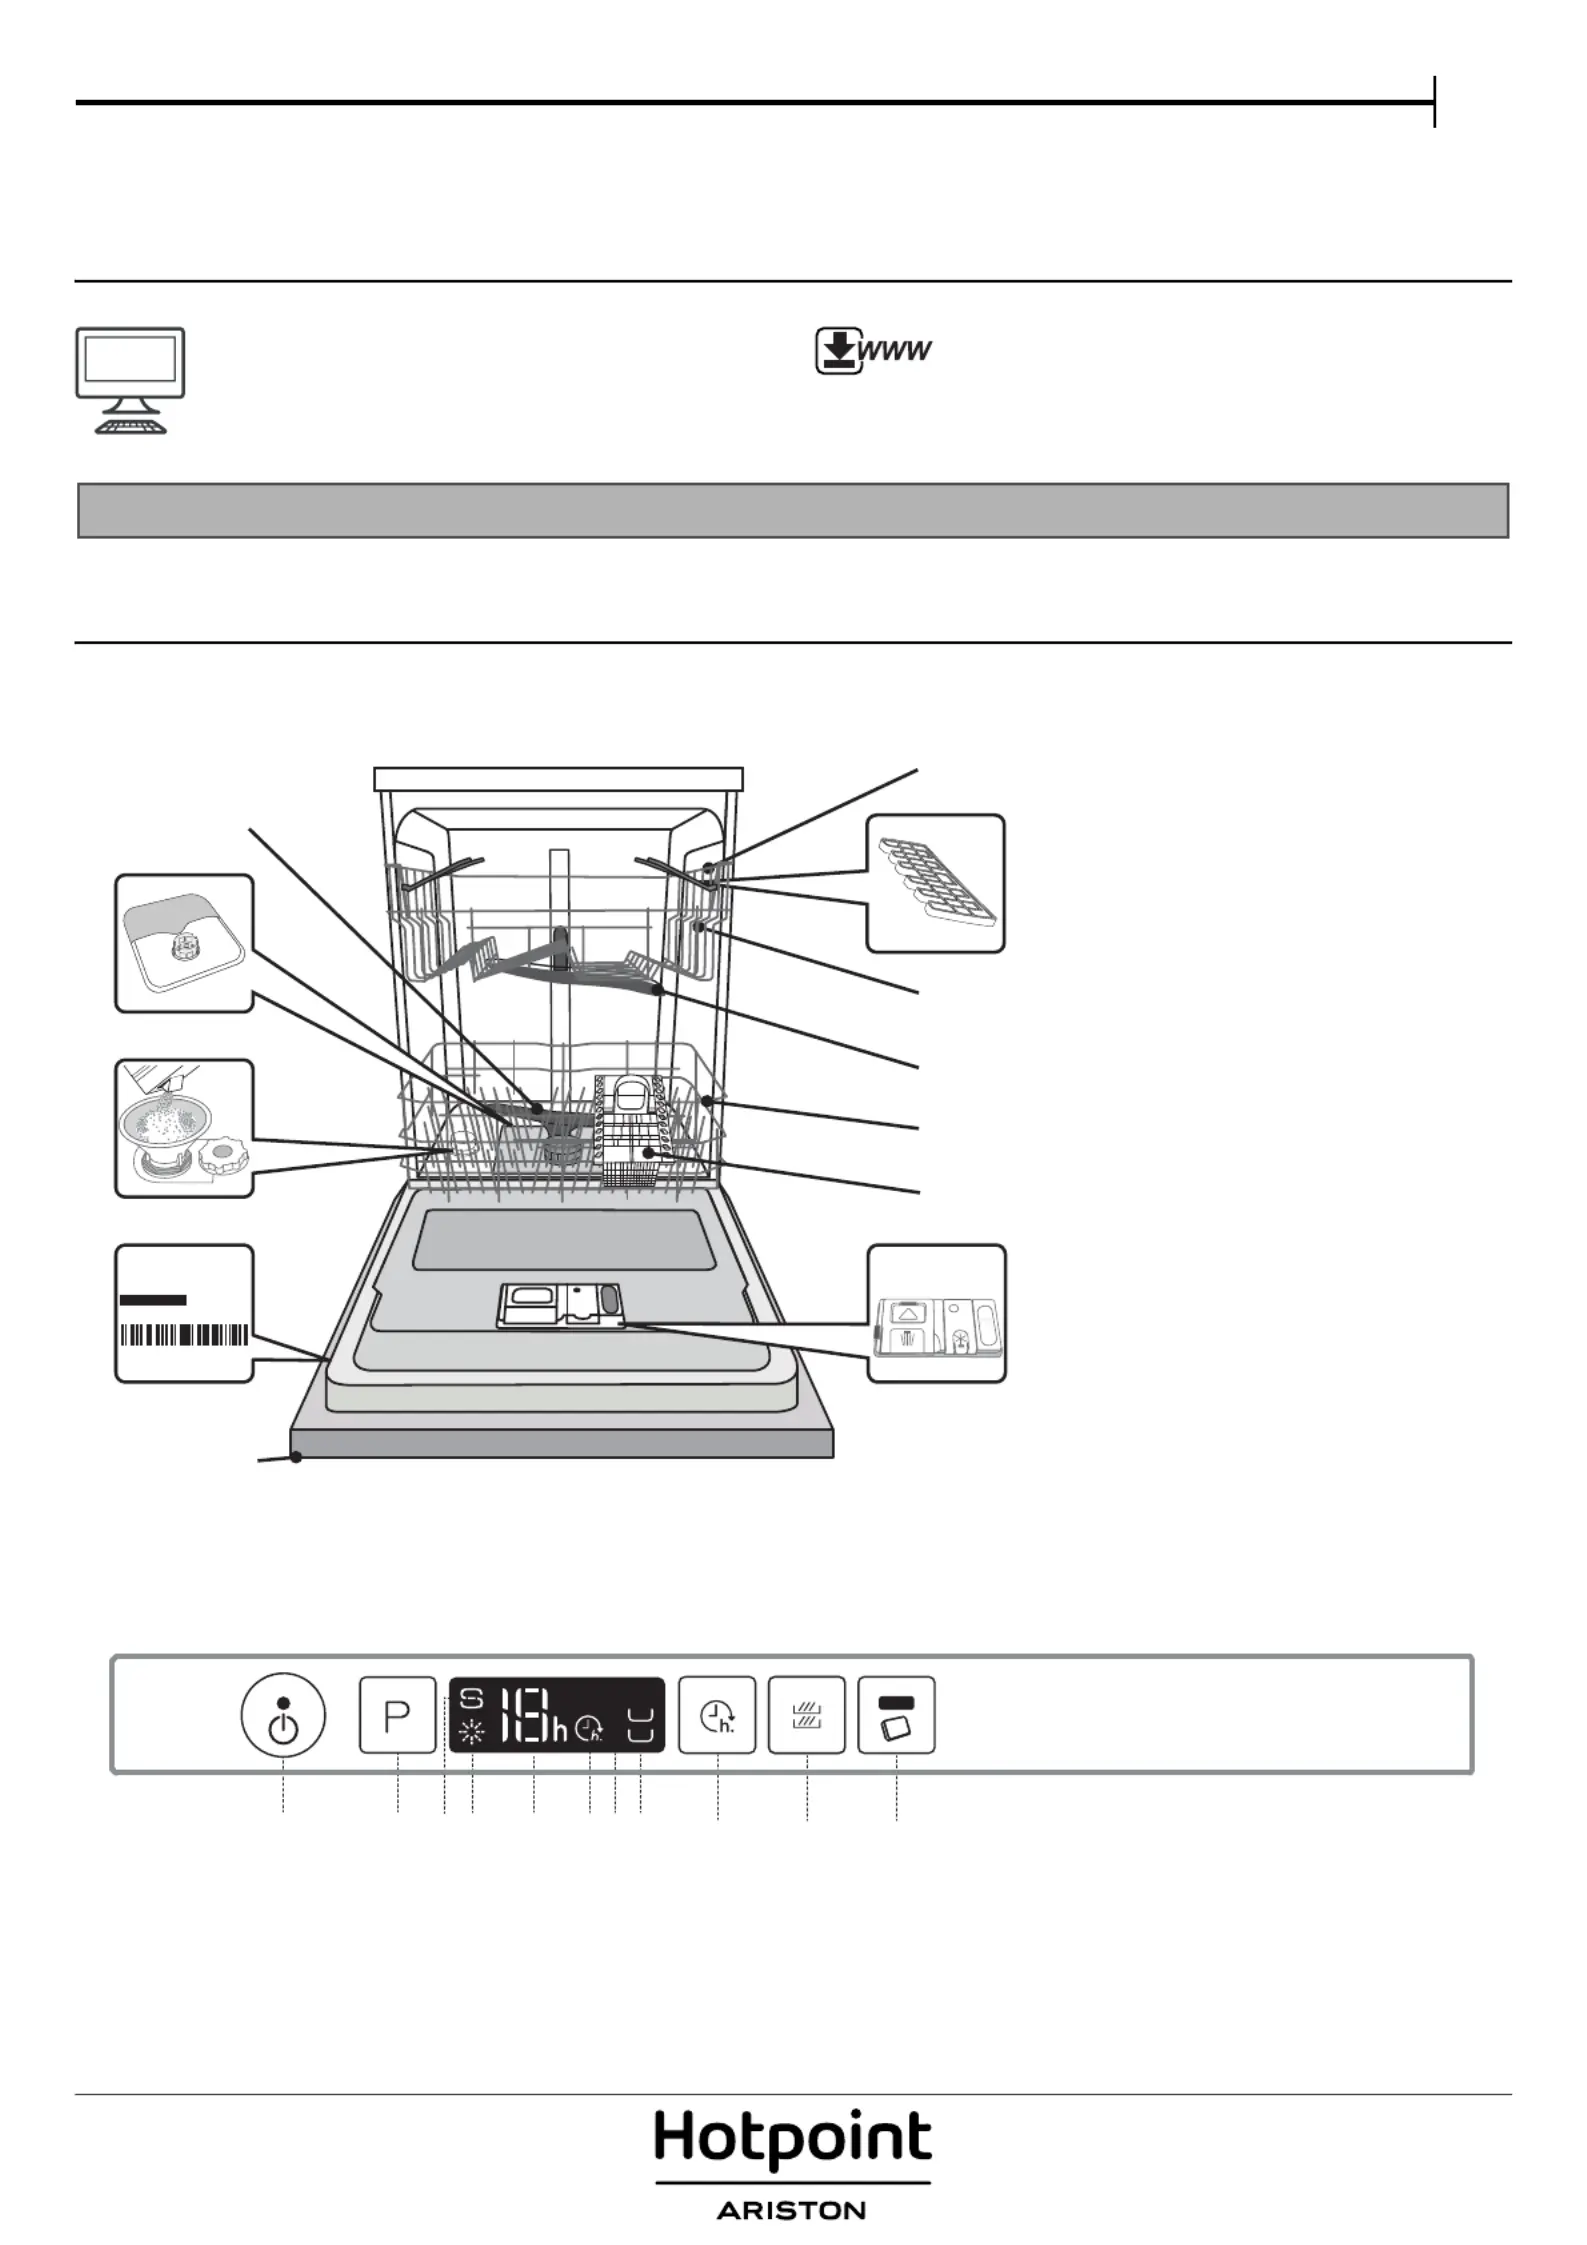
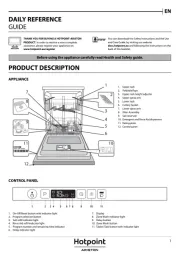
PRODUCT DESCRIPTION
APPLIANCE
1. Upper rack
2. Foldable flaps
3. Upper rack height adjuster
4. Upper spray arm
5. Lower rack
6. Cutlery basket
7. Lower spray arm
8. Filter Assembly
9. Salt reservoir
10. Detergent and Rinse Aid dispensers
11. Rating plate
12. Control panel
0000 000 00000
Service:
1
2
3
4
5
6
10
12
7
11
9
8
CONTROL PANEL
1. On-Off/Reset button with indicator light
2. Program selection button
3. Salt refill indicator light
4. Rinse Aid refill indicator light
5. Program number and remaining time indicator
6. Delay indicator light
7. Display
8. Zone Wash indicator light
9. Delay button
10.
Zone Wash
button
11. Tablet (Tab) button with indicator light
1 2 3
4
5 6 7
8 9 10 11

2
FIRST TIME USE
SALT, RINSE AID AND DETERGENT
ADVICE REGARDING THE FIRST TIME USE
After installation, remove the stoppers from the racks and the retaining
elastic elements from the upper rack.
FILLING THE SALT RESERVOIR
The use of salt prevents the formation of LIMESCALE on the dishes and
on the machine’s functional components.
• It is important that the salt reservoir be never empty.
• It is important to set the water hardness.
The salt reservoir is located in the lower part of the dishwasher (see
PROGRAMS DESCRIPTION) and should be filled when the SALT REFILL
indicator light
in the control panel is lit.
1.Remove the lower rack and unscrew the
reservoir cap (anticlockwise).
2.Position the funnel
(see figure)
and fill the salt
reservoir right up to its edge (approximately 1 kg);
it is not unusual for a little water to leak out.
3.Remove the funnel and wipe any salt residue
away from the opening.
Make sure the cap is screwed on tightly, so that no detergent can get
into the container during the wash program (this could damage the
water softener beyond repair).
Whenever you need to add salt, we recommend carrying out the
procedure before the washing cycle is started.
SETTING THE WATER HARDNESS
To allow the water softener to work in a perfect way, it is essential that
the water hardness setting is based on the actual water hardness in
your house. This information can be obtained from your local water
supplier.
The factory setting is for average (3) water hardness.
• Switch on the appliance by pressing the ON/OFF button.
• Switch off the appliance by pressing the ON/OFF button.
• Hold down button P for 5 seconds, until you hear a beep.
• Switch on the appliance by pressing the ON/OFF button.
• The current selection level number and the salt indicator light both flash.
• Press button P to select the desired hardness level (see WATER
HARDNESS TABLE).
• Switch off the appliance by pressing the ON/OFF button.
Setting is complete!
As soon as this procedure is complete, run a program without loading.
Only use salt that has been specifically designed for dishwashers.
After the salt has been poured into the machine, the SALT REFILL
indicator light switches off.
If the salt container is not filled, the water softener and the heating
element may be damaged as a result.
FILLING THE RINSE AID DISPENSER
Rinse aid makes dish DRYING easier. The rinse aid dispenser A should
be filled when the RINSE AID REFILL indicator light
in the control
panel is lit.
1. Open the dispenser
B
by pressing and pulling up the tab on the lid.
2. Carefully introduce the rinse aid as far as the maximum (110 ml)
reference notch of the filling space - avoid spilling it. If this happens,
clean the spill immediately with a dry cloth.
3. Press the lid down until you hear a click to close it.
NEVER pour the rinse aid directly into the tub.
ADJUSTING THE DOSAGE OF RINSE AID
If you are not completely satisfied with the drying results, you can ad-
just the quantity of rinse aid used.
• Switch the dishwasher on using the ON/OFF button.
• Switch it off using the ON/OFF button.
• Press button P three times - a beep will be heard.
• Switch it on using the ON/OFF button.
• The current selection level number and rinse aid indicator light flash.
• Press button P to select the level of rinse aid quantity to be
supplied.
• Switch it off using the ON/OFF button
Setting is complete!
If the rinse aid level is set to ZERO (ECO), no rinse aid will be supplied. The
LOW RINSE AID indicator light will not be lit if you run out of rinse aid.
A maximum of 4 levels can be set according to the dishwasher model.
The factory setting is for a medium level.
• If you see bluish streaks on the dishes, set a low number (1-2).
• If there are drops of water or limescale marks on the dishes, set a
high number (3-4).
FILLING THE DETERGENT DISPENSER
To open the detergent dispenser
use the opening device A. Introduce
the detergent into the dry dispenser
B only. Place the amount of
detergent for pre-washing directly
inside the tub.
1.When measuring out the detergent
refer to the
(see PROGRAMS TABLE)
to
add the proper quantity.
Compartment
B
comprises a level
showing the maximum quantity of liquid or powder detergent that
can be added to each cycle.
2. Remove detergent residues from the edges of the dispenser and
close the cover until it clicks.
3. Close the lid of the detergent dispenser by pulling it up until the
closing device is secured in place.
The detergent dispenser automatically opens up at the right time
according to the program.
If all-in-one detergents are used, we recommend using the
TABLET
button, because it adjusts the program so that the best washing and
drying results are always achieved.
Water Hardness Table
Level
°dH
German degrees
°fH
French degrees
1 Soft 0 - 6 0 - 10
2 Medium 7 - 11 11 - 20
3 Average 12 - 17 21 - 30
4 Hard 17 - 34 31 - 60
5 Very hard 35 - 50 61 - 90
M
A
X
A
B
35
25
A
B

3
EN
PROGRAMS TABLE
ECO program data is measured under laboratory conditions according to European Standard EN 50242.
*) Not all options can be used simultaneously.
**) The duration of the program shown on the display or in the booklet is an estimate calculated on standard conditions. The actual time may vary
depending on many factors such as temperature and pressure of the incoming water, room temperature, amount of detergent, quantity and type of load,
load balancing, additional selected options and sensor calibration. The sensor calibration can increase program duration up to 20 min.
Standby consumption: Left-on mode consumption: 5 W - Off mode consumption: 0.5 W
Program
Drying
phase
Available options
*)
Detergent
container
Duration of
wash program
(h:min)
**)
Water
consumption
(litres/cycle)
Energy
consumption
(kWh/cycle)
Tub B
1. Eco 50° 3:10 9 0.93
2. Auto Intensive 65° - 2:00 - 3:10 14 - 15.5 1.50 - 1.80
3. Auto Normal 55° 1:30 - 2:30 14.5 - 16 1.15 - 1.30
4. Auto Fast 50° - - 0:40 - 1:20 13 - 14.5 1.15 - 1.25
5. Express 30’ 50° - - 0:30 9 0.50
6. Sanitizing 65° - 1:40 10 1.30
7. Soak - - - - 0:12 4.5 0.01
PROGRAMS DESCRIPTION
Instructions on wash cycle selection.
ECO
Normally soiled crockery. Standard program, the most efficient in terms
of its combined energy and water consumption.
AUTO INTENSIVE
Heavily soiled dishes and pans (not to be used for delicate items).
AUTO NORMAL
Automatic program for normally soiled pans and dishes.
AUTO FAST
Limited quantity of daily soiling (ideal for 4 place settings).
EXPRESS 30’
Program to be used for lightly-soiled dishes with no dried food
residues. (Ideal for 2 place settings).
SANITIZING
Normally or heavily soiled crockery, with additional antibacterial wash.
SOAK
Crockery to be washed later. No detergent to be used with this
program.
Notes:
Optimum performance levels when using the “1 Hour” and “Rapid”
programs can be achieved by observing the maximum amounts of
specified place settings.
To reduce consumption even further, only run the dishwasher
when it is full.
Produkspesifikasjoner
Merke: | Hotpoint |
Kategori: | Oppvaskmaskin |
Modell: | HIC 3C24 |
Innebygd skjerm: | Ja |
Vekt: | 35500 g |
Bredde: | 595 mm |
Dybde: | 555 mm |
Høyde: | 820 mm |
Årlig energiforbruk: | 265 kWh |
Støynivå: | 44 dB |
Energieffektivitetsklasse (gammel): | A++ |
Vannforbruk per syklus: | 12 l |
Antall vaskeprogrammer: | 7 |
Pakkevekt: | 37500 g |
Saltindikator: | Ja |
Oppvaskprogrammer: | Eco |
Energiforbruk per syklus: | 0.93 kWh |
Årlig vannforbruk: | 2520 l |
AC-inngangsspenning: | 220 - 240 V |
AC-inngangsfrekvens: | 50 Hz |
Kabellengde: | 1.3 m |
Kontrolltype: | Knapper |
Produktstørrelse: | Full størrelse (60 cm) |
Strøm: | 10 A |
Plassering av innretning: | Fullstendig innebygget |
Tilkoblet nettbelastning: | 1900 W |
Temperatur (maks): | 60 °C |
Strømforbruk, av: | 0.5 W |
Dør farge: | Ikke gjeldende |
Dybde installasjonskammer: | 570 mm |
Bredde installasjonskammer: | 600 mm |
Lenge på tilkoblingsslange: | 1.55 m |
Lengde utløpsslange: | 1.5 m |
Justerbar høyde for den øverste kurven: | Ja |
Bestikkavdelingstype: | Kurv |
Justerbare bein: | Ja |
Gjenværende tid angis: | Ja |
Rensemiddelindikator: | Ja |
Antall kuverter: | 14 kuverter |
Syklustid: | 190 min |
Forsinket start: | 12 timer |
Forsinket start timer: | Ja |
Installasjonskammer høyde (maks): | 900 mm |
Installasjonskammer høyde (min): | 820 mm |
Kontrollpanelets farge: | Sølv |
Tørkeklasse: | A |
Trenger du hjelp?
Hvis du trenger hjelp med Hotpoint HIC 3C24 still et spørsmål nedenfor, og andre brukere vil svare deg
Oppvaskmaskin Hotpoint Manualer
6 August 2025
6 August 2025
6 August 2025
20 Februar 2025
6 Februar 2025
21 Januar 2025
21 Januar 2025
21 Januar 2025
8 Januar 2025
14 Desember 2024
Oppvaskmaskin Manualer
- Oppvaskmaskin Teka
- Oppvaskmaskin Maytag
- Oppvaskmaskin Miele
- Oppvaskmaskin Whirlpool
- Oppvaskmaskin Etna
- Oppvaskmaskin Haier
- Oppvaskmaskin KitchenAid
- Oppvaskmaskin Pelgrim
- Oppvaskmaskin Royal Catering
- Oppvaskmaskin LG
- Oppvaskmaskin Bosch
- Oppvaskmaskin Jocel
- Oppvaskmaskin BEKO
- Oppvaskmaskin Exquisit
- Oppvaskmaskin Grundig
- Oppvaskmaskin Hisense
- Oppvaskmaskin Sharp
- Oppvaskmaskin Electrolux
- Oppvaskmaskin Café
- Oppvaskmaskin Balay
- Oppvaskmaskin Siemens
- Oppvaskmaskin Koldfront
- Oppvaskmaskin Arcelik
- Oppvaskmaskin Smeg
- Oppvaskmaskin Hoover
- Oppvaskmaskin Saba
- Oppvaskmaskin Nabo
- Oppvaskmaskin Amica
- Oppvaskmaskin IKEA
- Oppvaskmaskin Ignis
- Oppvaskmaskin AEG
- Oppvaskmaskin Rosieres
- Oppvaskmaskin Artusi
- Oppvaskmaskin Cecotec
- Oppvaskmaskin Samsung
- Oppvaskmaskin Neff
- Oppvaskmaskin Delonghi
- Oppvaskmaskin Comfee
- Oppvaskmaskin Imarflex
- Oppvaskmaskin Bomann
- Oppvaskmaskin Edgestar
- Oppvaskmaskin Kogan
- Oppvaskmaskin Caple
- Oppvaskmaskin Midea
- Oppvaskmaskin Franke
- Oppvaskmaskin Sauber
- Oppvaskmaskin Candy
- Oppvaskmaskin CDA
- Oppvaskmaskin Kuppersbusch
- Oppvaskmaskin Gorenje
- Oppvaskmaskin Summit
- Oppvaskmaskin Brandt
- Oppvaskmaskin Gram
- Oppvaskmaskin Master Kitchen
- Oppvaskmaskin Monogram
- Oppvaskmaskin Vox
- Oppvaskmaskin Westinghouse
- Oppvaskmaskin Medion
- Oppvaskmaskin Kluge
- Oppvaskmaskin Privileg
- Oppvaskmaskin MPM
- Oppvaskmaskin Cosmo
- Oppvaskmaskin Euro Appliances
- Oppvaskmaskin Bauknecht
- Oppvaskmaskin Frigidaire
- Oppvaskmaskin Defy
- Oppvaskmaskin Euromaid
- Oppvaskmaskin GE
- Oppvaskmaskin Omega
- Oppvaskmaskin Fisher Paykel
- Oppvaskmaskin Fulgor Milano
- Oppvaskmaskin Hyundai
- Oppvaskmaskin Infiniton
- Oppvaskmaskin Indesit
- Oppvaskmaskin Asko
- Oppvaskmaskin Blaupunkt
- Oppvaskmaskin Cylinda
- Oppvaskmaskin AYA
- Oppvaskmaskin Fisher And Paykel
- Oppvaskmaskin Elba
- Oppvaskmaskin Philco
- Oppvaskmaskin Jenn-Air
- Oppvaskmaskin Wisberg
- Oppvaskmaskin ECG
- Oppvaskmaskin Klarstein
- Oppvaskmaskin ATAG
- Oppvaskmaskin Freggia
- Oppvaskmaskin V-Zug
- Oppvaskmaskin Black And Decker
- Oppvaskmaskin Sauter
- Oppvaskmaskin Element
- Oppvaskmaskin Kucht
- Oppvaskmaskin Technika
- Oppvaskmaskin Hansa
- Oppvaskmaskin Thor
- Oppvaskmaskin Kenmore
- Oppvaskmaskin Meireles
- Oppvaskmaskin Fagor
- Oppvaskmaskin Edesa
- Oppvaskmaskin IFB
- Oppvaskmaskin Profilo
- Oppvaskmaskin Gaggenau
- Oppvaskmaskin Constructa
- Oppvaskmaskin KKT Kolbe
- Oppvaskmaskin Tisira
- Oppvaskmaskin Porter & Charles
- Oppvaskmaskin Zerowatt
- Oppvaskmaskin Baumatic
- Oppvaskmaskin Iberna
- Oppvaskmaskin Silvercrest
- Oppvaskmaskin Otsein
- Oppvaskmaskin Signature
- Oppvaskmaskin Corberó
- Oppvaskmaskin Rangemaster
- Oppvaskmaskin Daewoo
- Oppvaskmaskin Emerio
- Oppvaskmaskin Eurom
- Oppvaskmaskin Barazza
- Oppvaskmaskin Thermador
- Oppvaskmaskin Continental Edison
- Oppvaskmaskin Crosley
- Oppvaskmaskin Pitsos
- Oppvaskmaskin La Germania
- Oppvaskmaskin Emilia
- Oppvaskmaskin Esatto
- Oppvaskmaskin JennAir
- Oppvaskmaskin Blomberg
- Oppvaskmaskin Robinhood
- Oppvaskmaskin De Dietrich
- Oppvaskmaskin Zanussi
- Oppvaskmaskin Qilive
- Oppvaskmaskin Junker
- Oppvaskmaskin Benavent
- Oppvaskmaskin Black Decker
- Oppvaskmaskin Bellini
- Oppvaskmaskin Cookology
- Oppvaskmaskin Hanseatic
- Oppvaskmaskin Proline
- Oppvaskmaskin Pando
- Oppvaskmaskin Equator
- Oppvaskmaskin SEIKI
- Oppvaskmaskin Oranier
- Oppvaskmaskin Upo
- Oppvaskmaskin Sammic
- Oppvaskmaskin Ariston Thermo
- Oppvaskmaskin Hoonved
- Oppvaskmaskin Helkama
- Oppvaskmaskin Rex
- Oppvaskmaskin Classique
- Oppvaskmaskin Castor
- Oppvaskmaskin New World
- Oppvaskmaskin Essentiel B
- Oppvaskmaskin Bompani
- Oppvaskmaskin Prima
- Oppvaskmaskin Cove
Nyeste Oppvaskmaskin Manualer
6 August 2025
6 August 2025
6 August 2025
6 August 2025
6 August 2025
6 August 2025
6 August 2025
6 August 2025
6 August 2025
6 August 2025