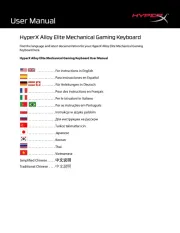
Korg PaAS MK2 Bruksanvisning
Les nedenfor 📖 manual på norsk for Korg PaAS MK2 (4 sider) i kategorien Tastatur. Denne guiden var nyttig for 3 personer og ble vurdert med 4.5 stjerner i gjennomsnitt av 2 brukere
Side 1/4

PaAS MK2
Pa AMPLIFICATION SYSTEM
Thank you for purchasing the KORG PaAS MK2 Pa
AMPLIFICATION SYSTEM for the KORG Professional Arrangers!
Félicitations et merci d’avoir acheté le système d’amplifica-
tion KORG PaAS MK2 Pa AMPLIFICATION SYSTEM pour les
KORG Professional Arrangers.
Vielen Dank dafür, dass Sie sich für den KORG PaAS MK2
Pa AMPLIFICATION SYSTEM für Ihrem KORG Professional
Arranger entschieden haben.
Grazie per avere acquistato il sistema di amplificazione
KORG PaAS MK2 Pa AMPLIFICATION SYSTEM per il vostro
Professional Arranger KORG.
Muchas gracias por haber comprado el sistema de amplifica-
ción KORG PaAS MK2 Pa AMPLIFICATION SYSTEM por vues-
tro KORG Professional Arranger.
非常感谢您购买KORG专业编曲器的KORG PaAS MK2 Pa
AMPLIFICATION SYSTEM放大系统。
このたびは、コルグPaアンプ・システムPaAS MK2をお買い上げい
ただきまして、まことにありがとうございます。
Precautions / Précautions /
Vorsichtsmaßnahmen / Precauzioni /
Precauciones / 注意事项 / 注意事項
• Installation of the Amplification System is done at the user’s
own risk. KORG will assume no responsibility for any damage
or injury resulting from its improper installation or use.
• Be very careful not to make the speaker box fall when in-
stalling it, or it can be damaged.
• L’installation de la barre de haut-parleurs est effectuée aux
risques et périls de l’utilisateur. KORG décline toute respon-
sabilité pour tout dommage ou blessure résultant d’une mau-
vaise installation ou utilisation.
• Soyez particulièrement prudent lors de l’installation afin
d’éviter que la barre de haut-parleurs ne tombe par terre.
• Die Installation des Lautsprechersystems geschieht auf eige-
nes Risiko. KORG haftet nicht für Schäden oder Verletzungen,
die sich aus einem unsachgemäßen Einbau bzw. einer fal-
schen Bedienung ergeben.
• Gehen Sie bei der Installation behutsam vor, um zu verhin-
dern, dass das Lautsprechersystem zu Boden fällt.
• L’utente si assume l’intero rischio per l’installazione del si-
stema di amplificazione. KORG non potrà essere in alcun caso
ritenuta responsabile per qualsiasi danno a cose o persone
derivante da un non corretto uso del sistema o dalla sua er-
rata installazione.
• Prestate molta attenzione a non far cadere il sistema di am-
plificazione durante l’installazione, per evitare di danneggiarlo.
• La instalación se realiza bajo la única responsabilidad del
usuario. Ni KORG ni sus distribuidores son responsables de
los posibles daños físicos o materiales como consecuencia de
una instalación o uso incorrecto.
• Tenga mucho cuidado para no hacer caer el sistema al insta-
larlo, o podría dañarse.
• 安装放大系统的风险由用户自负。如因安装或使用不当,
导致的损坏或人身伤害,KORG不承担任何责任。
• 安装的时候请小心不要将音箱摔在地上导致损坏。
・アンプシステムの取り付けは、ユーザーの自己責任で行ってくだ
さい。不適切な取り付けや使用による損害や怪我について、コル
グは一切の責任を負いません。
・スピーカ-・ボックスを取り付けるする際は、落下しないように
十分注意してください。
Installation / Installation / Installation /
Installazione / Instalación / 安装 / 取り付け
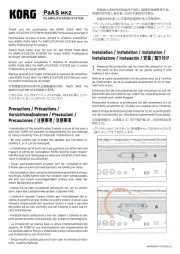
1
Remove the protective cap (b) from the connector (c) on
the back of the instrument (a), by gently pulling it and
making it turn down.
Retirez le cache de protection (b) du connecteur (c) à l’arrière
de l’instrument (a) en le soulevant doucement et en le tour-
nant vers le bas.
Entfernen Sie die Schutzblende (b) vom Anschluss (c) auf der
Rückseite des Instruments (a), indem Sie vorsichtig daran zie-
hen und sie nach unten klappen.
Rimuovete la placca di protezione (b) dal connettore (c) sul
retro dello strumento (a), tirando con cautela verso l’esterno.
Retire la tapa protectora (b) del conector (c) en la parte poste-
rior del instrumento (a), retirándola suavemente hacia abajo.
在设备背面(A) 从插座上(C)卸下保护盖(B),轻轻地拉出来
转向下方。
リア・パネル(a)のコネクター(c)用保護キャップ(b)をゆっくりと引
っ張り、キャップを下向きにします。
b
a
b
a
c
MAN0010171 EFGISCJ-8

2
2
Now locate the front (d1) and the rear (d2) side of the
speaker box, to be sure you will place it in the right way.
Repérez bien les faces avant (d1) et arrière (d2) de la barre de
haut-parleurs pour l’installer correctement.
Merken Sie sich, welche die Vorder- (d1) und welche die
Rückseite (d2) der Lautsprecherleiste ist, um sie richtig her-
um zu installieren.
Individuate la parte frontale (d1) e posteriore (d2) del sistema
di amplificazione, per essere sicuri di posizionarlo corretta-
mente.
Ahora localice la parte frontal (d1) y la parte trasera (d2) del
sistema de altavoces y colóquela en dirección correcta.
为了确保正确安装,请确认好音箱的前面(d1)和后面(d2) 。
スピーカー・ボックスの前面(d1)と背面(d2)を確認します。
d2
d1
3
Lift the speaker box (d) by making the back side (d2)
look toward you and the front side (d1) toward the
Professional Arranger. Align its extruding guide (e) to the
matching slot (f) on the back of the instrument (a). Slightly tilt
the speaker box (d) forward, to prevent the fixing pin (j, see
below) to damage the back of the instrument. To align them
correctly, use one of the two plastic stoppers/delimiters (h)
as a reference point, making one of the flanks or the speaker
box’s guide (e) touch it.
Soulevez la barre de haut-parleurs (d) en dirigeant sa face
arrière (d2) vers vous et sa face avant (d1) vers l’avant du
Professional Arranger. Alignez la partie protubérante (e) avec
la fente (f) à l’arrière de l’instrument (a). Inclinez légèrement
la barre de haut-parleurs (d) vers l’avant pour éviter que sa
tige de fixation (j, voyez plus loin) n’endommage la face ar-
rière de l’instrument. Pour faciliter l’alignement, utilisez une
des deux butées en plastique (h) comme point de référence et
glissez la face latérale de la barre de haut-parleurs (e) contre
la butée.
Halten Sie die Lautsprecherleiste (d) so, dass ihre Rückseite
(d2) zu Ihnen hin und ihre Vorderseite zur Vorderseite des
Professional Arranger weist. Halten die hervorstehende Partie
(e) so, dass sie sich über der Schiene (f) an der Rückseite des
Instruments befindet (a). Neigen Sie die Lautsprecherleiste (d)
leicht vorwärts, um zu verhindern, dass ihr Befestigungsstift
(j, siehe unten) die Rückseite des Instruments verkratzt. Im
Sinne einer leichteren Fluchtung sollten Sie einen der beiden
Plastikstopper (h) als Anhaltspunkt nehmen und die betref-
fende Seitenwand der Lautsprecherleiste (e) dagegen schie-
ben.
Sollevate il sistema di amplificazione (d) in modo da orientare
la parte posteriore (d2) verso voi stessi, e la parte frontale
(d1) verso il Professional Arranger. Allineate le guide (e) del
sistema di amplificazione (d) all’alloggiamento (f) situato sul
retro dello strumento (a). Inclinate leggermente il sistema di
amplificazione (d) in avanti, per evitare che il pin di ancorag-
gio (j, vedi sotto) danneggi il retro dello strumento. Per un
corretto allineamento, usate come punto di riferimento uno
dei due stop/delimitatori di plastica (h), facendo in modo che
uno dei fianchi o una delle guide (e) del sistema di amplifica-
zione lo tocchi.
Levantar la caja de altavoz (d) haciendo que la parte posterior
(d2) mire hacia usted y la parte frontal (d1) hacia el instrumen-
to. Alinear a su guía de extrusión (e) en la ranura correspon-
diente (f) en la parte posterior del instrumento (a). Inclinar
Ligeramente la caja de altavoz (d), para evitar que el pin de
fijación (j, véase más abajo) dañe la parte posterior del ins-
trumento. Para alinearlos correctamente, utilice uno de los
dos plásticos tapones/delimitadores (h) como punto de refe-
rencia, utilizando como guía uno de los flancos de la caja de
altavoz (e) y haciendo que lo toque.
提起音箱(d)确保音箱后面(d2) 朝向您和前面(d1)朝向专业编
曲器。将音箱轨(e) 与设备后面(a)的滑槽对齐(f). 请稍微向前
倾斜音箱(d)避免定位销子(j, 见下文) 损坏设备。为了正确对准
滑槽可以把两个塑料的障碍物(h)之一作为参考点,接触到音
箱轨(e)上。
スピーカー・ボックス(d)の背面(d2)を手前にし、前面(d1)を楽器側
に向けて持ち上げます。スピーカー・ボックスの押し出しガイド(e)
を楽器のリア・パネル(a)の取り付け溝(f)に合わせます。このときス
ピーカー・ボックス(d)を少し前に倒し、固定ピン(j, 次ページ参照)
が楽器を傷つけないようにします。正しい位置にするためには、2
つのプラスチック製ストッパー(h)のうち1つを基準点とし、スピー
カー・ボックスの押し出しガイド(e)の側面を合わせるようにする
とよいでしょう。
e
f
h
d
a

3
4
Insert the speaker box’s extruding guide (e) entirely into
the slot (f) on the back of the instrument, being sure the
speaker box is perfectly horizontal.
Insérez la partie protubérante (e) de la barre de haut-parleurs
complètement dans la fente (f) et veillez à ce que la barre soit
parfaitement horizontale.
Schieben Sie die hervorstehende Partie (e) der
Lautsprecherleiste komplett auf die Schiene (f) und sorgen
Sie dafür, dass die Lautsprecherleiste völlig horizontal liegt.
Inserite completamente le guide del sistema di amplificazio-
ne (e) nell’alloggiamento (f) situato sul retro dello strumento,
accertandovi che il sistema di amplificazione rimanga perfet-
tamente orizzontale.
Insertar la Guía de extrusión de la caja de altavoz (e) total-
mente en la ranura (f) en la parte posterior del instrumento,
asegurándose de que la caja de altavoz esté perfectamente
horizontal.
将音箱轨(e)完全地插入到设备背面的滑槽(f)里, 确保设备完
美水平。
スピーカー・ ボックスの押し出しガイド (e) をリア・パネルのスロッ
ト (f) に差し込みます。このときスピーカー・ ボックスが水平になっ
ていることを確認してください。
f
e
Be sure the nylon supports (i) for the music stand are perfect-
ly resting on the control panel of the instrument (a).
Les supports en nylon du pupitre (i) doivent reposer parfaite-
ment sur la face avant de l’instrument (a).
Die Nylon-Halterungen für das Notenpult (i) müssen sich auf
dem Bedienfeld des Instruments (a) befinden.
Assicuratevi che i supporti in nylon (i) per il leggio rimangano
sul pannello di controllo dello strumento (a).
Asegúrese de que los apoyos de nailon (i) para el atril de mú-
sica estén descansando en el panel de control del instrumen-
to (a).
确保乐谱架支柱(i) 靠在设备的控制面板上(a)
譜面台用のナイロンの指示部分 (i) が、コントロール・パネル (a) に
固定されているのを確認してください。
i
a
5
When the speaker box (d) is perfectly aligned to the
stoppers/delimiters, and the fixing pin (j) is over the
corresponding hole (k) on the back of the instrument (a), tilt
down the speaker box (d), to make the fixing pin (j) enter the
hole (k).
Quand la barre de haut-parleurs (d) est parfaitement alignée
avec les butées et la tige de fixation (j) se trouve au-dessus de
l’orifice correspondant (k) sur la face arrière de l’instrument
(a), vous pouvez incliner la barre de haut-parleurs vers le bas.
Assurez-vous que la tige de fixation (j) entre dans l’orifice (k).
Wenn sich die Lautsprecherleiste (d) hart an einem Stopper
und der Befestigungsstift (j) sich über der betreffenden
Aussparung (k) an der Rückseite des Instruments (a) be-
findet, dürfen Sie die Lautsprecherleiste hinunterklappen.
Achten Sie dabei darauf, dass der Befestigungsstift (j) in die
Aussparung (k) gleitet.
Dopo aver allineato correttamente il sistema di amplificazio-
ne (d) con gli stop/delimitatori, e aver verificato che il pin di
ancoraggio (j) sia in corrispondenza del foro (k) sul retro dello
strumento (a), ruotate il sistema di amplificazione (d) per far
entrare il pin (j) nel foro (k).
Cuando la caja de altavoz (d) está perfectamente alineada con
los delimitadores, y el pin de fijación (j) esté sobre el orificio
correspondiente (k) en la parte posterior del instrumento (a),
incline hacia abajo la caja de altavoz (d), para hacer que el pin
de fijación (j) se introduzca en el orificio (k).
当音箱(d)与塑料障碍物对齐,同时定位销子(j) 必须对应在设
备背面(a)的孔位(k)时,向下倾斜音箱(d) 使定位销子(j)插入到
相应的孔(k)内。
スピーカー・ボックス (d)をストッパーに合わせて置き、固定ピン (j)
がをリア・パネル (a)の穴 (k) の位置と合っていることを確認した
ら、スピーカー・ボックス (d) を回転して 固定ピン(j)を穴(k)に差し
込みます。
d
k
a
j
Produkspesifikasjoner
Merke: | Korg |
Kategori: | Tastatur |
Modell: | PaAS MK2 |
Trenger du hjelp?
Hvis du trenger hjelp med Korg PaAS MK2 still et spørsmål nedenfor, og andre brukere vil svare deg
Tastatur Korg Manualer
5 August 2025
5 August 2025
11 Januar 2025
Tastatur Manualer
- Tastatur Vorago
- Tastatur AOC
- Tastatur Philips
- Tastatur Krom
- Tastatur Razer
- Tastatur Kogan
- Tastatur Behringer
- Tastatur GoGEN
- Tastatur Yamaha
- Tastatur Urban Factory
- Tastatur Trust
- Tastatur Goldtouch
- Tastatur Asus
- Tastatur BlueBuilt
- Tastatur Gembird
- Tastatur Roccat
- Tastatur Woxter
- Tastatur Lenovo
- Tastatur Sharkoon
- Tastatur RGV
- Tastatur Gamdias
- Tastatur Dell
- Tastatur CSL
- Tastatur Zoom
- Tastatur Elgato
- Tastatur Corsair
- Tastatur Posiflex
- Tastatur Conceptronic
- Tastatur DeepCool
- Tastatur Genesis
- Tastatur Logilink
- Tastatur MSI
- Tastatur V7
- Tastatur Goodis
- Tastatur Speed-Link
- Tastatur Tracer
- Tastatur R-Go Tools
- Tastatur Native Instruments
- Tastatur Sven
- Tastatur Crestron
- Tastatur Manhattan
- Tastatur EVOLVEO
- Tastatur ModeCom
- Tastatur Boss
- Tastatur Xtrfy
- Tastatur Bluestork
- Tastatur Ducky
- Tastatur IOPLEE
- Tastatur Xtech
- Tastatur Mad Dog
- Tastatur STANDIVARIUS
- Tastatur Techly
- Tastatur Voxicon
- Tastatur UNYKAch
- Tastatur ADATA
- Tastatur Carlsbro
- Tastatur Accuratus
- Tastatur Gamesir
- Tastatur NGS
- Tastatur Havis
- Tastatur Kurzweil
- Tastatur HyperX
- Tastatur Keychron
- Tastatur Rapoo
- Tastatur Savio
- Tastatur Logitech
- Tastatur Erica Synths
- Tastatur Xcellon
- Tastatur IQUNIX
- Tastatur On-Stage
- Tastatur Kawai
- Tastatur Steelseries
- Tastatur Satechi
- Tastatur SureFire
- Tastatur Redragon
- Tastatur Cooler Master
- Tastatur NUX
- Tastatur NZXT
- Tastatur Dexibell
- Tastatur 4ms
- Tastatur Medeli
- Tastatur Alogic
- Tastatur SMK-Link
- Tastatur Loupedeck
- Tastatur Hammond
- Tastatur Ketron
- Tastatur Cherry
- Tastatur Hamlet
- Tastatur MK
- Tastatur Perixx
- Tastatur Adesso
- Tastatur Tiptop Audio
- Tastatur Polyend
- Tastatur Man & Machine
- Tastatur Blue Element
- Tastatur Acme Made
- Tastatur The Box
- Tastatur Essentiel B
- Tastatur Deltaco
- Tastatur Getttech
- Tastatur ENDORFY
- Tastatur Royal Kludge
- Tastatur Moog
- Tastatur Xuma
- Tastatur BakkerElkhuizen
- Tastatur Nanoxia
- Tastatur Evga
- Tastatur X9 Performance
- Tastatur Startone
- Tastatur Roadworx
Nyeste Tastatur Manualer
6 August 2025
6 August 2025
6 August 2025
6 August 2025
6 August 2025
5 August 2025
5 August 2025
4 August 2025
4 August 2025
4 August 2025