Metra 99-7397B Bruksanvisning
Metra
Ikke kategorisert
99-7397B
Les nedenfor 📖 manual på norsk for Metra 99-7397B (12 sider) i kategorien Ikke kategorisert. Denne guiden var nyttig for 28 personer og ble vurdert med 4.6 stjerner i gjennomsnitt av 14.5 brukere
Side 1/12
Metra. The World’s Best Kits.
®
MetraOnline.com © COPYRIGHT 2020 METRA ELECTRONICS CORPORATION REV. 11/11/20 INST99-7397B
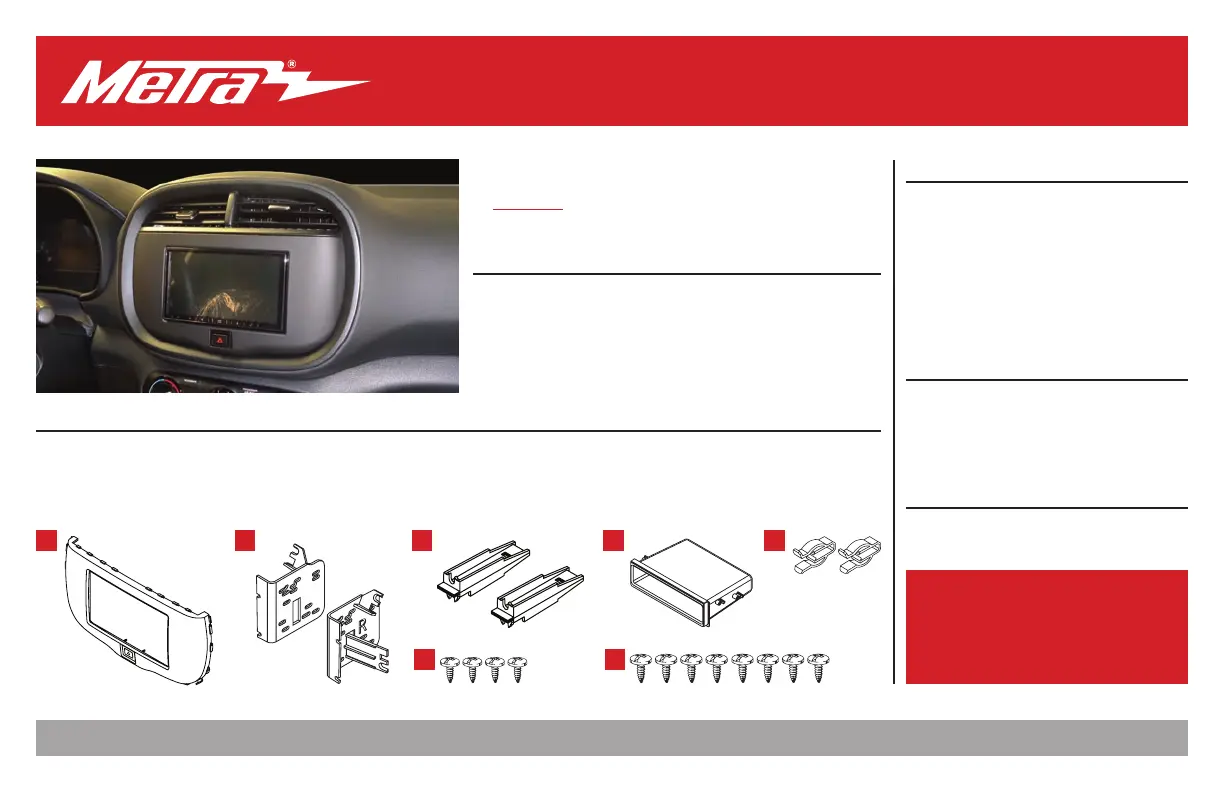
INSTALLATION INSTRUCTIONS
99-7397B
Attention! Let the vehicle sit with the key
out of the ignition for a few minutes before
removing the factory radio. When testing the
aftermarket equipment, ensure that all factory
equipment is connected before cycling the
key to ignition.
KIT FEATURES
• ISO DIN radio provision with pocket
• ISO DDIN radio provision
• Painted scratch resistant matte black
• Retains factory steering wheel controls (pre-wired in included harnessing)
• Radio harness included with connections to retain factory camera
KIT COMPONENTS
• A) Radio trim panel • B) Radio brackets • C) Panel clip legs • D) Pocket • E) Panel clips (2) • F) #6 x 3/8” Phillips screws (4)
• G) #8 x 3/8” Phillips screws (8) • H) Steering wheel control interface (not shown) • I) 6 volt factory camera adapter (not shown)
• J) Radio wire harness (not shown) • K) Antenna adapter (not shown)
TOOLS REQUIRED
• Panel removal tool • Phillips screwdriver
• Socket wrench • T-25 Torx driver • Cutting tool
TABLE OF CONTENTS
Dash Disassembly ..................................................2
Kit Preparation ....................................................2-3
Kit Assembly
–ISO DIN radio provision with pocket ..................4
–ISO DDIN radio provision .....................................4
AXXESS Interface installation ............................5-11
Final Assembly ...................................................... 11
WIRING & ANTENNA CONNECTIONS
(sold separately)
Wiring Harness: Included in kit
Antenna Adapter: Included in kit
SWC Interface: Included in kit
6v Camera Adapter: Included in kit
A B C
G
D E
F
Kia Soul (Non-NAV) 2020
Visit MetraOnline.com for more detailed information about the product and up-to-date vehicle
specific applications
Produkspesifikasjoner
| Merke: | Metra |
| Kategori: | Ikke kategorisert |
| Modell: | 99-7397B |
Trenger du hjelp?
Hvis du trenger hjelp med Metra 99-7397B still et spørsmål nedenfor, og andre brukere vil svare deg
Ikke kategorisert Metra Manualer

11 Oktober 2025
10 Oktober 2025
10 Oktober 2025
10 Oktober 2025
10 Oktober 2025

10 Oktober 2025
10 Oktober 2025
10 Oktober 2025
10 Oktober 2025
9 Oktober 2025
Ikke kategorisert Manualer
- Unitech
- Cobra
- Barazza
- Nemco
- Laserworld
- Telmax
- Inventum
- Cloud
- Hama
- Intesis
- Dedra
- Elvid
- Spektrum
- Medel
- NovaStar
Nyeste Ikke kategorisert Manualer

23 Oktober 2025

23 Oktober 2025

23 Oktober 2025

23 Oktober 2025

23 Oktober 2025

23 Oktober 2025

23 Oktober 2025

23 Oktober 2025

23 Oktober 2025

23 Oktober 2025