Metra XSVI-6515-NAV Bruksanvisning
Metra
Ikke kategorisert
XSVI-6515-NAV
Les nedenfor 📖 manual på norsk for Metra XSVI-6515-NAV (2 sider) i kategorien Ikke kategorisert. Denne guiden var nyttig for 6 personer og ble vurdert med 4.3 stjerner i gjennomsnitt av 3.5 brukere
Side 1/2

XSVI-6515-NAV XSVI-6515-NAV
INSTALLATION INSTRUCTIONS INSTALLATION INSTRUCTIONS
XSVI-6515-NAV XSVI-6515-NAV
INSTALLATION INSTRUCTIONS INSTALLATION INSTRUCTIONS
REV. 7/17/17 REV. 7/17/17© COPYRIGHT 2017 METRA ELECTRONICS CORPORATION © COPYRIGHT 2017 METRA ELECTRONICS CORPORATION
Integrate • AxxessInterfaces.com Integrate • AxxessInterfaces.com
REV. 7/17/17 REV. 7/17/17© COPYRIGHT 2017 METRA ELECTRONICS CORPORATION © COPYRIGHT 2017 METRA ELECTRONICS CORPORATION
Integrate • AxxessInterfaces.com Integrate • AxxessInterfaces.com
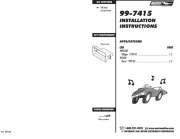
Fiat 500 accessory and NAV output CAN interface 2012-2015
• Provides accessory power (12-volt 10-amp)
• Retains R.A.P. (retained accessory power)
• Used in both amplified and non-amplified systems
• Provides NAV outputs (parking brake, reverse, speed sense)
• Pre-wired ASWC-1 harness included (ASWC-1 sold separately)
• High level speaker input
• Retains OE BT/USB and 3.5mm audio
• Mirco "B" USB updatable
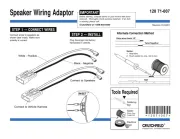
WIRING UP THE XSVI-6515-NAV
• Connect the Yellow wire to the radio’s 12-volt battery or memory wire.
• Connect the Black wire to the radio’s ground wire.
• Connect the Red wire to the ignition wire of the aftermarket radio
• Connect the Orange wire to the illumination wire of the aftermarket radio. If the aftermarket
radio has no illumination wire, tape off the Orange wire.
• Connect the Blue/White wire to the radio's amp turn on wire.
• Connect the White wire to the left front positive speaker output of the aftermarket radio.
•
Connect the White/Black wire to the left front negative speaker output of the aftermarket radio.
• Connect the
Gray
wire to the right front positive speaker output of the aftermarket radio.
•
Connect the
Gray/Black
wire to the right front negative speaker output of the aftermarket radio
.
• Connect the
Green
wire to the radio’s left rear positive speaker output.
• Connect the
Green/Black
wire to the radio’s left rear negative speaker output.
• Connect the
Purple
wire to the radio’s right rear positive speaker output.
• Connect the
Purple/Black
wire to the radio’s right rear negative speaker output.
Produkspesifikasjoner
| Merke: | Metra |
| Kategori: | Ikke kategorisert |
| Modell: | XSVI-6515-NAV |
Trenger du hjelp?
Hvis du trenger hjelp med Metra XSVI-6515-NAV still et spørsmål nedenfor, og andre brukere vil svare deg
Ikke kategorisert Metra Manualer

11 Oktober 2025
10 Oktober 2025
10 Oktober 2025

10 Oktober 2025

10 Oktober 2025

10 Oktober 2025

10 Oktober 2025

10 Oktober 2025
10 Oktober 2025
9 Oktober 2025
Ikke kategorisert Manualer
- Randell
- NOX
- SRS
- Terratec
- Genelec
- Digitech
- Ferrofish
- Carrier
- Volcano
- Gymform
- Heinner
- Generac
- Vankyo
- AMX
- Topex
Nyeste Ikke kategorisert Manualer

23 Oktober 2025

23 Oktober 2025

23 Oktober 2025

23 Oktober 2025

23 Oktober 2025

23 Oktober 2025

23 Oktober 2025

23 Oktober 2025

23 Oktober 2025

23 Oktober 2025