Nitecore HU2000 Bruksanvisning
Les nedenfor 📖 manual på norsk for Nitecore HU2000 (2 sider) i kategorien Lommelykt. Denne guiden var nyttig for 23 personer og ble vurdert med 4.8 stjerner i gjennomsnitt av 12 brukere
Side 1/2
(English)
(Deutsch)
Features
Specications
Accessories
Technical Data
Runtime Figure for Primary White Light
Clip Installation
Power Source
Power Button / MODE Button
⚠ Battery Safety
(Francais)
• Max output of 2,000 lumens
• Utilizes ultra high eciency UHE LED
• Equipped with a primary white light (Color Temperature: 6,000K) and an auxiliary red light
• Utilizes a unibody optical lens system with various facets for reecting a uniform and
soft light
• Powered by an external power source and supports PD protocol
• Features a built-in battery (3.6V 40mAh) and will automatically switch to EMERGENCY
mode if the power supply is disconnected
• Designed with two buttons dierent in shape and touch, oering easy one-handed
operation
• 7 brightness levels, 2 light sources, and 3 special modes available
• Made from durable PC material
• Die-casting aluminum alloy heat sink for ecient heat dissipation
• Impact resistant to 1 meter
• Waterproof and dustproof rating in accordance with IP68 (2 meters submersible)
Dimensions: 80.0mm x 41.9mm x 26.1mm (3.15" x 1.65" x 1.03") (Bracket Included)
Weight: 114g (4.02 oz) (Bracket, Headband and USB-C Extension Cable Included)
Headband, USB-C Extension Cable, Clip, USB-C Connector Protector, Hook-and-Loop Strap,
Spare Loop x 2
Using a power bank with output power 20W that supports PD protocol:≥
Primary White Light Auxiliary Red Light Primary White Light
*TURBO HIGH MID EMERGENCY HIGHLOW LOW
SLOW
FLASHING
SOS BEACON
Brightness
2,000 Lumens 1,000 Lumens 400 Lumens 180 Lumens 20 Lumens 15 Lumens 5 Lumens 15 Lumens 1,000 Lumens 1,000 Lumens
Runtime 9h 11h 17h 31.5h 66h 52h 78h ─ ─ ─
Beam Distance
160m 120m 75m 50m 25m 5m ─ ─ ─7m
Peak Beam Intensity 6,400cd 3,600cd 1,420cd 650cd 153cd 12cd 7cd ─ ─ ─
Impact Resistance
1m
IP Rating IP68, 2m (Waterproof and Submersible)
Note: The stated data is measured using NITECORE NB10000 Gen3 power bank (3.85V 10,000mAh) under laboratory conditions. The data may vary in real world use due to dierent
environmental conditions.
*TURBO Availability: The TURBO Level is only accessible when using a power bank with output power ≥20W that supports PD protocol.
Using a power bank with output power 20W that does not support PD protocol:<
Primary White Light Auxiliary Red Light Primary White Light
HIGH MID EMERGENCY HIGH SLOW FLASHING SOS BEACONLOW LOW
Brightness 1,000 Lumens 400 Lumens 180 Lumens 20 Lumens 15 Lumens 5 Lumens 15 Lumens 1,000 Lumens 1,000 Lumens
Runtime 6h 10h 42h 32h 51h ─ ─ ─20h
Beam Distance
120m 75m 50m 25m 5m ─ ─ ─7m
Peak Beam Intensity 3,600cd 1,420cd 650cd 153cd 12cd 7cd ─ ─ ─
Impact Resistance 1m
IP Rating IP68, 2m (Waterproof and Submersible)
Note: The stated data is measured using NITECORE Carbon Battery™ 6K (3.6V 6,000mAh) under laboratory conditions. The data may vary in real world use due to dierent environmental conditions.
⚠ Warnung
1. Dieses Produkt ist für den Gebrauch durch Erwachsene ab 18 Jahren bestimmt. Bitte
bewahren Sie dieses Produkt außerhalb der Reichweite von Kindern auf.
2. VORSICHT! Mögliche gefährliche Strahlung! Blicken Sie NICHT direkt in den Lichtstrahl
und leuchten Sie niemandem direkt in die Augen!
3. Das Produkt erzeugt bei längerem Betrieb große Hitze. Bitte lassen Sie bei der
Verwendung Vorsicht walten. Es wird empfohlen, hohe Helligkeitsstufen nicht über
längere Zeiträume zu verwenden, um Verbrennungen und Produktschäden zu vermeiden.
4. Decken Sie das Produkt NICHT ab und stellen Sie es NICHT in die Nähe anderer
Gegenstände, da dies zu Schäden am Produkt oder Unfällen aufgrund hoher
Temperaturen führen kann.
5. Verwenden Sie das Produkt NICHT zur Beleuchtung von brennbaren oder explosiven
Materialien, da die hohe Hitze zu Verbrennungen oder Explosionen führen kann.
6. Bitte verwenden Sie das Produkt auf normale Weise, um Unfälle im Falle eines
Produktausfalls zu vermeiden.
7. Tauchen Sie das Produkt NICHT in Flüssigkeiten ein, wenn es heiß ist. Dies kann zu
irreparablen Schäden an der Lampe führen, da der Luftdruck innerhalb und außerhalb
des Gehäuses unterschiedlich ist.
8. Wenn das Produkt in einer geschlossenen oder entammbaren Umgebung, wie z. B.
einer Tasche oder einem Rucksack, aufbewahrt wird oder wenn es über einen längeren
Zeitraum nicht benutzt wird, trennen Sie das Produkt bitte von der Stromquelle, um
eine versehentliche Aktivierung und Gefahren durch übermäßige Hitze zu vermeiden.
9. Setzen Sie das Produkt NICHT über einen längeren Zeitraum Temperaturen über
+60°C aus, da sonst die Gefahr einer Explosion oder Verbrennung des Akkus besteht.
10. Nehmen Sie dieses Produkt NICHT auseinander und modizieren Sie es nicht,
da es dadurch beschädigt wird und die Produktgarantie erlischt. Vollständige
Informationen zur Garantie nden Sie im Abschnitt "Garantiebedingungen" in dieser
Bedienungsanleitung.
⚠ Sicherheit des Akkus
Die unsachgemäße Verwendung des Akkus kann zu schweren Akkuschäden oder
Sicherheitsrisiken wie Verbrennung oder Explosion führen. Verwenden Sie den Akku NICHT,
wenn seine Verpackung beschädigt ist. Zerlegen, durchstechen, zerschneiden, zerquetschen,
verbrennen Sie den Akku NICHT! Wenn Sie ein Auslaufen, einen ungewöhnlichen Geruch
oder eine Verformung feststellen, stellen Sie die Verwendung des Akkus sofort ein und
entsorgen Sie ihn ordnungsgemäß. Entsorgen Sie das Gerät/den Akku in Übereinstimmung
mit den geltenden örtlichen Gesetzen und Vorschriften.
Stromquelle
Stromanschluss: Verbinden Sie das USB-C-Verlängerungskabel mit einer Powerbank,
einem USB-C-Adapter oder einer anderen Stromquelle.
Niedriger Batteriestand: Wenn die angeschlossene Powerbank nur noch wenig Strom
hat, schaltet die Stirnlampe im eingeschalteten Zustand automatisch auf die Verwendung
des integrierten Akkus um. Zu diesem Zeitpunkt sollte die Stromquelle so schnell wie
möglich ausgetauscht werden.
• Wurde zuvor das weiße Licht aktiviert, schaltet die Stirnlampe automatisch in den
Notbetrieb, der ca. 30 Minuten anhält.
• Wurde zuvor das rote Licht aktiviert, schaltet die Stirnlampe automatisch auf „Rot LOW“.
Hinweis: Das „EMERGENCY“ / „Rot LOW“ kann nicht wieder aktiviert werden, wenn es
ausgeschaltet wird, während die Stirnlampe von der eingebauten Batterie gespeist wird.
Umschalten der Stromquelle: Nach dem Ersetzen durch eine ausreichende
Stromquelle schaltet die HU2000 im eingeschalteten Zustand automatisch auf die
Verwendung der externen Stromversorgung um. Drücken Sie kurz auf die Einschalttaste,
Improper use of devices with built-in Li-ion batteries may result in severe battery damage or
safety hazards such as combustion or explosion. DO NOT use the device if it is damaged. DO
NOT disassemble, puncture, cut, crush, or incinerate the device. If any leakage or abnormal
odor is noticed, stop using the device immediately. Dispose of the device/batteries in
accordance with applicable local laws and regulations.
⚠ Warning
1. This product is intended for use by adults aged 18 and over. Please keep this product
out of the reach of children.
2. CAUTION! Possible dangerous radiation! DO NOT stare directly into the light beam or
shine the light directly into the eyes of anyone!
3. The product will generate massive heat during prolonged operation. Please exercise
caution during use. It is recommended not to use high brightness levels for extended
periods to prevent burns and product damage.
4. DO NOT cover the product or put it close to other objects, as this may cause damage
to the product or accidents due to high temperatures.
5. DO NOT use the product to illuminate ammable or explosive materials, as the high
heat may lead to combustion or explosion.
6. Please use the product in a standard manner to avoid accidents in the event of
product failure.
7. DO NOT submerge the product into any liquid when it is hot. Doing so may cause
irreparable damage to the product due to the dierence of air pressure inside and
outside.
8. When the product is placed in an enclosed or ammable environment such as
a pocket or backpack, or when it is left unused for an extended period, please
disconnect the power source to avoid accidental activation and dangers caused by
excessive heat.
9. DO NOT expose the product to temperatures above 60°C (140°F) for prolonged time,
as this poses a risk of battery explosion or combustion.
10. DO NOT disassemble or modify this product as doing so will cause damage to it and
render the product warranty invalid. Please refer to the warranty section in the manual
for complete warranty information.
Quick Guide
Power Source
Power Connection: Connect the USB-C extension cable to a power bank, a USB-C
adapter, or other power sources.
Low Battery: When the connected power bank is low on power, the headlamp in the on
state will automatically switch to using its built-in battery. At this point, the power source
should be replaced as soon as possible.
• If the white light was previously activated, the headlamp will automatically switch to
EMERGENCY, which lasts for approx. 30 minutes.
• If the red light was previously activated, the headlamp will automatically switch
to Red LOW.
Note: The EMERGENCY / Red LOW cannot be reactivated if it is turned o when the
headlamp is powered by the built-in battery.
Power Source Switching: After replacing with a sucient power source, the HU2000
in the on state will automatically switch to using the external power supply. Short press
the Power Button to switch from EMERGENCY to White LOW, allowing normal use of the
lighting function.
Note:
1. When connecting to a power source, use the USB-C connector protector as needed
based on the port compatibility.
2. When activating the headlamp, the external power source will automatically charge
the built-in battery.
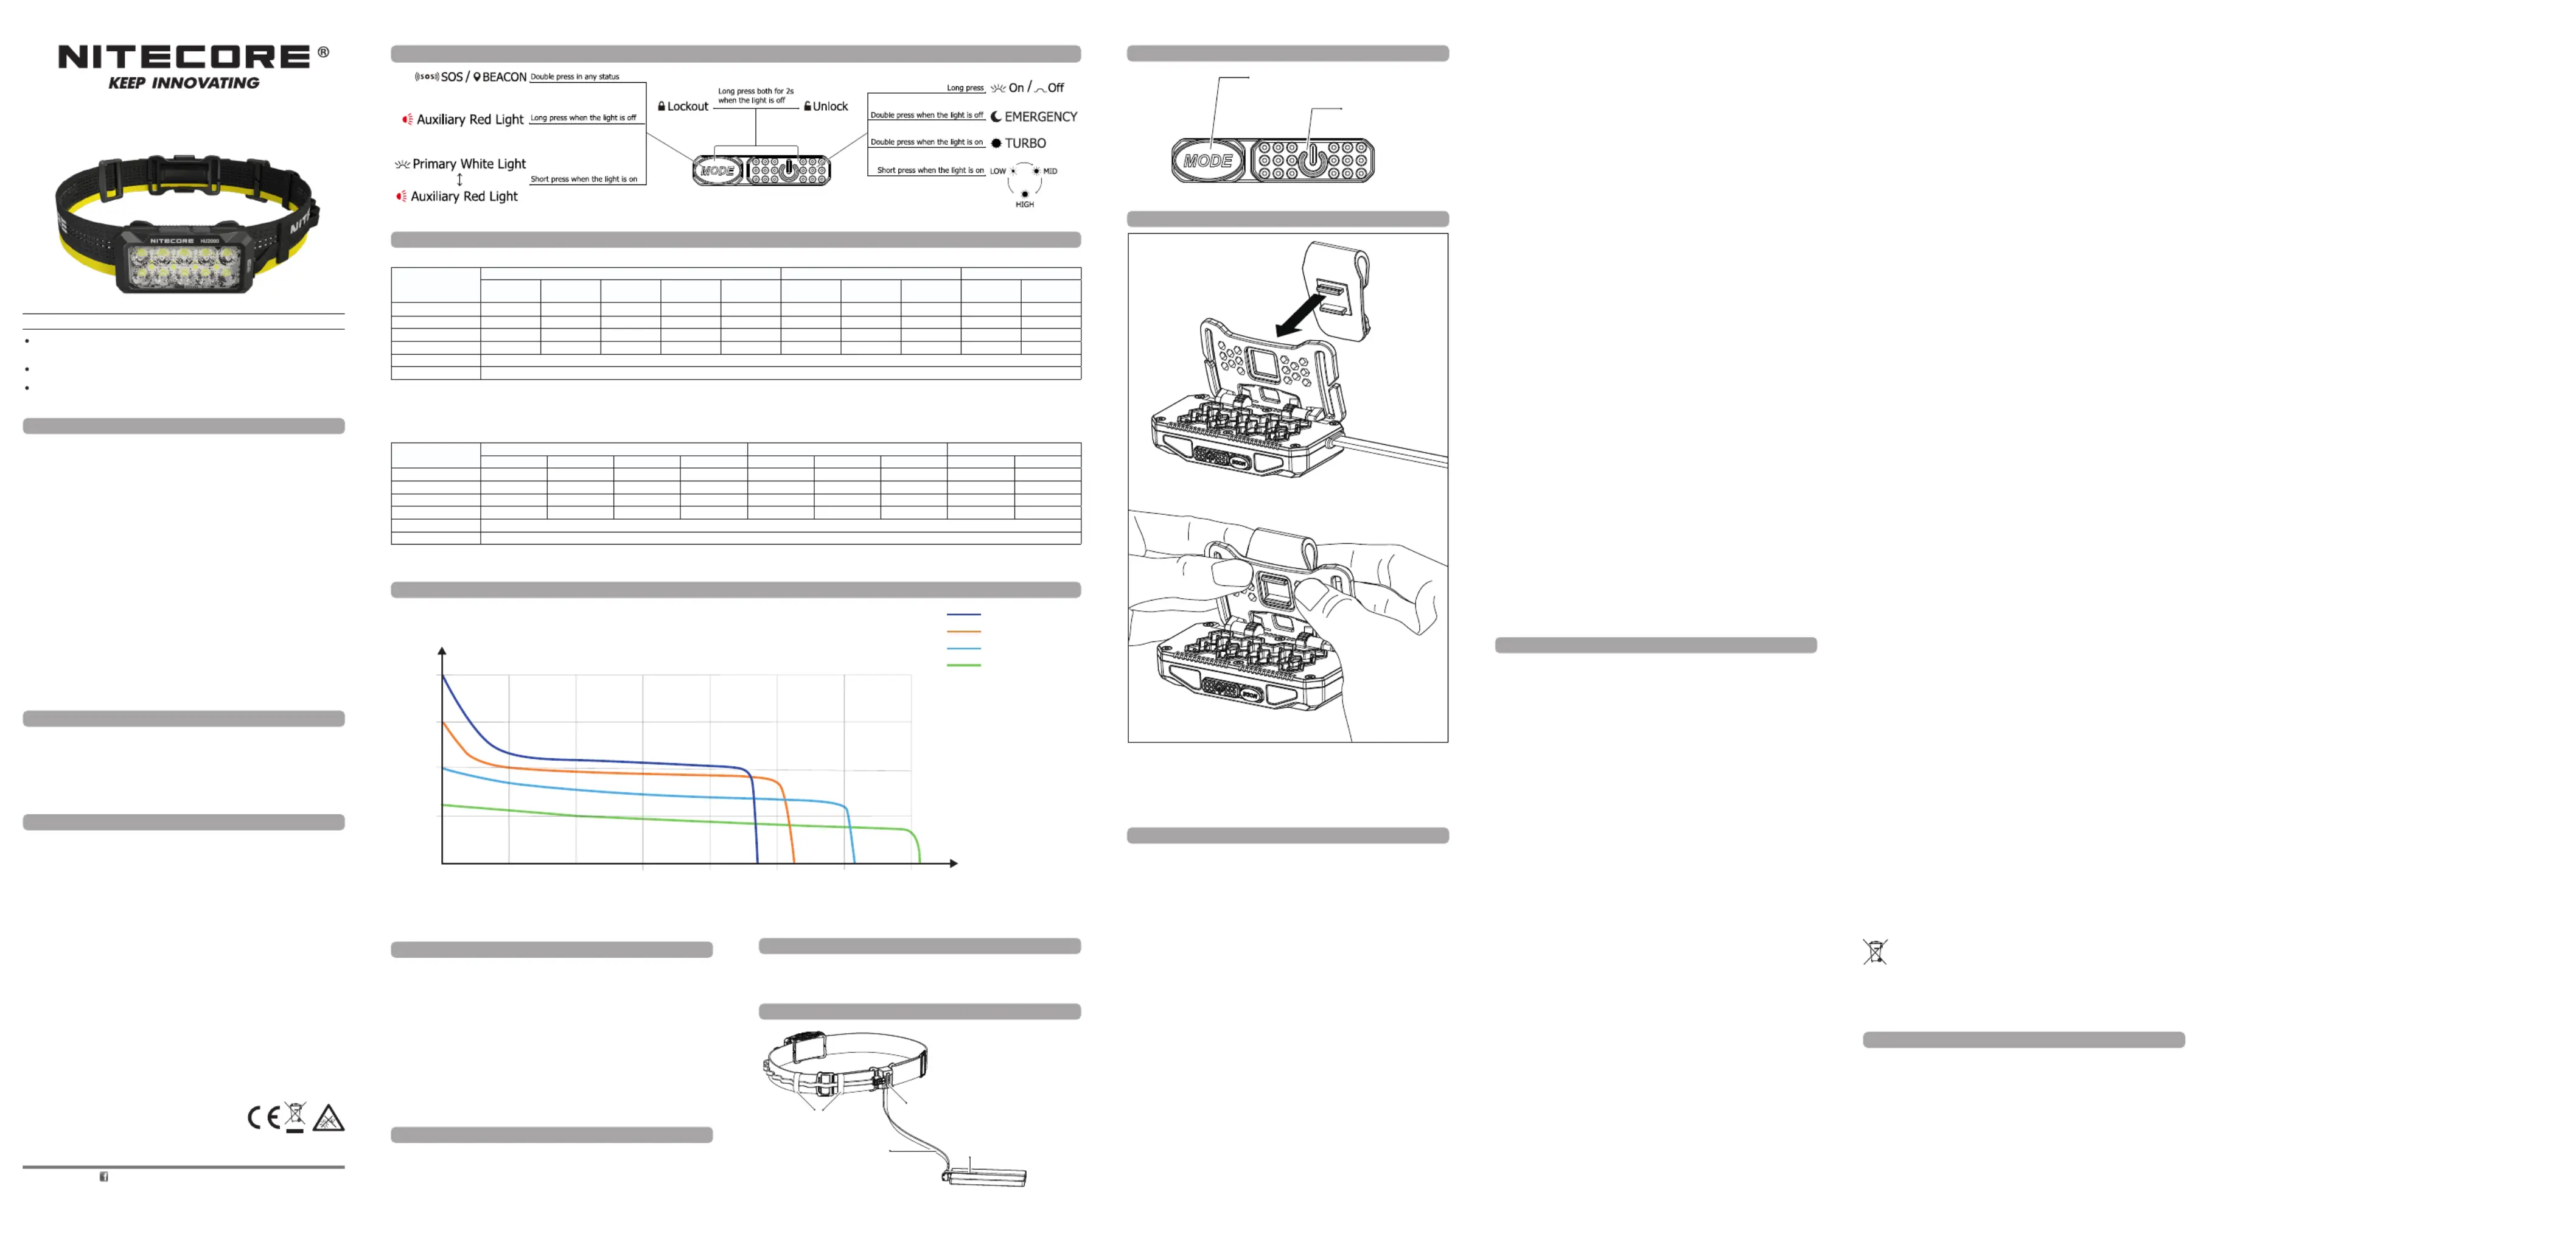
Power Button / MODE Button
• The Power Button is used for turning on / o the light and adjusting brightness levels.
• The MODE Button is designed for switching light sources.
On / Off
• When the light is o, long press the Power Button for 1 second to access White LOW.
• When the light is on, long press the Power Button or MODE Button for 1 second to
turn it o.
Primary White Light
• When the light is o, long press the Power Button for 1 second to access LOW.
• When the light is o, double press the Power Button to access EMERGENCY.
um von „EMERGENCY“ auf „Weiß LOW“ umzuschalten und die normale Nutzung der
Lichtfunktion zu ermöglichen.
Hinweis:
1. Wenn Sie das Gerät an eine Stromquelle anschließen, verwenden Sie je nach
Kompatibilität des Anschlusses den USB-C-Steckerschutz.
2. Wenn die Stirnlampe aktiviert wird, lädt die externe Stromquelle automatisch den
eingebauten Akku auf.
EIN-/AUS-Taste / MODE-Taste
• Die EIN-/AUS-Taste dient zum Ein- und Ausschalten des Lichts und zum Einstellen
der Helligkeit.
• Die MODE-Taste ist für das Umschalten der Lichtquelle vorgesehen.
Ein / Aus
• Wenn das Licht ausgeschaltet ist, drücken Sie die EIN-/AUS-Taste 1 Sekunde lang, um
auf „Weißlicht LOW“ zuzugreifen.
• Wenn das Licht eingeschaltet ist, halten Sie die EIN-/AUS-Taste oder die MODE-Taste 1
Sekunde lang gedrückt, um es auszuschalten.
Primäres weißes Licht
• Wenn das Licht ausgeschaltet ist, drücken Sie die EIN-/AUS-Taste 1 Sekunde lang, um
auf „LOW“ zuzugreifen.
• Wenn das Licht aus ist, drücken Sie EIN-/AUS-Taste doppelt, um auf „EMERGENCY“
aufzurufen.
• Wenn das primäre weiße Licht eingeschaltet ist, drücken Sie kurz auf die EIN-/AUS-Taste,
um zwischen den folgenden Helligkeitsstufen zu wechseln: „LOW“ – „MID“ – „HIGH“.
• Wenn das primäre weiße Licht eingeschaltet ist, drücken Sie zweimal auf die EIN-/
AUS-Taste, um zu „TURBO“ zu gelangen. Drücken Sie kurz auf die EIN-/AUS-Taste, um
zum vorherigen Status zurückzukehren.
Hinweis:
Der TURBO-Mode ist nur zugänglich, wenn Sie eine Powerbank mit einer Ausgangsleistung
≥ 20 W verwenden, die das PD-Protokoll unterstützt. Wenn der TURBO-Mode über einen
längeren Zeitraum läuft, wird er heruntergefahren, um eine Überhitzung zu vermeiden und
die Lebensdauer des Akkus zu verlängern.
Rotes Zusatzlicht
• Wenn das Licht aus ist, drücken Sie die MODE-Taste lange für 1 Sekunde, um zum
roten Zusatzlicht zu gelangen.
• Wenn das rote Zusatzlicht eingeschaltet ist, drücken Sie kurz auf die EIN-/AUS-Taste,
um zwischen „LOW“ - „Rot HIGH“ - „LANGSAMES BLINKEN“ zu wechseln.
Wechsel der Lichtquellen
Wenn das Licht eingeschaltet ist, drücken Sie kurz die MODE-Taste, um zwischen „Weißes
Primärlicht“ und „Rotes Zusatzlicht“ zu wechseln.
Sondermodi (SOS / BEACON)
• Wenn sich die Stirnlampe in einem beliebigen Status bendet, drücken Sie zweimal die
MODE-Taste, um den SOS-Mode aufzurufen.
• Wenn einer der Sonder-Modi eingeschaltet ist, drücken Sie kurz auf die EIN-/AUS-
Taste, um zwischen „SOS“ und „BEACON“ zu wechseln. Drücken Sie doppelt auf die
MODE-Taste, um zum vorherigen Status zurückzukehren.
Rote Rückleuchte
Das USB-C-Verlängerungskabel verfügt über eine rote Rückleuchte.
• AN: Wenn die Stirnlampe eingeschaltet ist, drücken Sie kurz auf die Taste für das
Rücklicht, um das Blinken des Rücklichts einzuschalten.
• Umschalten: Wenn das Rücklicht eingeschaltet ist, drücken Sie kurz auf die
Rücklichttaste, um die folgende Sequenz zu durchlaufen: Blinken - Dauerlicht - Aus.
• AUS: Wenn das Rücklicht eingeschaltet ist, drücken Sie die Taste für das Rücklicht 1
Sekunde lang, um es auszuschalten.
Hinweis: Das rote Rücklicht kann nicht eingeschaltet werden, wenn die Stirnlampe
ausgeschaltet ist. Sobald die Stirnlampe ausgeschaltet ist, schaltet sich das rote Rücklicht
automatisch aus.
Sperren/Entsperren
• Wenn die Stirnlampe ausgeschaltet ist, drücken Sie beide Tasten 2 Sekunden lang, bis
die Stirnlampe dreimal blinkt, um den Zugri auf den Sperr-Mode anzuzeigen. Im Sperr-
Mode sind keine Helligkeitsstufen oder Sonder-Modi verfügbar, und die Stirnlampe blinkt
einmal, um diesen Status anzuzeigen, wenn eine der Tasten gedrückt wird.
• Wenn Sie sich im Sperr-Mode benden, halten Sie beide Tasten erneut 2 Sekunden
lang gedrückt, bis „EMERGENCY“ aktiviert wird, um den Entsperr-Status anzuzeigen.
Einbau der Klammer
1. Nehmen Sie das Stirnband ab.
2. Richten Sie den vorstehenden Teil des Clips - wie abgebildet - auf den rechteckigen
Rahmen an der Halterung aus. Drücken Sie den Clip fest in die Halterung, bis ein
"Klick"-Geräusch zu hören ist.
Lagerung
Wenn Sie dieses Produkt über einen längeren Zeitraum aufbewahren, verwenden Sie es
bitte einmal alle 6 Monate, schließen Sie es an eine Stromquelle an und schalten Sie es
jedes Mal für mindestens eine Stunde ein, um den eingebauten Akku aufzufrischen.
Entsorgung von Elektro- und Elektronikgeräten
Die durchgestrichene Mülltonne bedeutet, dass Sie gesetzlich verpichtet sind,
diese Geräte einer vom unsortierten Siedlungsabfall getrennten Erfassung
zuzuführen. Die Entsorgung über die Restmülltonne oder die gelbe Tonne ist
untersagt. Enthalten die Produkte Batterien oder Akkus, die nicht fest verbaut sind,
müssen diese vor der Entsorgung entnommen und getrennt als Batterie entsorgt werden.
⚠ Avertissements :
1. Ce produit est destiné à être utilisé par des adultes âgés de 18 ans et plus. Veuillez
garder ce produit hors de portée des enfants.
2. ATTENTION ! Risque de radiation dangereuse ! Ne xez pas directement le faisceau
lumineux et ne projetez pas la lumière directement dans les yeux de quelqu'un !
3. Le produit génère une chaleur importante en cas de fonctionnement prolongé.
Veuillez à faire preuve de prudence pendant l'utilisation. Il est recommandé de ne
pas utiliser des niveaux de luminosité élevés pendant des périodes prolongées an
d'éviter les brûlures et les dommages au produit.
4. NE PAS couvrir le produit ou le placer à proximité d'autres objets, car cela pourrait
endommager le produit ou provoquer des accidents dus à des températures élevées.
5. NE PAS utiliser le produit pour éclairer des matériaux inammables ou explosifs, car la
chaleur élevée peut entraîner une combustion ou une explosion.
6. Veuillez utiliser le produit de manière appropriée an d'éviter tout accident en cas de
défaillance du produit.
7. NE PAS immerger le produit dans un liquide lorsqu'il est chaud. Cela pourrait causer
des dommages irréparables au produit en raison de la diérence de pression d'air à
l'intérieur et à l'extérieur.
8. Lorsque le produit est placé dans un environnement clos ou inammable, tel qu'une
poche ou un sac à dos, ou lorsqu'il n'est pas utilisé pendant une période prolongée,
veuillez débrancher la source d'alimentation an d'éviter une activation accidentelle et
les dangers causés par une chaleur excessive.
9. N'exposez PAS le produit à des températures supérieures à 60°C (140°F) pendant une
période prolongée, car cela pose un risque d'explosion ou de combustion de la batterie.
10. NE PAS démonter ou modier ce produit, car cela l'endommagerait et rendrait la
garantie du produit invalide. Veuillez-vous référer à la section garantie du manuel pour
des informations complètes sur la garantie.
⚠ Sécurité de la batterie
L'utilisation inappropriée d'appareils dotés de batteries Li-ion intégrées peut entraîner
de graves dommages à la batterie ou des risques de sécurité tels que la combustion
ou l'explosion. N'utilisez PAS l'appareil s'il est endommagé. NE PAS démonter, percer,
couper, écraser ou incinérer l'appareil. En cas de fuite ou d'odeur anormale, cessez
immédiatement d'utiliser l'appareil. Éliminez l'appareil/les piles conformément aux lois et
réglementations locales en vigueur.
Source d'alimentation
Connexion à une source d'alimentation : Connectez le câble d'extension USB-C à
une batterie externe, à un adaptateur USB-C ou à d'autres sources d'alimentation.
Batterie faible : Lorsque la batterie externe connectée est faible, la lampe frontale
allumée se met automatiquement à utiliser sa batterie intégrée. À ce stade, la source
d'alimentation doit être remplacée dès que possible.
• Si la lumière blanche a été activée auparavant, la lampe frontale passe
automatiquement en mode URGENCE, pour une durée d'environ 30 minutes.
• Si la lumière rouge a été activée auparavant, la lampe frontale passe automatiquement
en mode Rouge BAS (LOW).
Remarque : Le bouton URGENCE / ROUGE BAS (LOW) ne peut pas être réactivé s'il
est éteint lorsque la lampe frontale est alimentée par la batterie intégrée.
Changement de source d'alimentation : après avoir été remplacé par une source
d'alimentation susante, le HU2000 en état de marche passe automatiquement à
l'utilisation de la source d'alimentation externe. Une brève pression sur le bouton
d'alimentation permet de passer de la fonction URGENCE à la fonction BLANCHE, ce qui
permet une utilisation normale de l'éclairage.
Remarque :
1. Lors de la connexion à une source d'alimentation, utilisez le protecteur de connecteur
USB-C selon les besoins en fonction de la compatibilité du port.
2. Lors de l'activation de la lampe frontale, la source d'alimentation externe chargera
automatiquement la batterie intégrée.
Bouton d'alimentation / Bouton MODE
• Le bouton d'alimentation sert à allumer/éteindre la lumière et à régler les niveaux de
luminosité.
• Le bouton MODE permet de changer de source lumineuse.
Allumé / éteint
• Lorsque la lumière est éteinte, appuyez longuement sur le bouton d’alimentation
pendant 1 seconde pour accéder à la fonction White LOW.
• Lorsque la lumière est allumée, appuyez longuement sur le bouton d’alimentation ou
sur le bouton MODE pendant 1 seconde pour l'éteindre.
Lumière blanche primaire
• Lorsque la lumière est éteinte, appuyez longuement sur le bouton d'alimentation pendant
1 seconde pour accéder au niveau BAS (LOW).
• Lorsque la lumière est éteinte, appuyez deux fois sur le bouton d’alimentation pour
accéder à la fonction URGENCE.
• Lorsque la lumière blanche primaire est allumée, appuyez brièvement sur le bouton
d’alimentation pour faire déler les niveaux de luminosité suivants : FAIBLE - MOYENNE
- ÉLEVÉE.
• Lorsque la lumière est allumée, appuyez deux fois sur le bouton d’alimentation pour
accéder à TURBO. Appuyez brièvement sur le bouton d’alimentation pour revenir à
l'état précédent.
Remarque : Le niveau TURBO n'est accessible que lors de l'utilisation d'une batterie
externe d’une puissance de sortie ≥20W prenant en charge le protocole PD. Le niveau
TURBO diminue pour éviter la surchaue et prolonger la durée de vie de la batterie
lorsqu'il fonctionne pendant une période prolongée.
Lumière rouge auxiliaire
• Lorsque la lumière est éteinte, appuyez longuement sur le bouton MODE pendant 1
seconde pour allumer la lumière rouge auxiliaire.
• Lorsque le voyant rouge auxiliaire est allumé, appuyez brièvement sur le bouton
d'alimentation pour faire déler la séquence suivante : Rouge BAS - Rouge HAUT -
Clignotement LENT.
Changement de source lumineuse
Lorsque la lumière est allumée, appuyez brièvement sur le bouton MODE pour passer de
la lumière blanche primaire à la lumière rouge auxiliaire.
Modes spéciaux (SOS / BEACON)
• Lorsque la lampe frontale est dans n'importe quel état, appuyez deux fois sur le
bouton MODE pour accéder au mode SOS.
• Lorsque l'un des modes spéciaux est activé, appuyez brièvement sur le bouton
d’alimentation pour basculer entre SOS et BALISE. Appuyez à nouveau deux fois sur le
bouton MODE pour revenir à l'état précédent.
Lumière arrière rouge
Le câble d'extension USB-C est doté d'un voyant arrière rouge.
• Allumé : Lorsque la lampe frontale est allumée, appuyez brièvement sur le bouton du
voyant arrière pour activer le clignotement du voyant rouge arrière.
• Changement : lorsque le voyant arrière rouge est allumé, appuyez brièvement sur
le bouton du voyant arrière pour passer de l'un à l'autre dans la séquence suivante :
Clignotant - Allumé en permanence - Éteint.
• Éteindre : lorsque le voyant arrière rouge est allumé, appuyez longuement sur le
bouton du voyant arrière pendant 1 seconde pour l'éteindre.
Remarque : le voyant arrière rouge ne peut pas être allumé lorsque la lampe
frontale est éteinte. Une fois la lampe frontale éteinte, le feu arrière rouge s'éteint
automatiquement.
Verrouillage / Déverrouillage
• Lorsque la lampe frontale est éteinte, appuyez longuement sur les deux boutons
pendant 2 secondes jusqu'à ce que la lampe frontale clignote 3 fois pour indiquer
l'accès au mode verrouillage. En mode verrouillage, tous les niveaux de luminosité ou
modes spéciaux sont indisponibles, et la lampe frontale clignote une fois pour indiquer
cet état lorsque vous appuyez sur l'un des boutons.
• En mode verrouillage, appuyez longuement sur les deux boutons pendant 2 secondes
jusqu'à ce que le signal EMERGENCY soit activé pour indiquer l'état de déverrouillage.
⚠ IMPORTANT
Thanks for purchasing NITECORE!
Please read this manual carefully before using the product and follow the
instructions.
This manual contains important safety information and operating instructions. Please
keep it for future reference.
In case of updates, please refer to the latest version available on the ocial website.
HU2000 User Manual
• When the primary white light is on, short press the Power Button to cycle through the
following brightness levels: LOW – MID – HIGH.
• When the light is on, double press the Power Button to access TURBO. Short press the
Power Button to return to the previous status.
Note: The TURBO Level is only accessible when using a power bank with an output
power ≥20W that supports PD protocol. The TURBO Level will step down to prevent
overheating and prolong battery life when it runs for a prolonged period.
Auxiliary Red Light
• When the light is o, long press the MODE Button for 1 second to turn on the auxiliary
red light.
• When the auxiliary red light is on, short press the Power Button to cycle through the
following sequence: Red LOW – Red HIGH – SLOW FLASHING.
Light Sources Switching
When the light is on, short press the MODE Button to switch between primary white light
and auxiliary red light.
Special Modes (SOS / BEACON)
• When the headlamp is in any status, double press the MODE Button to access SOS.
• When either special mode is on, short press the Power Button to switch between SOS
and BEACON. Double press the MODE Button again to return to the previous status.
Red Rear Light
The USB-C extension cable features a red rear light.
• On: When the headlamp is on, short press the Rear Light Button to turn on Rear Light
Flashing.
• Switching: When the rear light is on, short press the Rear Light Button to cycle through
the following sequence: Flashing – Constant-on – O.
• O: When the rear light is on, long press the Rear Light Button for 1 second to turn it o.
Note: The rear red light cannot be turned on when the headlamp is o. Once the headlamp
is o, the red rear light will automatically turn o.
Lockout / Unlock
• When the headlamp is o, long press both buttons for 2 seconds until the headlamp
ashes 3 times to indicate access to the Lockout Mode. In Lockout Mode, any brightness
levels or special modes are unavailable, and the headlamp will ash once to indicate this
status when pressing either button.
• When in the Lockout Mode, long press both buttons for 2 seconds again until
EMERGENCY is activated to indicate the unlock status.
Clip Installation
1. Remove the headband.
2. As illustrated, align the protruding part of the clip with the rectangular frame on
the bracket. Press the clip rmly into place until a "click" sound is heard to indicate
successful installation.
Storage
When storing this product for long periods, please use it once every 6 months, connecting
it to a power source and turning it on for at least one hour each time to refresh its built-in
battery.
600
150
0
1000
2000
1 2 5 11
17
Runtime (Hours)
Output (Lumens)
2000 Lumens
1000 Lumens
400 Lumens
180 Lumens
32
SYSMAX Innovations Co., Ltd.
TEL: +86-20-83862000
FAX: +86-20-83882723
E-mail: info@nitecore.com
Web: www.nitecore.com
Address: Unit 6355, 5/F, No. 1021 Gaopu Road, Tianhe District,
Guangzhou, 510653, Guangdong, China
Please nd us on facebook : NITECORE Flashlight
Thanks for purchasing NITECORE!
HC09072K24
Made in China
USB-C Extension Cable
Hook-and-Loop Strap
Loop
Rear Light Button
(Red Rear Light)
Power Button
MODE Button
Warranty Details
All NITECORE
®
products are warranted for quality. Any DOA / defective product can
be exchanged for a replacement through a local distributor/dealer within 15 days of
purchase. After that, all defective / malfunctioning NITECORE
®
products can be repaired
free of charge within 24 months from the date of purchase. Beyond 24 months, a
limited warranty applies, covering the cost of labor and maintenance, but not the cost of
accessories or replacement parts.
The warranty will be nullied if
1. the product(s) is/are broken down, reconstructed and/or modied by unauthorized
parties;
2. the product(s) is/are damaged due to improper use.
For the latest information on NITECORE
®
products and services, please contact a local
NITECORE
®
distributor or send an email to service@nitecore.com
※ All images, text and statements specied herein this user manual are for reference
purpose only. Should any discrepancy occur between this manual and information
specied on www.nitecore.com, Sysmax Innovations Co., Ltd. reserves the rights to
interpret and amend the content of this document at any time without prior notice.
Note: The stated data is measured using NITECORE NB10000 Gen3 power bank (3.85V 10,000mAh) under laboratory conditions. The data may vary in real world use due to dierent
environmental conditions.
Produkspesifikasjoner
| Merke: | Nitecore |
| Kategori: | Lommelykt |
| Modell: | HU2000 |
Trenger du hjelp?
Hvis du trenger hjelp med Nitecore HU2000 still et spørsmål nedenfor, og andre brukere vil svare deg
Lommelykt Nitecore Manualer

18 Januar 2025

16 Januar 2025

15 Januar 2025

30 Desember 2025

30 Desember 2025

30 Desember 2025

30 Desember 2025

30 Desember 2025

30 Desember 2025

30 Desember 2025
Lommelykt Manualer
- Carson
- FoxFury
- Underwater Kinetics
- Blackburn
- Lupine
- Ledlenser
- Beghelli
- Nedis
- WAGAN
- Pelican
- Varta
- Ansmann
- Silva Schneider
- Princeton Tec
- EMOS
Nyeste Lommelykt Manualer

9 April 2025

9 April 2025

3 April 2025

3 April 2025

30 Mars 2025

30 Mars 2025

30 Mars 2025

30 Mars 2025

30 Mars 2025

29 Mars 2025