On-Q IC7001-WH Bruksanvisning
On-Q
Intercomsystem
IC7001-WH
Les nedenfor 📖 manual på norsk for On-Q IC7001-WH (3 sider) i kategorien Intercomsystem. Denne guiden var nyttig for 2 personer og ble vurdert med 4.5 stjerner i gjennomsnitt av 2 brukere
Side 1/3

Selective Call Intercom Room Unit
Appel
selectif interphone salle unite
Llamada selectiva Intercom sala unidad
Doc
. #1507253
6/16
Rev
A
Installation Instructions • Notice d'lnstallation • lnstrucciones de lnstalaci6n
Catalog Number(s) • Numero(s) de Catalogue • Les Numeros de Catalogue: IC7001
Country of Origin: Made
in
China •
Pays
d'origine: Fabrique
en
Chine •
Pais
de
origen:
Hecho
en
China
1
2
3
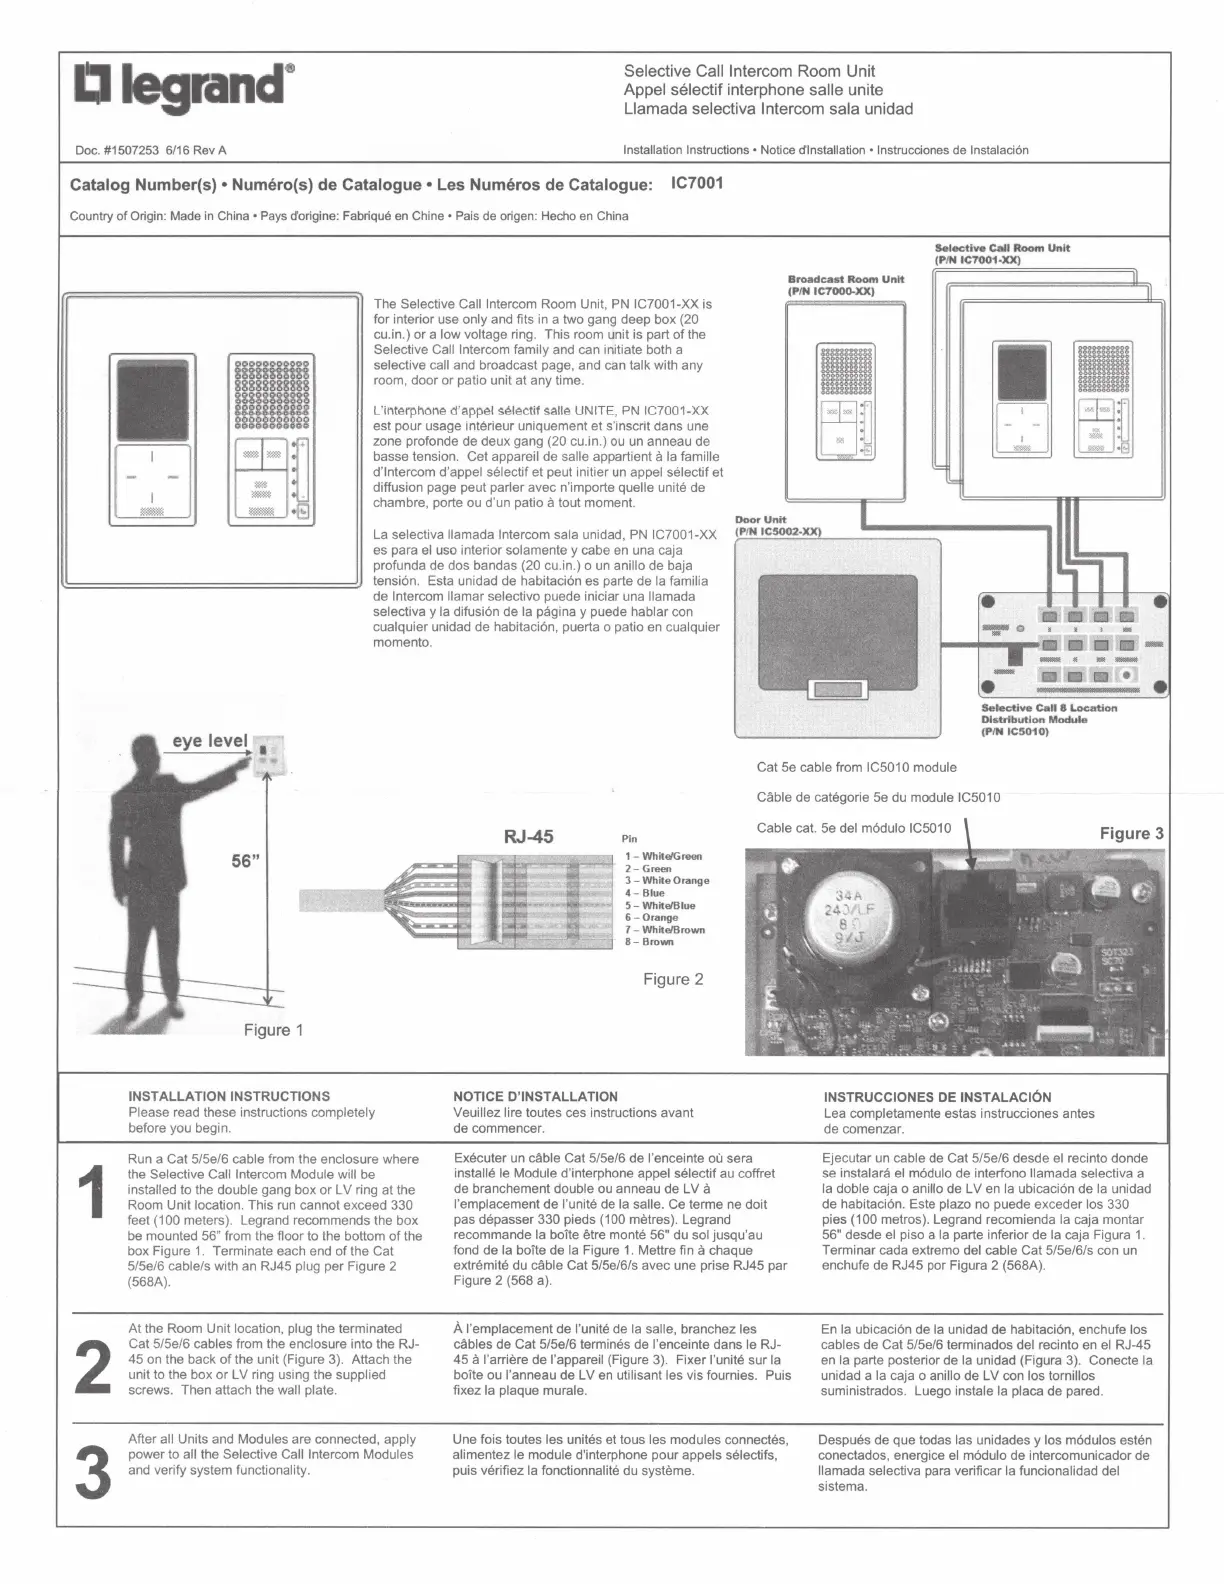
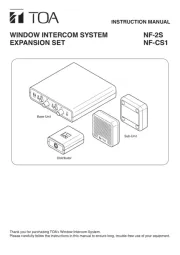
The Selective Call Intercom Room Unit, PN IC7001-XX is
for interior use
only and fits in a two gang deep box (20
cu.in.) or a low voltage ring. This room unit is part
of
the
Selective Call Intercom family and can initiate both a
selective call and broadcast page, and can talk with any
room, door or patio unit at any time.
L'
interpMne
d'
appel
selectif
salle
UNITE,
PN
IC7001-XX
est pour usage interieur uniquement
et
s'inscrit dans une
zone profonde de deux gang
(20 cu .in.) ou un anneau de
basse tension. Cet
appareil de salle appartient
a
Ia
famille
d'lntercom d'appel selectif
et peut initier un appel selectif et
diffusion page peut
parler avec n'importe quelle unite de
chambre, porte ou d'un patio
a tout moment.
Door
Unit
Broadcast
Room
Unit
(P
IN IC7000.XX)
Selective
Call
RQom
Unit
(PIN ICT001·XX)
La selectiva llamada Intercom sala unidad,
PN
IC7001-XX
(
;.c
PIN
~
-'-IC
::..;
S002-
;..;;..;.
~
::..;;z...
--
------...
es para el uso interior solamente y cabe en una caja
profunda de dos bandas
(20 cu.
in
.) o un anillo de baja
tensi6n. Esta unidad de habitaci6n es parte de
Ia
familia
de
Intercom llamar selectivo puede iniciar una llamada
selectiva
y
Ia
difusi6n de
Ia
pagina y puede hablar con
cualquier unidad de habitaci6n, puerta o patio en cualquier
momenta.
Selective
Call 8
Location
Distribution
Module
(PIN
IC5010)
Cat 5e cable from IC501 0 module
INSTALLATION INSTRUCTIONS
Please
read these instructions completely
before you begin.
Run a Cat 5/5e/6
cable from the enclosure where
the
Selective Call Intercom Module will be
installed to the double gang box or
LV
ring at the
Room Unit
location. This run cannot exceed 330
feet (100 meters). Legrand recommends the box
be mounted
56" from the floor to the bottom
of
the
box Figure 1. Terminate each end
of
the Cat
5/5e/6
cable/s with an RJ45 plug per Figure 2
(568A).
At the Room Unit location, plug the terminated
Cat 5/5e/6
cables from the enclosure into the RJ-
45 on the back
of
the unit (Figure 3). Attach the
unit to the box
or
LV ring using the supplied
screws. Then attach the wall plate.
After all Units and Modules are connected, apply
power to all the Selective Call Intercom Modules
and verify system functionality.
Cable
de categorie 5e du module IC501 0
RJ-45
NOTICE
D'INSTALLATION
Pin
1 - WhiteiGreen
2 - Green
3-
White Orange
4-
Blue
5-
White/Blue
6
-Orange
7-
White/Brown
8-
Brown
Figure 2
Veuillez lire toutes ces instructions avant
de commencer.
Executer un
cable Cat 5/5e/6 de !'enceinte ou sera
installe le Module d'interphone appel selectif
au
coffret
de branchement
double ou anneau de LV
a
I'
emplacement
de
I'
unite de Ia salle. Ce terme ne doit
pas depasser
330 pieds (100 metres). Legrand
recommande
Ia
boite etre monte 56" du sol jusqu'au
fond de
Ia
boite
de
Ia
Figure
1.
Mettre fin a chaque
extremite du cable
Cat 5/5e/6/s avec une prise RJ45 par
Figure 2 (568 a).
A I' emplacement de l'unite
de
Ia
salle, branchez les
cables
de Cat 5/5e/6
!ermines
de !'enceinte dans le RJ-
45
a l'arriere de l'appareil (Figure 3). Fixer l'unite sur Ia
boite ou l'anneau de LV
en
utilisant les vis fournies. Puis
fixez
Ia
plaque murale.
Une fois toutes les unites et taus les modules connectes,
alimentez le module d'interphone pour appels selectifs,
puis verifiez Ia fonctionnalite du systeme.
INSTRUCCIONES DE
INSTALACI6N
Lea completamente estas instrucciones antes
de comenzar.
Ejecutar un
cable de Cat 5/5e/6 desde el recinto donde
se
instalara el modulo de interfono llamada selectiva a
Ia
doble caja o anillo de LV en Ia ubicaci6n de
Ia
unidad
de habitaci6n. Este
plaza no puede exceder los 330
pies
(100 metros). Legrand recomienda
Ia
caja montar
56" desde el piso a
Ia
parte inferior de
Ia
caja Figura
1.
Terminar cada extrema del cable Cat 5/5e/6/s con un
enchufe de RJ45 par Figura 2 (568A).
En
Ia
ubicaci6n de
Ia
unidad de habitaci6n, enchufe los
cables
de Cat 5/5e/6 terminados del recinto en el RJ-45
en
Ia
parte posterior de
Ia
unidad (Figura 3). Conecte
Ia
unidad a
Ia
caja o anillo de LV con los tornillos
suministrados. Luego instale
Ia
placa de pared.
Despues de que todas
las unidades
y
los m6dulos esten
conectados, energice el modulo de intercomunicador de
llamada selectiva para verificar
Ia
funcionalidad del
sistema.
•
•

LCD: This is the Liquid
Crystal Display
that is used to customize, personalize and operate
the
Selective Call Intercom
System.
It
identifies which unit is
calling
you, and gives you
status
of
all
the individual units.
It also
provides pop-up messages to inform you
of
specific
system functions and changes.
LCD: C'est l'affichage
a
cristaux
liquides
qui sert
a
personnaliser, personnaliser et
exploiter
le
systeme d'interphone
appel selectif.
II
identifie
quelle unite
vous
appelle
et vous donne
le
statut de toutes
les
unites
individuelles.
II
fournit
egalement
des messages pop-up pour vous
informer des parametres
operationnels
specifiques.
LCD:
Es
Ia
pantalla
de
cristalliquido
que se
utiliza
para personalizar, personalizar y operar
el
sistema de intercomunicaci6n de
llamada
selectiva. ldentifica que te
esta llamando
y
le
da
estatus de todas
las
unidades individuales. Tambien ofrece mensajes emergentes para
informarle de
los parametres
operacionales especificos.
000000000
000000000
00000000
00000000
0000000
0000000
000000
00000
00000
0000
0000
compass:
The compass allows you to move up/down and
leWright
within the LCD GUI
interface.
boussole:
Ia
boussole
permet de se deplacer
vers
le
haut/bas et gauche/droite au sein
de !'interface utilisateur graphique LCD.
brujula:
Ia
brujula
permite mover arriba/abajo y derecha/izquierda dentro de
Ia
interfaz
LCD.
door:
Pressing this button
will allow
you to communicate with the
last
Door Unit that
rang its door tone. Hold
in the door button while
speaking and
let
it go to
listen
for a
response.
porte
: Ce bouton vous permettra de communiquer avec
Ia
derniere
unite
de
porte
qui a sonne
son ton porte. Maintenez
le
bouton
de
Ia
porte tout en
parlant et
le
laisser aller
a
l'ecoute
pour une reponse.
puerta:
AI
presionar este bot6n le
permitira comunicarse con
Ia
unidad pasada que
son6 su tono de
Ia
puerta. Mantenga
pulsado
el
bot6n de
Ia
puerta mientras habla
y
deje que se vaya a escuchar una respuesta.
monitor:
Press this button once to put the Unit in monitor mode and the monitor
button
will
change its
normal
white
backlit color
to red. This means that
all
active
room units
will
be
able
to hear what is happening at this
location.
Press the monitor
button again to return to
normal
mode. Note: When
in
monitor mode, a door chime
ring
will
not
be
heard.
surveillance
: Appuyez sur ce bouton une fois pour mettre
l'appareil
en mode
monitor et
le
bouton monitor va changer sa
couleur normale retro-eclaire blanc
au
rouge.
Cela
signifie que toutes
les
unites d'active de
salle
sera en mesure d'entendre
ce qui se passe
a
cet endroit. Appuyez sur le
bouton de moniteur pour revenir au
mode normal.
Remarque : Lorsque
ce
mode est active, cette unite
ne reproduira
pas
le carillon
de porte.
supervision:
Pulse
este bot6n una vez poner
Ia
unidad en modo
monitory
el
bot6n
del monitor cambia su
color
con retroiluminaci6n
blanca normal
a rojo. Esto significa
que todas
las
unidades de habitaci6n activo sera
capaces de escuchar
lo
que
esta
sucediendo
en
este
Iugar.
Presione
el
bot6n del
monitor para
volver
al
modo
normal.
Nota: En
el
modo monitor, no se escuchara
el
timbre de
Ia
puerta en esta unidad.
volume:
Pressing the
volume+
rocker
will increase the
volume level while
pressing
on
the-
rocker
will
decrease
volume.
You can
also hold
in the
volume+
or-
rocker
until
you have reached the desired
volume level.
volume:
La
touche + du bouton
a bascule
de
volume
VOUS
permet d'augmenter
le
volume,
landis que
Ia
touche
-
du bouton
a
bascule
VOUS
permet de baisser
le volume.
Vous pouvez
egalement maintenir
Ia
pression sur
les
touches + ou
-
du bouton
a
bascule
jusqu'a atteindre
le volume
souhaite.
volumen:
Si
presiona
el
interrupter+ de
volumen,
aumentara
el
nivel
de
volumen, y
si
presiona
el
interrupter-,
el
volumen
disminuira. Tambien puede mantener
presionado
el
interrupter+ o
-
hasta que haya
alcanzado
el
nivel del volumen
deseado.
do
not
disturb:
Press this button once to put the unit in dnd mode and the LED
will illuminate
to red.
While
in dnd mode, both the speaker and microphone of
the unit
will
be inactive. Press the button again to return the unit back
to
normal
mode and the LED turn off.
ne
pas
deranger: Appuyez sur
ce
bouton une fois pour mettre
l'appareil
en
ne
pas derange le
mode et
Ia
LED
s'allume
en rouge.
While
dans
ne
pas deranger
le
mode,
le
haut-parleur et
le
micro de
l'appareil
sera inactifs. Appuyez sur
le
bouton pour revenir
a
l'unite
de retour au mode
normal
et
Ia
LED s'eteindra.
no
molestar:
Presione este bot6n una vez para poner
Ia
unidad
en
funci6n de
no
molestar
el
modo y
el
LED se
iluminara
en rojo. Mientras que en no
perturbar
el
modo,
el
altavoz y
el
micr6fono de
Ia
unidad estara inactivadas.
Presione
el
bot6n otra vez para
volver
Ia
unidad a modo
normal
y
el
LED
se
apague.
talk/select:
Depressing this button will allow
you to communicate with any active units
selected
on the LCD Display. Hold
in the
talk/select
button
while
speaking, and
let
it go when
you are done. Your voice
will be heard on the
selected
Unit, or any active Room or Patio Unit
if
All
is
selected.
parler/selectionnez
: Appuyant sur
ce
bouton vous permettra de communiquer avec n'importe quelle unite
active
selectionnee
sur
l'ecran
LCD. Maintenir enfonce
le
bouton
talk/selection
tout en
parlant
et
laissez-le aller lorsque vous avez termine. Votre voix sera entendue sur
!'unite selectionnee,
active Room ou
un
Patio
unite
si
tout est
selectionne.
hablar/seleccione:
AI
oprimir este bot6n
le
permitira comunicarse con
las
unidades de activadas seleccionadas en
Ia
pantalla
LCD. Mantenga
pulsado
el
bot6n de
selecci6n
de
hablar y
hablar
y
dejarlo
ir cuando termines. Su voz se escuchara en
Ia
unidad selectionada, o cualquier unidad de Patio o
sala
activa
si
todos seleccionados.
This device is verified to
comply
with
Part
15
Class
B of the
FCC Rules.
Cet appareil
est
verifie pour se conformer
a
Ia
partie 15
classe
B de
Ia
FCC.
Este aparato
esta
verificado para cumplir con
Ia
parte
15
clase
B de
Ia
FCC.
Doc
. #1507253
6/16
Rev
A
©Copyright
2013
Legrand
All
Rights
Reserved.
©Copyright
2013
Tous droits
reserves
Legrand.
©Copyright
2013
Legrand
Todos
los
derechos
reservados.
860.233.6251
1.877.BY.LEGRAND
www.legrand.us
www.legrand.ca

QUICK
START
GUIDE
CALL
ALL
ROOMS
(BROADCAST
CALL)
To
call
all
rooms, press and hold the
talk/select
button wait
for
the audible
"blink"
sound and begin
talking. Release the button when finished and an
audible
··blank''
sound
will
be
heard at
that
time
any other station can reply.
CALL
A
SELECT
ROOM
OR
GROUP
OF
ROOMS
To
call a select room, use the compass
under
the
LCD
screen to highlight the desired room
or
group.
Once
a room/group is selected, press and hold the
talk/select button
wa1t
for
the audible
"blink
"
sound
and begin talking. Release the button when finished
and
an
audible
"blank" sound
will
be
heard at that
time
any
other
station can reply.
HANDS-FREE
REPLY
While a call is always initiated at the room
un1t,
anyone can reply to a
call
from
anywhere in the
room.
After
the audible
"blank"
sound is heard,
begin speaking, only the calling station
will
hear
your reply. A second audible
"blank"
sound
announces the end of the hands free
talk
t1me.
The
reply
time
is adjustable
1n
the settings menu.
For complete
User Documentation
Please Visit www.Legrand.us/SCI
Produkspesifikasjoner
Merke: | On-Q |
Kategori: | Intercomsystem |
Modell: | IC7001-WH |
Trenger du hjelp?
Hvis du trenger hjelp med On-Q IC7001-WH still et spørsmål nedenfor, og andre brukere vil svare deg
Intercomsystem On-Q Manualer
6 September 2025
Intercomsystem Manualer
- Intercomsystem Philips
- Intercomsystem Axis
- Intercomsystem Viking
- Intercomsystem Busch-Jaeger
- Intercomsystem Somfy
- Intercomsystem Panasonic
- Intercomsystem EMOS
- Intercomsystem Midland
- Intercomsystem DataVideo
- Intercomsystem FlyingVoice
- Intercomsystem Avidsen
- Intercomsystem Hikvision
- Intercomsystem Valcom
- Intercomsystem Nedis
- Intercomsystem WHD
- Intercomsystem Becken
- Intercomsystem Vibell
- Intercomsystem Russound
- Intercomsystem Mobotix
- Intercomsystem Vimar
- Intercomsystem Elro
- Intercomsystem NuTone
- Intercomsystem M-e
- Intercomsystem Rollei
- Intercomsystem Toucan
- Intercomsystem Pentatech
- Intercomsystem Elcom
- Intercomsystem Akuvox
- Intercomsystem Hanwha
- Intercomsystem Tador
- Intercomsystem Swann
- Intercomsystem 2N Telecommunications
- Intercomsystem Louroe Electronics
- Intercomsystem Fysic
- Intercomsystem REV
Nyeste Intercomsystem Manualer
7 September 2025
7 September 2025
7 September 2025
7 September 2025
7 September 2025
7 September 2025
7 September 2025
7 September 2025
7 September 2025
7 September 2025