PAC AP4-GM71 Bruksanvisning
Les nedenfor 📖 manual på norsk for PAC AP4-GM71 (5 sider) i kategorien Mottaker. Denne guiden var nyttig for 2 personer og ble vurdert med 4.5 stjerner i gjennomsnitt av 2 brukere
Side 1/5

© 2024 Stinger. All rights reserved.
PAC-audio.com
C
Page 1
Rev: 1
Date:090924
Advanced Amplier Interface for
General Motors
AP4-GM71
The AP4-GM71 provides a 6-channel pre-amp output for use with aftermarket audio equipment. The AP4-GM71
delivers a variable 5v RMS pre-amp output with fading, balance, equalization, and level control capabilities. The
module also retains all audio from other vehicle features such as factory navigation prompts, Bluetooth, OnStar, and
parking sensor chimes. A data controlled remote amplier turn on wire is also provided by the AP4-GM71. The module
also provides a variable 2-channel ber optic digital audio output (TOSLINK).
Introduction and Features
Important Notes
1. This interface is only compatible in vehicles with Bose that are equipped with IOS, IOT and IOK Infotainment.
2. The factory amplier must be disconected and removed from the vehicle when the AmpPRO has been installed.
3. The remote output is rated at 2A of current. If more current is needed, an external relay must be used.
4. Channel 5 & 6 are a non-fading outputs. The outputs level of channel 5 & 6 can be controlled using the supplied level
control knob.
5. When the non-fading level control knob is not connected to the AP4-GM71, the output level of channels 5 & 6 will default to
100 percent.
6. To adjust mininum volume or chime volume without using the PC APP the level control knob must be connected.
7. The chime volume and minimum volume levels are set to a sutiable level by default. If you are happy with this level in your
particular application, then additional adjustment is not required. Please refer to the Setup and Conguration section on
page 2 for more details.
8. The factory radio's speed controlled volume and surround sound mode are not supported by the AP4 outputs.
9. When using the TOSLINK output, all chimes must be routed through the front output by setting DIP switch 1 on (down).
10. No adjustments can be made manually using the programming button, or the factory SWC when the module is connected to
a PC.
11. The AP4-GM71 is designed to be installed in the factory amplier location not behind the radio. It will replace the factory
amplier and it will no longer be used.
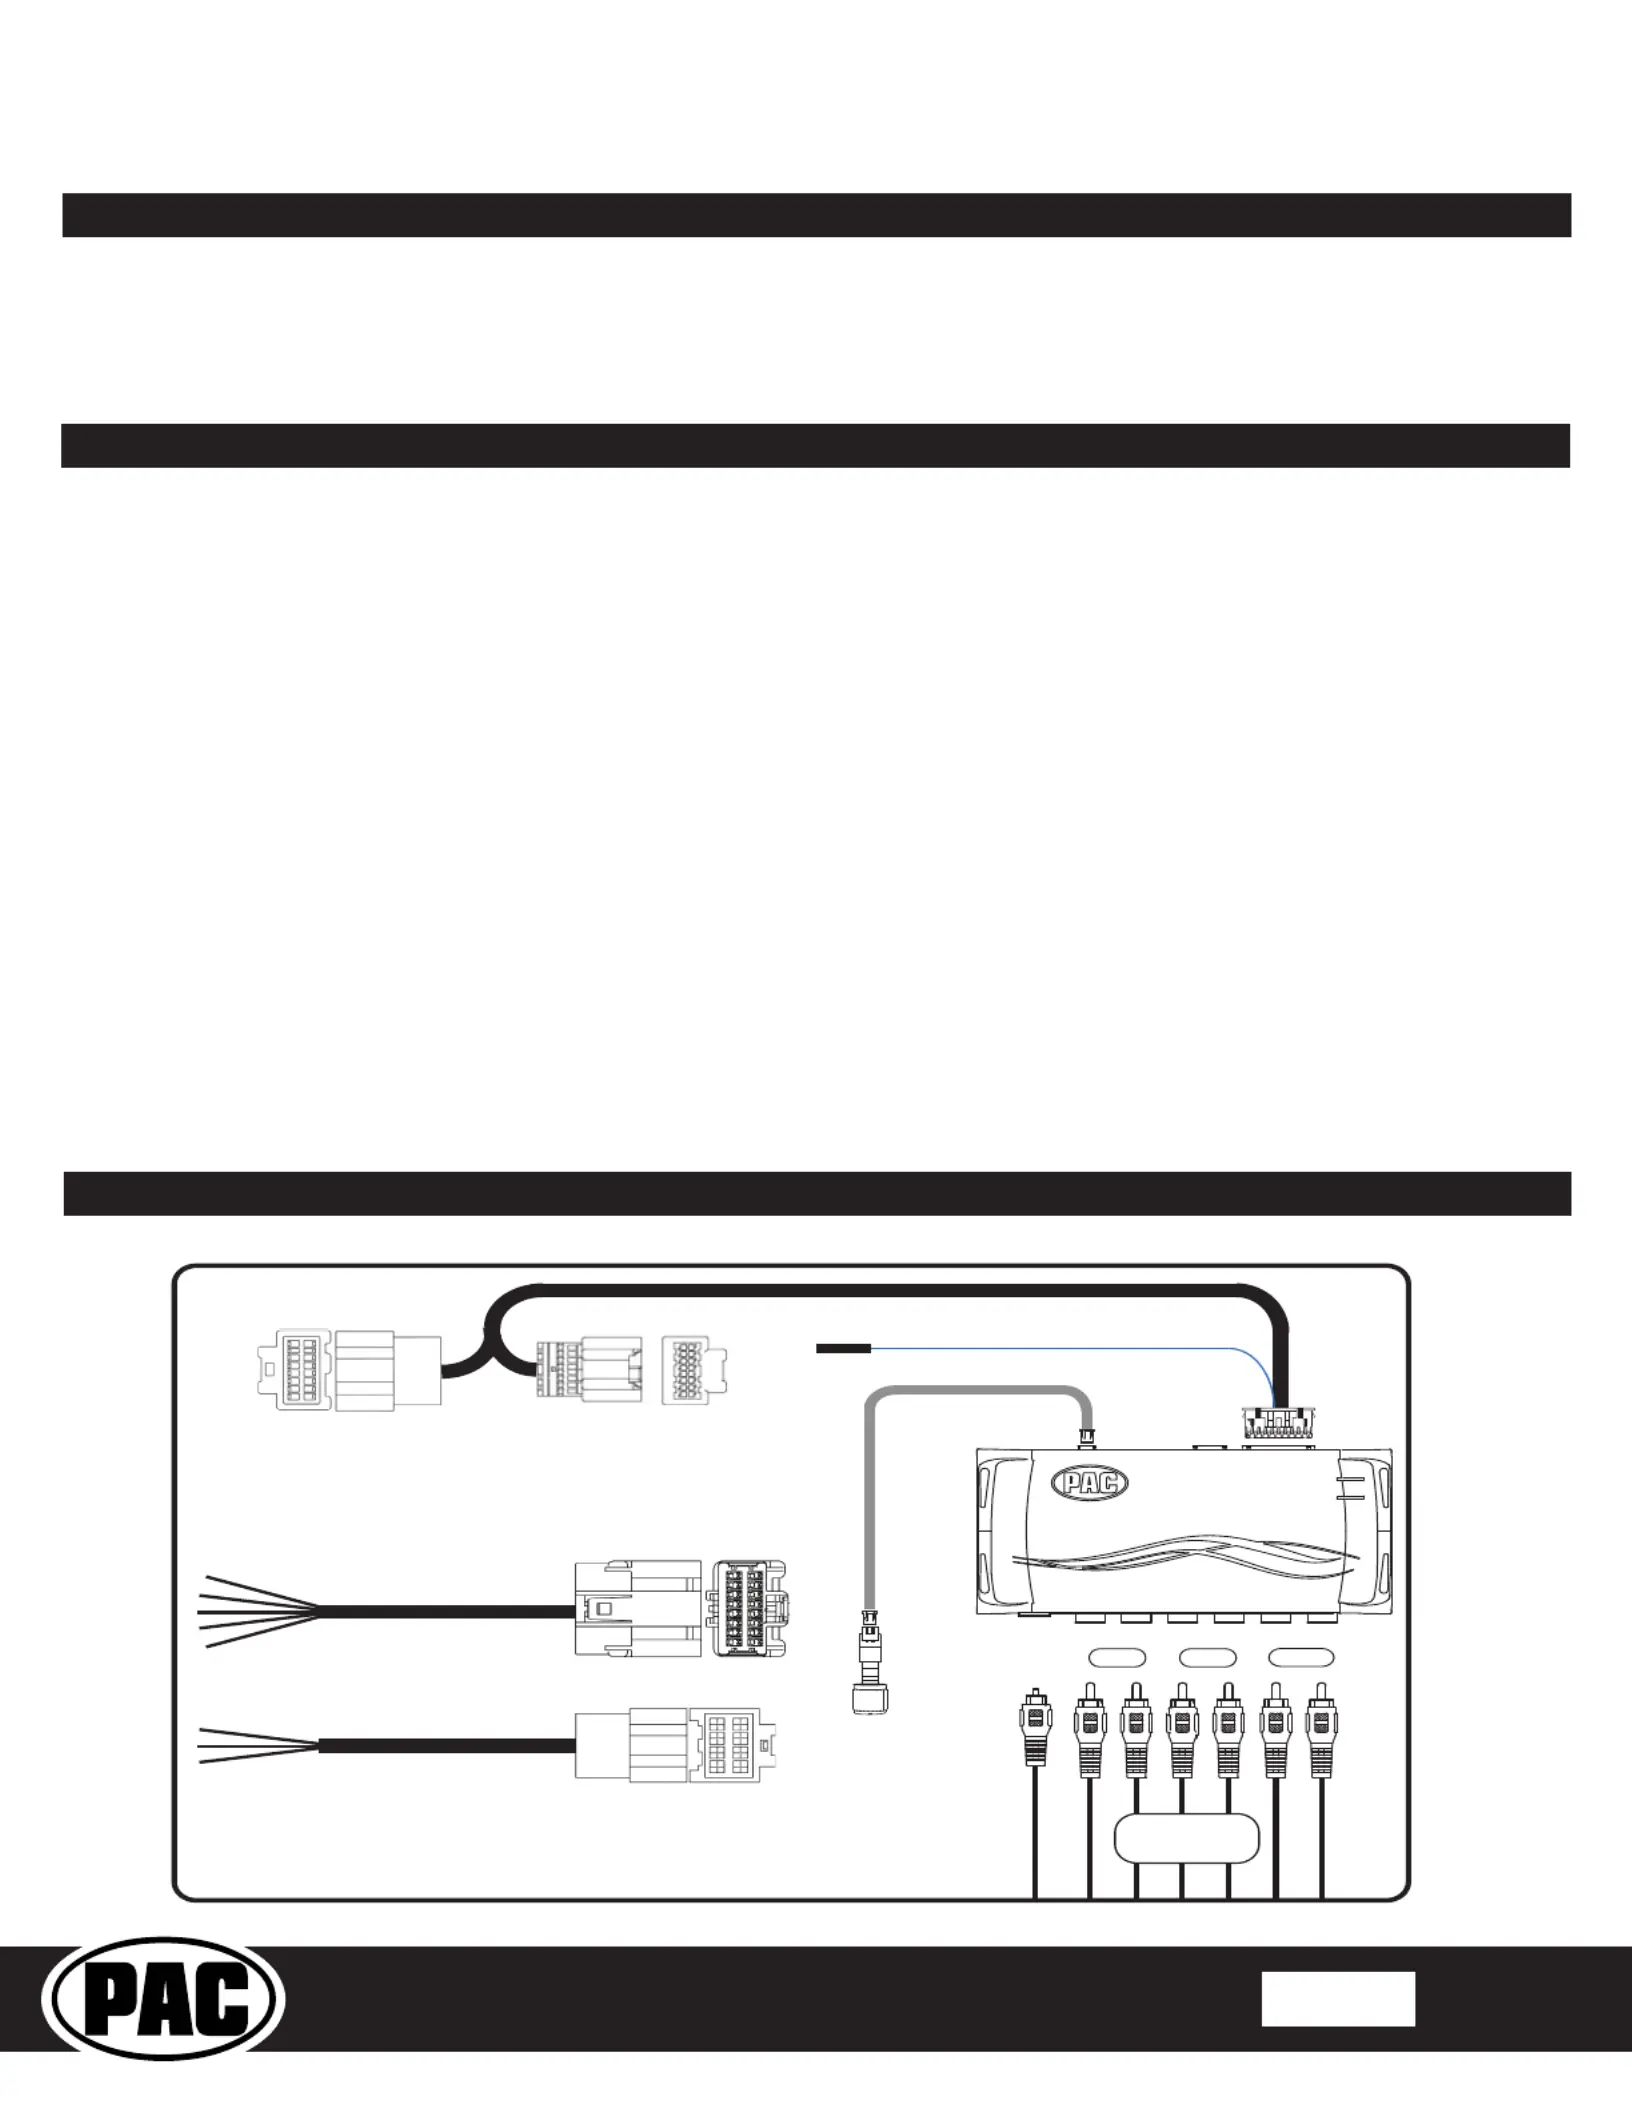
Wiring Connection Chart
Remote Turn On Output
2A Max Output
Front
1/L
2/R
4/R
5 6
3/L
Rear
Sub
TOSLINK
Speaker
Leads
1-3
AP4-GM71-HAR (A) or (B) Based on Data Type (SEE MANUAL)
To Vehicle
Amplier Harness
Non-Fading
Level Control
Knob
AP4-GM71-HAR (D)
To Aftermarket
Amplifier
Speaker
Leads
4-11
AP4-GM71-HAR (C)

© 2024 Stinger. All rights reserved.
PAC-audio.com
C
Page 2
Rev: 1
Date:090924
Advanced Amplier Interface for
General Motors
AP4-GM71
Setup and Conguration
1. Turn the ignition on. LED 1 on the interface will turn on and the +12v remote output will turn on.
2. Set the amp gain(s) to the desired level. We recommend using an oscilliscope and test tones to set the amp gain(s). Please
refer to the MECP Advanced study guide (p. 360) if you are unfamiliar with this process.
3. Check volume, balance, fade and EQ settings.
4. If you would like to adjust the chime volume or minimum volume, do so using one of the methods outlined on the next page.
If you are happy with the default levels, no adjustments are necessary.
5. Please ensure your aftermarket amplier gains are set to your desired level before proceeding to the next steps.
Installation
1. Access the factory amplier (see location info to the right).
2. Disconnect all of the factory connectors from the factory
amplier as it must remain disconected.
3. Connect the AmpPRO harness to vehicle amplier harness.
4. Make sure you are using the right data harness marked (A)
or (B). Failing to do so will result in failed operation.
5. Set any feature DIP switches that apply to your install.
a. DIP switch 1 is used for two channel mode. In this mode,
both the TOSLINK and front RCA outputs (1 and 2)
become non-fading outputs. All rear chimes will also be
routed through these outputs in two channel mode.
b. Set DIP switch 2 on (down) to lower the RCA output
voltage to 4v. Leave DIP switch 2 off (up) to keep the
RCA output voltage at 5v. See the troubleshooting
DIP
1 2 3 4
ON
Two Channel Mode 5v / 4v Preout No Function No Function
1 2 3 4
Set DIP switches to the ON position to activate the corresponding features.
Set DIP switches to the OFF position for any features that are not desired.
Module Layout
section on page 5 for more details.
c. DIP switch 3 & 4 are not used.
6. Connect the AmpPRO harness to the module.
7. Connect the level control knob to the module and install in an
accessible location.
8. Connect the signal cables and remote input from the
aftermarket amplier.
9. Turn the vehicle off, shut the doors and lock the vehicle with
the factory keyfob. Wait 5 minutes. After 5 minutes, turn
vehicle back on, and proceed with setup and conguration.
V
V
V
Vehicle
ehicle
ehicle
ehicleVehicle Factory
Factory
Factory
Factory Amplier Location
Amplier Location
Amplier Location
Amplier LocationFactory Amplier Location
Silverado / Sierra
Silverado / Sierra HD
Back wall of Cab
Colorado / Canyon Behind glove box on right side
Tahoe / Yukon
Suburban / Escalade
Left rear quarter in cargo area
Camaro
Under center area of trunk
Corvette
Under passenger front carpet
Equinox / Traverse /
Blazer
Acadia / Terrain
Under front center console access
from passenger side
Malibu / Trailblazer
Right rear quarter in trunk
Cadillac ATS / CTS /
XT4 / XTS
Right rear quarter in trunk
Cadillac CT6
Left rear quarter in trunk
Interface Connector 1
Expansion Port
Programming Button
Feature Select
DIP switches
Non-Fading Level Control
Knob Connection
USB Connection
LED 1
TOSLINK Output
Front Output
Ch. 1(L) and 2(R)
Rear Output
Ch. 3(L) and 4(R)
SUB (Non-Fading)
Ch. 5 and 6
LED 2

© 2024 Stinger. All rights reserved.
PAC-audio.com
C
Page 3
Rev: 1
Date:090924
Advanced Amplier Interface for
General Motors
AP4-GM71
Setup and Conguration (cont.)
AmpPRO PC App
Use of the AmpPRO PC App allows you to
do the following:
• Congure Interface Options such as:
• Minimum Volume Level
• Chime Volume Level
• Enable / Disable AP4 Chimes
• Enable / Disable factory EQ
• Set Bass / Mid / Treble center frequencies and
Q factor
• Update Product Firmware
• Read Firmware / Hardware Versions
• You can download the AmpPRO app at :
PAC-Audio.com
Manually Setting the Chime Volume (optional)
You can manually set the level of the factory chime using the programming button on the side of the interface, or the steering
wheel controls. If you would like to set the chime volume using the AmpPRO PC app please proceed to the AmpPRO PC app
section. PLEASE NOTE: Knob must be connected to module for either of the following methods.
Setting the chime volume using the programming button
1. Start with the level control knob turned all the way down (counter-clockwise).
2. Press the programming button on the side of the interface.
3. LED 1 will turn green and the chimes will begin continuously sounding.
4. Turn the level control knob clockwise until the desired chime level is reached.
5. You can now either press the programming button twice or wait ten seconds to exit the settings.
Setting the chime volume using the radio steering wheel controls
1. Start with the level control knob turned all the way down.
2. Press and hold the track down button on the steering wheel panel for approximately ten seconds. PLEASE NOTE: The
radio will respond to the SWC commands during this process, this is normal and has no effect on the AP4 operation.
3. The chimes will begin continuously sounding.
4. Turn the level control knob clockwise until the desired chime level is reached.
5. Wait ten seconds to exit the settings.
Manually Setting the Minimum Volume (optional)
If the minimum volume of the radio (factory radio volume level 1) not sutiable, you can manually set the level of the minimum
volume using either the programming button on the side of the interface or the radio steering wheel controls. If you would like
to set the minimum volume using the AmpPRO PC app, please proceed to the AmpPRO PC app section.
PLEASE NOTE: Level control knob must be connected to module for either of the following methods.
Setting the minimum volume using the programming button
1. Start with the level control knob turned all the way down (counter-clockwise).
2. Set the volume on the factory radio to 1.
3. Press the programming button on the side of the interface twice.
4. LED 1 will turn amber and the chimes will begin sounding every ve seconds.
5. Turn the level control knob clockwise until the desired minimum volume level is reached.
6. You can now either press the programming button once or wait ten seconds to exit the settings.
Setting the minimum volume using the factory steering wheel controls
1. Start with the level control knob turned all the way down (counter-clockwise).
2. Set the volume on the factory radio to 1.
3. Press and hold the track up button on the radio steering wheel controls for approximately ten seconds. PLEASE NOTE:
The radio will respond to the SWC commands during this process, this is normal and has no effect on the AP4 operation.
4. The chimes will begin sounding every ve seconds.
5. Turn the level control knob clockwise until the desired minimum volume level is reached.
6. Wait ten seconds to exit the settings.
Produkspesifikasjoner
Merke: | PAC |
Kategori: | Mottaker |
Modell: | AP4-GM71 |
Trenger du hjelp?
Hvis du trenger hjelp med PAC AP4-GM71 still et spørsmål nedenfor, og andre brukere vil svare deg
Mottaker PAC Manualer
3 August 2025
12 Februar 2025
12 Februar 2025
Mottaker Manualer
- Mottaker Bosch
- Mottaker Power Dynamics
- Mottaker Vonyx
- Mottaker Akg
- Mottaker Jensen
- Mottaker Hartke
- Mottaker Philips
- Mottaker Goobay
- Mottaker Avantree
- Mottaker Godox
- Mottaker Cayin
- Mottaker Meridian
- Mottaker Fender
- Mottaker Axton
- Mottaker Kogan
- Mottaker DJI
- Mottaker McIntosh
- Mottaker Sony
- Mottaker Pro-Ject
- Mottaker Yamaha
- Mottaker Morel
- Mottaker Extron
- Mottaker Lindy
- Mottaker Pioneer
- Mottaker NuPrime
- Mottaker Ecler
- Mottaker AudioControl
- Mottaker Rotel
- Mottaker Audio-Technica
- Mottaker Toa
- Mottaker Marantz
- Mottaker Rega
- Mottaker Vox
- Mottaker Pyle
- Mottaker Shure
- Mottaker Roland
- Mottaker NAD
- Mottaker Wet Sounds
- Mottaker JVC
- Mottaker VMV
- Mottaker S.M.S.L
- Mottaker Kicker
- Mottaker Auna
- Mottaker OSD Audio
- Mottaker DataVideo
- Mottaker Audizio
- Mottaker Bluesound
- Mottaker Blackstar
- Mottaker Hertz
- Mottaker Kenwood
- Mottaker Cambridge
- Mottaker MB Quart
- Mottaker Aplic
- Mottaker CSL
- Mottaker NUVO
- Mottaker IFi Audio
- Mottaker Henry Engineering
- Mottaker Block
- Mottaker Smart-AVI
- Mottaker Advance
- Mottaker Artsound
- Mottaker Denon
- Mottaker Marshall
- Mottaker Yorkville
- Mottaker Valcom
- Mottaker Mosconi
- Mottaker JBL
- Mottaker Infinity
- Mottaker Helix
- Mottaker Soundstream
- Mottaker Klipsch
- Mottaker Bellari
- Mottaker Rolls
- Mottaker Ground Zero
- Mottaker Karma
- Mottaker Glemm
- Mottaker EA
- Mottaker Match
- Mottaker Renkforce
- Mottaker Scansonic
- Mottaker SPL
- Mottaker Audiotec Fischer
- Mottaker Crunch
- Mottaker QSC
- Mottaker A-NeuVideo
- Mottaker Atlona
- Mottaker Classé
- Mottaker FoneStar
- Mottaker Monitor Audio
- Mottaker Peavey
- Mottaker Crown
- Mottaker Fosi Audio
- Mottaker Graupner
- Mottaker Antelope Audio
- Mottaker Vaddio
- Mottaker ESX
- Mottaker Omnitronic
- Mottaker Rocstor
- Mottaker Russound
- Mottaker MEE Audio
- Mottaker Monacor
- Mottaker GigaBlue
- Mottaker Mx Onda
- Mottaker Black Hydra
- Mottaker Electro-Voice
- Mottaker Boss
- Mottaker JL Audio
- Mottaker Shanling
- Mottaker Atlas Sound
- Mottaker Comica
- Mottaker Ashly
- Mottaker MuxLab
- Mottaker Audiolab
- Mottaker Lectrosonics
- Mottaker Memphis Audio
- Mottaker Alpine
- Mottaker Evolution
- Mottaker AVM
- Mottaker Primare
- Mottaker Elektrobock
- Mottaker PureLink
- Mottaker Kramer
- Mottaker ATen
- Mottaker Blustream
- Mottaker Mtx Audio
- Mottaker Yaesu
- Mottaker Musical Fidelity
- Mottaker Vimar
- Mottaker Bogen
- Mottaker RDL
- Mottaker Harman Kardon
- Mottaker Dynacord
- Mottaker Ferguson
- Mottaker DAP Audio
- Mottaker REL Acoustics
- Mottaker Inovonics
- Mottaker KanexPro
- Mottaker BZBGear
- Mottaker Bresser
- Mottaker InLine
- Mottaker Ram Audio
- Mottaker Gefen
- Mottaker Phoenix Gold
- Mottaker Strong
- Mottaker Vincent
- Mottaker HiFi ROSE
- Mottaker Intelix
- Mottaker Comprehensive
- Mottaker Deaf Bonce
- Mottaker Fiio
- Mottaker Lab Gruppen
- Mottaker GlobalSat
- Mottaker AVMATRIX
- Mottaker Imperial
- Mottaker Hifonics
- Mottaker Hotone
- Mottaker Phonic
- Mottaker AudioSource
- Mottaker Taga Harmony
- Mottaker SoundTube
- Mottaker James
- Mottaker Geemarc
- Mottaker Devialet
- Mottaker ButtKicker
- Mottaker Antelope
- Mottaker Futaba
- Mottaker Crest Audio
- Mottaker Mooer
- Mottaker Rexing
- Mottaker Marshall Electronics
- Mottaker Atoll
- Mottaker August
- Mottaker Inter-M
- Mottaker Esoteric
- Mottaker Alto
- Mottaker Konig & Meyer
- Mottaker Lumantek
- Mottaker Aguilar
- Mottaker Mark Levinson
- Mottaker Selfsat
- Mottaker Proel
- Mottaker Audibax
- Mottaker Line 6
- Mottaker Luxman
- Mottaker Sound Ordnance
- Mottaker Wavtech
- Mottaker Dual
- Mottaker Parasound
- Mottaker Benchmark
- Mottaker Koda
- Mottaker Technical Pro
- Mottaker Naim
- Mottaker Anthem
- Mottaker Audison
- Mottaker Loxjie
- Mottaker Clare Controls
- Mottaker Edwards Signaling
- Mottaker Iriver
- Mottaker Hegel
- Mottaker PTN-electronics
- Mottaker Datapath
- Mottaker Sunfire
- Mottaker DLS
- Mottaker Triax
- Mottaker Xtrend
- Mottaker Nubert
- Mottaker VigilLink
- Mottaker Harper
- Mottaker SmartSystem
- Mottaker DARTS
- Mottaker ETON
- Mottaker Elipson
- Mottaker Streacom
- Mottaker Phonocar
- Mottaker Rockville
Nyeste Mottaker Manualer
3 August 2025
9 April 2025
9 April 2025
6 April 2025
5 April 2025
2 April 2025
2 April 2025
2 April 2025
31 Mars 2025
31 Mars 2025