Plieger K12 Bruksanvisning
Les nedenfor 📖 manual på norsk for Plieger K12 (2 sider) i kategorien Termostat. Denne guiden var nyttig for 39 personer og ble vurdert med 4.3 stjerner i gjennomsnitt av 20 brukere
Side 1/2

ENGLISH
-
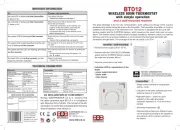
The K12 is designed specially for electrical oor heang. The oor
sensor is supplied standard with the system. Always switch o the
power before installaon or removal. The connecon should always
be carried out by a qualied electrician according to the local instruc-
ons. Please study these guidelines with cauon before installaon
and use. Save these instrucons carefully for possible later use.
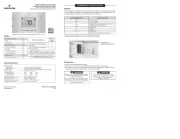
Check before installaon the power is o. Remove the cover and
protecon cap by carefully taking them o together.
Connect the sensor, power and power supply cables according to the
wiring diagram.
Place the thermostat in the right posion and fasten this with two
screws. Replace the cover and protecon cap by pressing them soly.
As soon as the power is turned back on 12.00 will appear ashing and
the thermostat can be used.
In case of a newly installed oor, allow at least three weeks drying out
periods.
Turn on the power aer having checked the installaon instrucons
carefully. In the screen the present room temperature and 12.00h will
appear ashing.
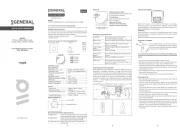
Le Note the signs, higher or lower
Middle SET: menu choice and conrmaon
Right Note the signs, higher or lower
At the boom appears “SET” above the middle buon and by pres-
sing this, the menu will appear.
The menu is made up from:
Day/Time Seng right day and me
Program Change standard week program
Temperature Adjustment standard seng
On/O On/O
Auto/Man Automac or manual
Seng day and me
1. Press the middle buon twice
2. First conrm Day/Time with the middle buon
3. Set the day on the top and conrm
4. Wait unl hour ashes. Set the correct hour and conrm
5. Wait unl minute ashes. Set the right minutes and conrm
Almost immediately automac will appear in the main screen.
The thermostat is now operave following to the standard program.
You can recognise this from the blinking of the two dots between the
hour and the minutes in the main screen. Please do not change this
program during the rst week so the thermostat can store historical
data. When power is consumed the word HEATING will appear on the
screen. If not the thermostat is funconing on stand-by.
In the menu the sengs you will nd underneath are pre-program-
med. These sengs can be adjusted by going into the menu by pres-
sing SET, select the relevant topic, conrming this and then adjusng
this with the le or right buon. Do not forget to conrm all steps
with the middle buon. Aer the last conrmaon the main screen
will appear again.
Incorrect sengs can be reset in the same way.
Choose Auto/Man and press the right buon for approx. 5 seconds.
Conrm and adjust standard sengs of:
Mo to Fri from 5.00h to 9.00h and from
17.00h to 23.00h. Sa / Sun from 9.00h to 23.00h.
Adjust comfort temperature and conrm.
Night set back will show. Adjust as below.
The dierence can be approx. 3°C for main
heang and 5°C max. for side heang. For
example: if you set a comfort temperature of 21°C
for side heang, the set back temperature should
not be lower than 16°C.
Conrm and adjust standard seng On to O or
vice versa.
Conrm and adjust standard seng Auto to Man
or vice versa.
When desirable a childproof lock can be installed by pressing the mid-
dle buon for approx. 8 seconds. A small lock will
appear in the top right of the screen. This lock can be turned o by
pressing the middle buon for 8 seconds.
When the following codes appear on the screen, rst contact your
supplier.
F1 = Sensor failure
F2 = Power failure
F3 = Memory failure
Choose Auto/Man in the menu and press the le buon for approx. 5
seconds. You now enter the service menu which is only intended for
the installer.
1 = With the ashing number you can adjust the screen contrast.
2 = Press SET - with the ashing number you can now adjust the
calibraon.
3 = Press SET - with the ashing number you can now adjust the dif-
ferenal.
4 = Press SET and the soware number appears on the screen.
To return to the main screen press SET
Power supply 230V / 16 Amp
Max. capacity 3200W
Temperature range 5°C to 40°C
IP-Class IP21
Colour RAL9010 – Polar/White
Warrantee 2 years
Examinaon CE
Manufacturer C&F Technics BV, The Netherlands
Document type
Document description
Document code and revision
Item
Date
DOC.file
Page
Modifier
Doc. no.
Replaces
Drawing
4.1.2012
1 / 1
-------- --
-------
-------
1
2345678
5678
A
B
C
D
E
FF
E
D
C
B
A
Picture for manual 1
Author
Document type
Document description
Document code and revision
Item
Date
DOC.file
Page
Modifier
Doc. no.
Replaces
Drawing
4.1.2012
1 / 1
-------- --
-------
-------
1
2345678
5678
A
B
C
D
E
FF
E
D
C
B
A
Picture for manual 2
Author
Produkspesifikasjoner
| Merke: | Plieger |
| Kategori: | Termostat |
| Modell: | K12 |
Trenger du hjelp?
Hvis du trenger hjelp med Plieger K12 still et spørsmål nedenfor, og andre brukere vil svare deg
Termostat Plieger Manualer

27 Oktober 2024

27 Oktober 2024

27 Oktober 2024

27 Oktober 2024

27 Oktober 2024
Termostat Manualer
- Wachendorff
- AEG
- Etherma
- Danfoss
- Bosch
- Bticino
- H-Tronic
- Hoffman
- Hunter
- Boneco
- Ouellet
- Magnum
- Hive
- Sygonix
- Siemens
Nyeste Termostat Manualer
19 Oktober 2025
19 Oktober 2025

9 Oktober 2025

8 Oktober 2025
6 Oktober 2025
6 Oktober 2025
6 Oktober 2025
24 September 2025

24 September 2025
24 September 2025