Samsung GX10 Bruksanvisning

Les nedenfor 📖 manual på norsk for Samsung GX10 (120 sider) i kategorien Ikke kategorisert. Denne guiden var nyttig for 16 personer og ble vurdert med 4.5 stjerner i gjennomsnitt av 2 brukere

Side 1/120
ŝ1Ş
For Safe Use of Your Camera
Thank you for buying a Samsung Digital Camera.
ƃ Prior to using this camera, please read this user manual thoroughly.
ƃ When you require After Sales service, please bring the camera and the cause of the camera
malfunction (such as battery, Memory card etc.) to the After Sales centre.
ƃ To avoid disappointment please ensure that your camera is operating properly well before you intend
to use it (e.g. for a trip or an important event). Samsung Cameras take no responsibility for any loss
or damages that may result from camera malfunction.
ƃ Keep the manual in a safe place.
Ҭ Microsoft, Windows and Windows logo are registered trademarks of Microsoft Corporation
incorporated in the United States and/or other countries.
Ҭ All brand and product names appearing in this manual are registered trademarks of their respective
companies.
ſ Specifications are subject to change without prior notice.
DANGER
DANGER indicates an imminently hazardous situation which, if not avoided, will result
in death or serious injury.
WARNING
WARNING indicates a potentially hazardous situation, which, if not avoided, could
result in death or serious injury.
CAUTION
CAUTION indicates a potentially hazardous situation, which, if not avoided, may result
in a minor or moderate injury.
This manual contains instructions that will help you to use this camera safely and correctly.
This will help prevent danger and injury to others.
ŝ2Ş
Danger
Warning
ƈ Do not use the flash in close proximity to people or animals. Positioning the flash too close to your
subject’s eyes, may cause eyesight damage.
ƈ When taking photographs, never point the lens of the camera directly into very strong light. This may
result in permanent damage to your eyesight.
ƈ For safety reasons keep this product and accessories out of reach of children or animals to prevent
accidents e.g.:
ҮSwallowing batteries or small camera accessories. If an accident should occur, please consult a
doctor immediately.
ҮThere is the possibility of injury from the camera’s moving parts.
ƈ Batteries and camera may become hot during prolonged use which may result in camera malfunction.
Should this be the case, allow the camera to sit idle for a few minutes to allow it time to cool.
ƈ Do not leave this camera in places subject to extremely high temperatures, such as a sealed vehicle,
direct sunlight or other places of extreme variations in temperature.
Exposure to extreme temperatures may adversely affect the cameraŖs internal components and could
cause a fire.
ƈ When in use, do not cover the camera or AC Power Adapter. This may cause heat to build up and
distort the camera body or cause a fire. Always use the camera and its accessories in a well-ventilated
area.
ƈ Do not attempt to modify this camera in any way. This may result in fire, injury, electric shock or
severe damage to you or your camera. Internal inspection, maintenance and repairs should be
carried out by your dealer or Samsung Camera Service centre.
ƈ Please do not use this product in close proximity to flammable or explosive gases, as this could
increase the risk of explosion.
ƈ Should any form of liquid or a foreign object enter the camera, do not use it. Switch off the camera,
and then disconnect the power source (batteries or AC Power Adapter).
You must contact your dealer or Samsung Camera Service centre. Do not continue to use the
camera as this may cause a fire or electric shock.
ƈ Do not insert or drop metallic or inflammable foreign objects into the camera through access points
e.g. the memory card slot and battery chamber. This may cause a fire or electric shock.
ƈ Do not operate this camera with wet hands. This could pose a risk of electric shock.
ŝ3Ş
Caution
ƈ Only use specified batteries (SLB-1674) with this camera. Use of other batteries can cause
overheating or explosion.
ƈ Do not allow metallic or inflammable foreign objects to come into contact with the battery.
ƈ Remove the battery when not planning to use the camera for a long period of time. Otherwise the
battery may leak corrosive electrolyte and permanently damage the camera’s components.
ƈ Cover the battery with the battery cap to prevent the short circuit.
ƈ Do not disassemble the battery. It may cause leakage or breakage.
ƈ If liquid from the battery enters the eyes, wash it away immediately with fresh water and consult a
doctor. It may cause loss of eyesight.
ƈ If any of the battery leakage should come in contact with skin or clothes,wash the affected areas
thoroughly with water.
ƈ If there is overheating in, or smoke from, the battery chamber, remove the battery from the camera as
soon as possible. When doing so, take care to avoid burns. And then contact your dealer or
Samsung Camera Service Centre.
ƈ The battery is expendable and its life is shortened through use. If the battery capacity is reduced by
half, purchase new one.
ƈ After removing the batteries for about 110 hour (4-5 days), the camera may be reset.
Precautions for Battery Usage
ƈ Leaking, overheating, or burst batteries could result in fire or injury.
ҮUse batteries with the correct specification for the camera.
ҮDo not short circuit, heat or dispose of battery in fire.
ҮDo not insert the batteries with polarities reversed.
ƈ Do not fire the flash while it is in contact with hands or objects. Do not touch the flash after using it
continuously. It may cause burns.
ƈ If you are using the AC power adaptor be careful when moving the camera.
After use, always switch off the camera before unplugging the adapter from the wall socket. Then
make sure that any connector cords or cables to other devices are disconnected before moving the
camera. Failure to do so may damage the cords or cables and cause a fire or electric shock.
ƈ Only D-XENON lenses can be used with this camera.
ŝ4Ş
Caution
ƈ Only use specified charger (SBC-L6) with this camera.
ƈ Other chargers can cause fire or electric shock. Observe the power specification (100-240V only) and
only charge the specified rechargeable batter (SLB-1674). Do not disassemble the charger.
It may cause fire, electric shock or malfunction.
ƈ If the charger smokes or overheats, stop using it immediately and contact your dealer or Samsung
Camera Service Centre as soon as possible.
ƈ If water gets inside the camera, stop using the camera and contact your dealer or Samsung Camera
Service Centre. It may cause fire or electric shock.
ƈ If the lightning flashes or thunder fills the air, disconnect the power plug. It may cause breakage, fire
or electric shock.
ƈ If there is dirt on the plug, clear the dirt or it may cause fire.
Precautions for Charger Usage
ŝ5Ş
Contents
For Safe Use of Your Cameraōōōōōōōōōōōōōōōōōōōōōōōōōōōōōōōōō1
Danger ōōōōōōōōōōōōōōōōōōōōōōōōōōōōōōōōōōōōōōōōōō2
Warning ōōōōōōōōōōōōōōōōōōōōōōōōōōōōōōōōōōōōōōōōōō2
Caution ōōōōōōōōōōōōōōōōōōōōōōōōōōōōōōōōōōōōōōōōōō3
Precautions for Battery Usageōōōōōōōōōōōōōōōōōōōōōōōōōōōōōōōōō3
Precautions for Charger Usage ōōōōōōōōōōōōōōōōōōōōōōōōōōōōōōōō4
Contents ōōōōōōōōōōōōōōōōōōōōōōōōōōōōōōōōōōōōōōōōō5
Contents of the Operating Manual ōōōōōōōōōōōōōōōōōōōōōōōōōōōōōō10
Before Using Your Camera
ƃGX-10 Camera Characteristics ōōōōōōōōōōōōōōōōōōōōōōōōōōōōōōō12
ƃChecking the Contents of the Package ōōōōōōōōōōōōōōōōōōōōōōōōōōō14
ƃNames of Working Parts ōōōōōōōōōōōōōōōōōōōōōōōōōōōōōōōōō15
ƈFront ōōōōōōōōōōōōōōōōōōōōōōōōōōōōōōōōōōōōōōōōō15
ƈBack ōōōōōōōōōōōōōōōōōōōōōōōōōōōōōōōōōōōōōōōōō15
ƈTop ōōōōōōōōōōōōōōōōōōōōōōōōōōōōōōōōōōōōōōōōōō16
ƈSideōōōōōōōōōōōōōōōōōōōōōōōōōōōōōōōōōōōōōōōōōō16
ƈBottom ōōōōōōōōōōōōōōōōōōōōōōōōōōōōōōōōōōōōōōōō17
ƃUsing the Button Functions ōōōōōōōōōōōōōōōōōōōōōōōōōōōōōōōō18
ƈCapture Mode ōōōōōōōōōōōōōōōōōōōōōōōōōōōōōōōōōōōōō18
ƈPlayback mode ōōōōōōōōōōōōōōōōōōōōōōōōōōōōōōōōōōōōō21
ƃLCD Monitor Indicationsōōōōōōōōōōōōōōōōōōōōōōōōōōōōōōōōōō23
ƈWhile Power is On or Operating Mode Dial ōōōōōōōōōōōōōōōōōōōōōōōōō23
ƈCapture Mode ōōōōōōōōōōōōōōōōōōōōōōōōōōōōōōōōōōōōō24
ƈPlayback Mode ōōōōōōōōōōōōōōōōōōōōōōōōōōōōōōōōōōōōō25
ƈHistogram Display ōōōōōōōōōōōōōōōōōōōōōōōōōōōōōōōōōōōō26
ƃViewfinder Indications ōōōōōōōōōōōōōōōōōōōōōōōōōōōōōōōōōō27
ƃLCD Panel Indications ōōōōōōōōōōōōōōōōōōōōōōōōōōōōōōōōōō29
Getting Started
ƃAttaching the Strapōōōōōōōōōōōōōōōōōōōōōōōōōōōōōōōōōōōō32
ƃConnecting to a Power Source ōōōōōōōōōōōōōōōōōōōōōōōōōōōōōōō33
ƈInserting the Battery ōōōōōōōōōōōōōōōōōōōōōōōōōōōōōōōōōōō33
ƈHow to charge the exclusive rechargeable battery ōōōōōōōōōōōōōōōōōōōōōō34
ƈBattery Level Indicator / Approximate Playback Time (new batteries)ōōōōōōōōōōōōōōō36
ƈUsing the Optional AC Adapter ōōōōōōōōōōōōōōōōōōōōōōōōōōōōōō37
ƃUsing the memory card ōōōōōōōōōōōōōōōōōōōōōōōōōōōōōōōōōō38
ƈInserting / Removing the Memory Card ōōōōōōōōōōōōōōōōōōōōōōōōōōō38
ƈPrecautions When Using the Memory Card ōōōōōōōōōōōōōōōōōōōōōōōōō39
ŝ6Ş
Contents
ƈRecorded Pixels and Quality Level ōōōōōōōōōōōōōōōōōōōōōōōōōōōōō40
ƃTurning the Camera On and Off ōōōōōōōōōōōōōōōōōōōōōōōōōōōōōō41
ƃInitial Settings ōōōōōōōōōōōōōōōōōōōōōōōōōōōōōōōōōōōōōō42
ƈSetting the Display Language ōōōōōōōōōōōōōōōōōōōōōōōōōōōōōōō42
ƈSetting the Date and Time ōōōōōōōōōōōōōōōōōōōōōōōōōōōōōōōō44
ƃAttaching the Lens ōōōōōōōōōōōōōōōōōōōōōōōōōōōōōōōōōōōō46
ƃAdjusting the Viewfinder Dioptre ōōōōōōōōōōōōōōōōōōōōōōōōōōōōōō48
Basic Operations
ƃBasic Shooting Operation ōōōōōōōōōōōōōōōōōōōōōōōōōōōōōōōōō50
ƈHolding the Camera ōōōōōōōōōōōōōōōōōōōōōōōōōōōōōōōōōōō50
ƈLetting the Camera Choose the Optimal Settings ōōōōōōōōōōōōōōōōōōōōōōō51
ƈOperating the shutter release button ōōōōōōōōōōōōōōōōōōōōōōōōōōōō53
ƈHard-to-Autofocus Subjects ōōōōōōōōōōōōōōōōōōōōōōōōōōōōōōōō54
ƃOPS (Optical Picture Stabilisation) ōōōōōōōōōōōōōōōōōōōōōōōōōōōōō55
ƈOptical Picture Stabilisation ōōōōōōōōōōōōōōōōōōōōōōōōōōōōōōōō55
ƈShake Reduction Function and Lens Focal Length / Turning On the OPS Functionōōōōōōōōō56
ƈSetting the OPS Function ōōōōōōōōōōōōōōōōōōōōōōōōōōōōōōōōō57
ƃUsing the RAW button ōōōōōōōōōōōōōōōōōōōōōōōōōōōōōōōōōō59
ƃOther Shooting Modes ōōōōōōōōōōōōōōōōōōōōōōōōōōōōōōōōōō60
ƈContinuous Shootingōōōōōōōōōōōōōōōōōōōōōōōōōōōōōōōōōōō60
ƈSelf-Timer Shooting ōōōōōōōōōōōōōōōōōōōōōōōōōōōōōōōōōōō62
ƈRemote Control Shooting (Remote Control F : Sold Separately)ōōōōōōōōōōōōōōōōō65
ƈUsing Mirror Lock Up Function to Prevent Camera Shake ōōōōōōōōōōōōōōōōōōō68
ƃUsing the Zoom Lensōōōōōōōōōōōōōōōōōōōōōōōōōōōōōōōōōōō69
ƃUsing the Built-in Flash ōōōōōōōōōōōōōōōōōōōōōōōōōōōōōōōōōō70
ƈSelecting Flash Mode ōōōōōōōōōōōōōōōōōōōōōōōōōōōōōōōōōō71
ƈUsing Auto Discharge , ōōōōōōōōōōōōōōōōōōōōōōōōōōōōō72
ƈUsing Fill-in Flash , ōōōōōōōōōōōōōōōōōōōōōōōōōōōōōōō73
ƈUsing Red-eye Reduction Flash / Daylight-Sync Shooting ōōōōōōōōōōōōōōōōōōō74
ƈCompensating Flash Outputōōōōōōōōōōōōōōōōōōōōōōōōōōōōōōōō75
ƃUsing the White Balance ōōōōōōōōōōōōōōōōōōōōōōōōōōōōōōōōō76
ƈSetting the White Balance ōōōōōōōōōōōōōōōōōōōōōōōōōōōōōōōō76
ƈAdjusting the White Balance Manually ōōōōōōōōōōōōōōōōōōōōōōōōōōō78
ƈFine-Tuning the White Balance ōōōōōōōōōōōōōōōōōōōōōōōōōōōōōō80
ƃUsing the ISO sensitivity ōōōōōōōōōōōōōōōōōōōōōōōōōōōōōōōōō82
ƈSetting the Sensitivity ōōōōōōōōōōōōōōōōōōōōōōōōōōōōōōōōōō82
ƈSetting the Range of Automatic Correction in AUTOōōōōōōōōōōōōōōōōōōōōōō83
ƃPlaying Back Still Pictures ōōōōōōōōōōōōōōōōōōōōōōōōōōōōōōōōō84
ƈPlaying Back Imagesōōōōōōōōōōōōōōōōōōōōōōōōōōōōōōōōōōō84
ŝ7Ş
Contents
ƈRotating Imagesōōōōōōōōōōōōōōōōōōōōōōōōōōōōōōōōōōōōō85
ƈEnlarging Playback Images ōōōōōōōōōōōōōōōōōōōōōōōōōōōōōōōō86
ƈDisplaying Multiple Images ōōōōōōōōōōōōōōōōōōōōōōōōōōōōōōōō88
ƈSelecting the Number of Images to Display / Displaying a Folder ōōōōōōōōōōōōōōōō89
ƈSlideshow ōōōōōōōōōōōōōōōōōōōōōōōōōōōōōōōōōōōōōōō90
ƈConnecting the Camera to AV Equipment ōōōōōōōōōōōōōōōōōōōōōōōōōō92
ƈDigital Filters ōōōōōōōōōōōōōōōōōōōōōōōōōōōōōōōōōōōōōō93
ƈEditing RAW Imagesōōōōōōōōōōōōōōōōōōōōōōōōōōōōōōōōōōō96
ƃDeleting Images ōōōōōōōōōōōōōōōōōōōōōōōōōōōōōōōōōōōōō98
ƈDeleting a Single Image ōōōōōōōōōōōōōōōōōōōōōōōōōōōōōōōōō98
ƈDeleting All Images ōōōōōōōōōōōōōōōōōōōōōōōōōōōōōōōōōōō99
ƈDeleting Selected Images (from Nine-Image Display)ōōōōōōōōōōōōōōōōōōōōō100
ƈDeleting images taken with the RAW button ōōōōōōōōōōōōōōōōōōōōōōōō102
ƃProtecting Imagesōōōōōōōōōōōōōōōōōōōōōōōōōōōōōōōōōōōō103
ƈProtecting Images from Deletion (Protect) ōōōōōōōōōōōōōōōōōōōōōōōōō103
ƈProtecting All Images ōōōōōōōōōōōōōōōōōōōōōōōōōōōōōōōōōō104
ƃSetting the Printing Service (DPOF) ōōōōōōōōōōōōōōōōōōōōōōōōōōōō105
ƈPrinting Single Images ōōōōōōōōōōōōōōōōōōōōōōōōōōōōōōōōō105
ƈSettings for All Images ōōōōōōōōōōōōōōōōōōōōōōōōōōōōōōōōō107
ƃPrinting Using PictBridge ōōōōōōōōōōōōōōōōōōōōōōōōōōōōōōōōō108
ƈSetting USB ōōōōōōōōōōōōōōōōōōōōōōōōōōōōōōōōōōōōōō109
ƈConnecting the Camera to the Printer ōōōōōōōōōōōōōōōōōōōōōōōōōōō110
ƈPrinting Single Images ōōōōōōōōōōōōōōōōōōōōōōōōōōōōōōōōō111
ƈPrinting All Images ōōōōōōōōōōōōōōōōōōōōōōōōōōōōōōōōōōō113
ƈPrinting Images Using the DPOF Settings / Disconnecting the Cable from the Printer ōōōōōōō115
Button, Menu, Mode dial Reference
ƃUsing the Menuōōōōōōōōōōōōōōōōōōōōōōōōōōōōōōōōōōōōō118
ƈHow to Operate the Menu ōōōōōōōōōōōōōōōōōōōōōōōōōōōōōōōō118
ƈSelect a menu item and set ōōōōōōōōōōōōōōōōōōōōōōōōōōōōōōō119
ƈ[CAPTURE MENU] Menu Settings ōōōōōōōōōōōōōōōōōōōōōōōōōōōō120
ƈSetting the Image Tone ōōōōōōōōōōōōōōōōōōōōōōōōōōōōōōōōō121
ƈSetting the File Format / Setting the JPEG Recorded Pixels ōōōōōōōōōōōōōōōōōō122
ƈSetting the JPEG Quality Level ōōōōōōōōōōōōōōōōōōōōōōōōōōōōōō123
ƈSetting the Saturation / Sharpness / Contrast ōōōōōōōōōōōōōōōōōōōōōōōō124
ƈStoring User Settings ōōōōōōōōōōōōōōōōōōōōōōōōōōōōōōōōōō125
ƈSetting the Colour Space ōōōōōōōōōōōōōōōōōōōōōōōōōōōōōōōō126
ƈShooting in Extended Bracket Mode / Shooting in Multi-exposure Mode ōōōōōōōōōōōōō127
ƈMemory setting ōōōōōōōōōōōōōōōōōōōōōōōōōōōōōōōōōōōō128
ƈOptical Picture stabilisation (OPS) / Exposure mode ōōōōōōōōōōōōōōōōōōōōō129
ŝ8Ş
Contents
ƃ[CUSTOM1 MENU] Menu Setting Items ōōōōōōōōōōōōōōōōōōōōōōōōōō130
ƈLinking AF Point and AE / Superimpose ōōōōōōōōōōōōōōōōōōōōōōōōōō131
ƈAF in remote control / AF Button Function ōōōōōōōōōōōōōōōōōōōōōōōōō132
ƈAF by Press Halfway / EV Steps ōōōōōōōōōōōōōōōōōōōōōōōōōōōōō133
ƈMeter Operating Time / AE-L with AF locked ōōōōōōōōōōōōōōōōōōōōōōōō134
ƈProgram Line / Auto EV Compensation ōōōōōōōōōōōōōōōōōōōōōōōōōō135
ƈFine tune when AWB / WB when using flash ōōōōōōōōōōōōōōōōōōōōōōōō136
ƈAdjusting the White Balance with Color Temperature / Noise Reduction ōōōōōōōōōōōōō137
ƈISO Warning ōōōōōōōōōōōōōōōōōōōōōōōōōōōōōōōōōōōōō138
ƈISO sensitivity step / Reset Custom Function1 ōōōōōōōōōōōōōōōōōōōōōōō139
ƈ[CUSTOM2 MENU] Menu Setting Items ōōōōōōōōōōōōōōōōōōōōōōōōōō140
ƈAuto Bracketing order / Green Button in Manual mode ōōōōōōōōōōōōōōōōōōōō141
ƈAperture Ring Use ōōōōōōōōōōōōōōōōōōōōōōōōōōōōōōōōōōō142
ƈe-dial functions on the P / Sv / Tv / Av mode ōōōōōōōōōōōōōōōōōōōōōōōō142
ƈOne-touch RAW + / Recordable Image No. ōōōōōōōōōōōōōōōōōōōōōōōōō144
ƈAllowing Shooting while Charging Flash / Selecting the Preview Methodōōōōōōōōōōōōō145
ƈInitial zoom display / Auto Image Rotation ōōōōōōōōōōōōōōōōōōōōōōōōō146
ƈSaving rotation information / Illuminating LCD panel ōōōōōōōōōōōōōōōōōōōōō147
ƈReset Custom Function2 ōōōōōōōōōōōōōōōōōōōōōōōōōōōōōōōō148
ƃ[SETUP MENU] Menu Setting Items ōōōōōōōōōōōōōōōōōōōōōōōōōōōō149
ƈFormatting the Memory Card ōōōōōōōōōōōōōōōōōōōōōōōōōōōōōōō150
ƈTurning the Beep On and Offōōōōōōōōōōōōōōōōōōōōōōōōōōōōōōō151
ƈChanging the Date and Time and the Display Style ōōōōōōōōōōōōōōōōōōōōō152
ƈSetting the World Time ōōōōōōōōōōōōōōōōōōōōōōōōōōōōōōōōō153
ƈList of World Time Citiesōōōōōōōōōōōōōōōōōōōōōōōōōōōōōōōōō155
ƈSetting the Display Language / Guide Display Time ōōōōōōōōōōōōōōōōōōōōō156
ƈAdjusting the Brightness of the LCD Monitor ōōōōōōōōōōōōōōōōōōōōōōōō157
ƈSelecting the Video Output Format ōōōōōōōōōōōōōōōōōōōōōōōōōōōō158
ƈUSB (Selecting an external device) / Setting Auto Power Offōōōōōōōōōōōōōōōōōō159
ƈSelecting the Folder Nameōōōōōōōōōōōōōōōōōōōōōōōōōōōōōōōō160
ƈCleaning the CCD ōōōōōōōōōōōōōōōōōōōōōōōōōōōōōōōōōōō161
ƈRemoving the dust ōōōōōōōōōōōōōōōōōōōōōōōōōōōōōōōōōōō163
ƈReset ōōōōōōōōōōōōōōōōōōōōōōōōōōōōōōōōōōōōōōōō164
ƃ[PLAYBACK MENU] Menu Setting Items / Exposure warning ōōōōōōōōōōōōōōōōō165
ƈInstant View ōōōōōōōōōōōōōōōōōōōōōōōōōōōōōōōōōōōōōō166
ƈDigital Preview / Digital Filter ōōōōōōōōōōōōōōōōōōōōōōōōōōōōōōō167
ƈSlide show ōōōōōōōōōōōōōōōōōōōōōōōōōōōōōōōōōōōōōō168
ƃUsing the Fn Menu ōōōōōōōōōōōōōōōōōōōōōōōōōōōōōōōōōōō169
ƈCapture Mode ōōōōōōōōōōōōōōōōōōōōōōōōōōōōōōōōōōōōō169
ƈPlayback Mode ōōōōōōōōōōōōōōōōōōōōōōōōōōōōōōōōōōōō170
ŝ9Ş
Contents
ƃUsing the Mode Dialōōōōōōōōōōōōōōōōōōōōōōōōōōōōōōōōōōō171
ƈUsing the (AUTO) modeōōōōōōōōōōōōōōōōōōōōōōōōōōōōōōō173
ƈUsing the P (Program) mode ōōōōōōōōōōōōōōōōōōōōōōōōōōōōōōō174
ƈUsing the Hyper-program Mode ( ) ōōōōōōōōōōōōōōōōōōōōōōōōōōō175
ƈUsing the Sv (Sensitivity Priority) Mode ōōōōōōōōōōōōōōōōōōōōōōōōōō176
ƈUsing the Tv (Shutter Priority) Modeōōōōōōōōōōōōōōōōōōōōōōōōōōōō177
ƈUsing the Av (Aperture Priority) Mode ōōōōōōōōōōōōōōōōōōōōōōōōōōō179
ƈUsing the TAv (Shutter & Aperture Priority) Mode ōōōōōōōōōōōōōōōōōōōōōō181
ƈUsing M (Hyper-manual) Mode ōōōōōōōōōōōōōōōōōōōōōōōōōōōōōō182
ƈEV Bar ōōōōōōōōōōōōōōōōōōōōōōōōōōōōōōōōōōōōōōōō184
ƈUsing the B (Bulb) Mode ōōōōōōōōōōōōōōōōōōōōōōōōōōōōōōōō186
ƈUsing the X (Flash X-Sync Speed) Modeōōōōōōōōōōōōōōōōōōōōōōōōōō187
ƈUsing the USER Mode ōōōōōōōōōōōōōōōōōōōōōōōōōōōōōōōōō187
Basic Function
ƃChecking the Composition, Exposure and Focus Before Shooting ōōōōōōōōōōōōōōō190
ƃFocusing ōōōōōōōōōōōōōōōōōōōōōōōōōōōōōōōōōōōōōōō192
ƃSetting the Exposure ōōōōōōōōōōōōōōōōōōōōōōōōōōōōōōōōōō199
ƃUsing the Built-in Flash ōōōōōōōōōōōōōōōōōōōōōōōōōōōōōōōōō208
ƃUsing an External Flash (Optional)ōōōōōōōōōōōōōōōōōōōōōōōōōōōōō212
Software information
ƃSoftware Notes ōōōōōōōōōōōōōōōōōōōōōōōōōōōōōōōōōōōōō218
ƃAbout the software ōōōōōōōōōōōōōōōōōōōōōōōōōōōōōōōōōōō219
ƃSetting up the application softwareōōōōōōōōōōōōōōōōōōōōōōōōōōōōō220
ƃRemovable Disk ōōōōōōōōōōōōōōōōōōōōōōōōōōōōōōōōōōōō223
ƃRemoving the removable diskōōōōōōōōōōōōōōōōōōōōōōōōōōōōōōō225
ƃDigimax Masterōōōōōōōōōōōōōōōōōōōōōōōōōōōōōōōōōōōōō227
ƃDigimax RAW Converter ōōōōōōōōōōōōōōōōōōōōōōōōōōōōōōōōō232
Appendix
ƃDefault Settingsōōōōōōōōōōōōōōōōōōōōōōōōōōōōōōōōōōōōō234
ƃOptional Accessories ōōōōōōōōōōōōōōōōōōōōōōōōōōōōōōōōōō239
ƃError Messages ōōōōōōōōōōōōōōōōōōōōōōōōōōōōōōōōōōōō241
ƃTroubleshooting ōōōōōōōōōōōōōōōōōōōōōōōōōōōōōōōōōōōō243
ƃMain Specifications ōōōōōōōōōōōōōōōōōōōōōōōōōōōōōōōōōōō248
ƃGlossary ōōōōōōōōōōōōōōōōōōōōōōōōōōōōōōōōōōōōōōō250
ƃIndex ōōōōōōōōōōōōōōōōōōōōōōōōōōōōōōōōōōōōōōōōō254
ŝ10Ş
Contents of the Operating Manual
This operating manual contains the following chapters.
1. Before Using Your Camera
Explains camera characteristics, accessories and the names of various parts.
2. Getting Started
Explains your first steps from purchasing the camera to taking pictures. Be sure to read it and follow
the instructions.
3. Basic Operations
Explains the basic procedures for taking, playing back, and printing still pictures.
4. Menu Reference
Understand how to use and access the buttons and menus of the GX-10.
5. Function Reference
Introduces functions to further enhance your GX-10 experience.
6. Software information
Explains software installation and how to use the program.
7. Appendix
Explains troubleshooting, introduces optional accessories and provides various resources.
ŝ11Ş
Check the package contents and names of working parts before use.
GX-10 Camera Characteristics ōōōōōōōōōōōōōōōōōōōōōō12
Checking the Contents of the Package ōōōōōōōōōōōōōōōōōō14
Names of Working Partsōōōōōōōōōōōōōōōōōōōōōōōōōō15
Using the Button Functions ōōōōōōōōōōōōōōōōōōōōōōōō18
LCD Monitor Indications ōōōōōōōōōōōōōōōōōōōōōōōōōō23
Viewfinder Indications ōōōōōōōōōōōōōōōōōōōōōōōōōōō27
LCD panel Indications ōōōōōōōōōōōōōōōōōōōōōōōōōōō29
1
Before Using Your Camera
ŝ12Ş
ƃ Features a 23.5x15.7 mm CCD with 10.14 million effective pixels for superior definition and a wide
dynamic range.
ƃ Coupled CCD shift type OPS (Optical Picture Stabilization) function. This feature will minimise
camera shake.
ƃ Features an Auto-Focus sensor with 11 focusing points. The central 9 are wide cross area sensors.
ƃ Improved manual focusing using a viewfinder similar to a conventional 35 mm SLR camera, with
0.95x magnification. Also features a superimpose function in which the focus points on the viewfinder
illuminate red.
ƃ Features a Digital Preview function for checking the image to ensure that the desired result is
achieved.
ƃ Features a large 2.5-inch LCD monitor with 210,000 pixels and a brightness adjusting function for
high-precision viewing performance.
ƃ The large, high-resolution LCD monitor and clear menus make the camera easy to operate.
ƃ The SP coated CCD minimises dust. Any remaining dust can be removed with CCD clear function.
ƃ You can select JPEG or RAW image format. Or you can select JPEG and PAW at the same time.
ƃ This is a dustproof and damp proof camera for safe outdoor shooting.
GX-10 Camera Characteristics
ŝ13Ş
GX-10 Camera Characteristics
The captured area (view angle) will differ between the GX-10 and 35 mm SLR cameras even if the
same lens is used because the format size for 35 mm film and the CCD are different.
Sizes for 35 mm film and CCD
35 mm film : 36x24 mm
GX-10 CCD : 23.5x15.7 mm
Angles of view being equal, the focal length of a lens used with a 35 mm camera must be
approximately 1.5 times longer than that of GX-10. To obtain a focal length framing the same area,
divide the focal length of the 35 mm lens by 1.5.
Example) To capture the same image as a 150 mm lens attached to a 35 mm camera
150÷1.5=100
Use a 100 mm lens with the GX-10.
Conversely, multiply the focal length of the lens used with GX-10 by 1.5 to determine the focal
length for 35 mm cameras.
Example) If 300 mm lens is used with GX-10
300x1.5=450
Focal length is equivalent to 450 mm lens on a 35 mm camera.
ŝ14Ş
Please check that you have the correct contents before using this product. The contents can vary
depending on the sales region. To buy the optional equipment, contact your nearest Samsung dealer or
Samsung service centre.
Hot shoe cover
(Installed on camera)
Eyecup
(Installed on camera)
Viewfinder cap
Body mount cover
(Installed on camera)
USB cable Video cable
Software (CD-ROM) Strap
Charger (SBC-L6) AC cord
Rechargeable battery
(SLB-1674)
Operating Manual
(this manual)
Checking the Contents of the Package
ŝ15Ş
Names of Working Parts
MENU button
Playback ( ) button
Delete ( ) button
INFO button
Mirror
Focus mode
lever
AF coupler
Lens information contacts
Lens unlock button
Self-Timer lamp /
Remote control receiver
LCD monitor
Fn button
AE-L / button
Four-way controller
OK button
Rear e-dial
Focus (AF) button
Lens mount index
Front e-dial
Flash ( )
pop-up button
Strap
Exposure
Bracket button
Viewfinder
Self-Timer lamp / Remote control receiver
Card access lamp
(Optical Picture
Stabilization) lever
Focus point selection dial
Front
Back
RAW button
Exposure Compensation ( ) / LCD panel lamp button
ŝ16Ş
Names of Working Parts
Built-in Flash
Hot shoe
Mode dial
DC input terminal
Side
Top
Cable switch port
USB / Video
terminal
Terminal Cover
Card cover
Memory Card
Slot
LCD panel
Strap
Front e-dial
Main Switch
Strap
Dioptre adjustment
lever
Shutter Button
Green button
Rear e-dial
Metering Lever
Card cover lock
Connection ports Memory Card Slot
ŝ17Ş
Names of Working Parts
Bottom
Tripod socket
Battery cover &
Lock lever
Battery Chamber cover
Battery Chamber
Battery Holder
Battery Chamber
ŝ18Ş
Using the Button Functions
ƈ Functions of buttons used during shooting.
ڹ Shutter release button
Press to capture images. (p.53)
ں Main switch
Move to turn the power on/off (p.41) and confirm the depth of field (Preview) (p.190).
ڻ Lens unlock button
Press to detach lens. (p.47)
ڼ Focus mode lever
Switches between Autofocus mode (p.192) and Manual focus mode (p.197).
ڽ RAW button
Press to capture a JPEG and RAW file at the same time. (p.59)
ھ Flash pop-up button ( )
Press to pop up the built-in flash. (p.72)
ڹ
ں
ڻ
ڼ
ھ
ڽ
Capture Mode
ŝ19Ş
Using the Button Functions
ڹ
ڻ
ڼ
ڽ
ۀ
ۃ
ۄ
ں
ہ
ۂ
ڿ
ھ
ڹ Exposure bracket button
Sets the Exposure bracket. (p.206)
ں MENU button
Displays the [CAPTURE MENU], [CUSTOM1 MENU], [CUSTOM2 MENU], [SETUP MENU] and
[PLAYBACK MENU] menu. (p.118)
ڻ INFO button
Press to show shooting information on the LCD monitor. (p.24)
ڼ button
Switches to the Playback mode. (p.84)
ڽ Fn button
Press to display the Fn menu. Press the four-way controller (ƊƌȜȞ) to choose the next operation.
(p.169)
ھ Optical Picture Stabiliser ( ) button
Switches on or off the OPS function. (p.55)
ڿ Four-way controller (ƊƌȜȞ)
Uses it to move cursor or change items in menus and Fn menu.
ۀ OK button
Saves the setting you selected in the menu.
ہ Focus position dial
Press to select a focus position. (p.194)
ۂ AF button
Focuses on the subject and get the proper metering. (p.132)
ۃ AE-L button
Locks the exposure before shooting. (p.205)
ۄ EV ( ) / LCD panel lamp button
Holding this button, rotate the front e-dial to compensate the exposure. (p.204)
Press this button to turn on the LCD panel lamp.
ŝ20Ş
Using the Button Functions
ڹ Metering mode lever
Changes the metering modes. (p.202)
ں Mode dial
Changes the camera modes. (p.171)
ڻ Rear e-dial
Sets aperture ISO sensitivity values.
ڼ Green button
Resets exposure settings and automatically adjusts the appropriate exposure in a M (Manual) mode.
ڽ Front e-dial
Sets shutter speed and EV compensation values.
ڹ
ڻ
ڼ
ڽ
ں
ŝ21Ş
Using the Button Functions
ƈ Functions of buttons used during playback.
ڹ
ں
Playback mode
ڼ
ڹ Front e-dial
Use it to display the previous or next image in magnified playback (p.86) or adjust the digital filter.
(p.93)
ں Main switch
Move to turn the camera on and off. (p.41)
ڻ Shutter release button
Press to switch to capture mode.
ڼ Rear e-dial
Sets the Exposure values.
Use it to enlarge an image or display multiple images at the same time. (p.86)
Use to select a digital filter. (p.93)
ڻ
ŝ22Ş
Using the Button Functions
ڹ MENU button
Press to display the [CAPTURE MENU], [PLAYBACK MENU], [CUSTOM1 MENU], [CUSTOM2
MENU] and [SETUP MENU] menu. (p.118)
ں button
Press to delete images. (p.98)
ڻ INFO button
Press to show shooting information on the LCD monitor. (p.84)
ڼ button
Press to switch to capture mode.
ڽ Fn button
Press to display the Fn menu. Press the four-way controller (ƊƌȜȞ) to choose your next
operation. (p.170)
ھ Four-way controller (ƊƌȜȞ)
Uses it to move cursor or change items in menus, Fn menu and playback screen.
ڿ OK button
Saves the setting you selected in the menu or playback screen.
ۀ AE-L / button
Locks the exposure of the shooting conditions. (p.205)
Press to protect images from being accidentally erased. (p.103)
ڻ
ڼ
ڽ
ڿ
ۀ
ڹ
ں
ھ
ŝ23Ş
LCD Monitor Indications
ƈ The following indicators appear on the LCD monitor depending
on the status of the camera.
ƈ Guides appear on the LCD monitor for 3 seconds when powered on or setting dial mode.
LCD monitor
While Power is On or Operating Mode Dial
* Indicators 3, 4, 5, 6 and 7 only appear when the setting other
than the default setting is selected. 11 only appears when
World Time is On.
1. Flash mode (Active mode
appears) (p.70)
2.
Drive mode / Auto Bracket /
Multi Exposure (p.60)
3. Metering type (p.202)
4. AF mode (p.192)
5. Focus Point Information
(p.194)
6. White balance (p.76)
7. Sensitivity (p.82)
8. Shooting mode (Mode dial
position) (p.171)
9. e-dial information (p.142)
10. Battery Status (p.36)
11. World time warning
display (p.153)
12. Date and time (p.152)
13. Custom mode (p.187)
14. Exposure mode (p.171)
15. Button Guide
Progrm Automatic
Exposure
ƃ Select [Off] for [Guide Display] in [SETUP MENU] to hide indicators. (p.156)
INFORMATION
ŝ24Ş
LCD Monitor Indications
ƈ Press the INFO button in capture mode to display the capture function settings on the LCD monitor
for 15 seconds.
1. Shooting mode (p.171)
2. Custom mode (p.187)
3. Metering mode (p.202)
4. Flash mode (p.70)
5. Drive mode (p.60)
6. Shutter Speed (p.199)
7. Aperture Value (p.200)
8. Exposure Compensation Value (p.204)
9. Flash Exposure Value (p.75)
10. Exposure Bracket / Multi Exposure
(p.206, 127)
11. Extended Bracket (p.127)
12. Image tone (p.121)
13. ISO sensitivity (p.82)
14. ISO range (Auto) (p.83)
15. White balance (p.76)
16. GM compensation value (p.80)
17. BA compensation value (p.80)
18. Colour space (p.126)
19. File type (p.122)
20. Recorded pixels (p.122)
21. Quality level (p.123)
22. Optical Picture Stabilization (OPS)
(p.55)
23. AF mode (p.192)
24. Focus point location (p.194)
25. Lens focal length (p.57)
26. Saturation (p.124)
27. Sharpness (p.124)
28. Contrast (p.124)
29. Battery Status (p.36)
30. World tiem (p.153)
31. Date and time (p.152)
Capture Mode
Detailed Information
ŝ25Ş
LCD Monitor Indications
ƈ Press the INFO button in playback mode to display the image information on the LCD monitor.
Whenever pressing the INFO button, Basic information, Histogram, Detail information and no
information will display in that order.
1. Rotate icon (p.85)
2. Captured images
3. Metering mode
4. Flash mode
5. Drive mode
6. Exposure Bracket /
Multi Exposure
7. Exposure mode
8. Shutter Speed
9. Aperture Value
10. Exposure Compensation
Value
11. Flash Compensation Value
12. Folder name and Stored
image number (p.126, 160)
13. DPOF settings (p.105)
14. Protect icon (p.103)
15. AF mode
16. Focus point information
17. Lens focal length
18. Image tone
19. Sensitivity
20. White Balance / Colour
Temperature
21. WB compensation (GM)
22. WB compensation (BA)
23. File type
24. Image size
25. Quality
26. Colour Space
27. Date & Time
28. Saturation
29. Sharpness
30. Contrast
31. Extended Bracket
ƃ You can change the information initially displayed by pressing the PB button. (p.84)
INFORMATION
Playback Mode
* Indicators 4 (Flash mode) and 11 (Flash compensation Value) only appear when the image was
taken with flash.
Detailed Information
ŝ26Ş
LCD Monitor Indications
1. Capture quality (Image file type)
2. Image folder number and file number
3. Protect icon (p.103)
4. Histogram (Brightness)
5. DPOF settings (p.105)
6. Indicator for Brightness Histogram and
RGB Histogram
7. Histogram (R)
8. Histogram (G)
9. Histogram (B)
ƃ DPOF icon ( ) will display only when an DPOF set image is played back.
ƃ Areas where blooming occurred blink if [Exposure Warning] warning is on. (p.165)
ƃ Histogram shows you the distribution of brightness in recorded
images. If the bars in the histogram are higher towards the right,
the image may be too bright.
If the bars are higher on the left, the image may be too dark.
If the lighting conditions are too bright to check the subject by using
the LCD, checking the histogram will enable more precise exposure
control for the shots.
INFORMATION
ƈ Brightness Histogram that distributes brightness of the image and RGB Histogram that distributes
colour of the image are selectable by using the Up and Down (Ɗ, ƌ) button.
Histogram Display
[Playback] [Y Histogram] [RGB Histogram]
Pixel
Dark Bright
Distribution of brightness
ŝ27Ş
Viewfinder Indications
1. Autofocus frame
2. Spot metering frame
3. Focus point (p.194)
4. indicator
: Blinks when OPS is operating (p.55)
5. Flash status
: Appears when flash is available and blinks when flash is recommended but not set. (p.70)
6. Shutter speed
: Shutter speed when capturing or adjusting (underlined when shutter speed can be adjusted with
front e-dial). (p.199)
7. Aperture
: Aperture when capturing or adjusting (underlined when aperture can be adjusted with rear e-dial).
(p.200)
8. Focus indicator
: Appears when image is focused.
9. Manual Focus
: Appears when the Manual Focus is selected.
10. Exposure Bar
: Displays the Exposure Compensation Value. (p.184)
The differences between Current Exposure Value and Proper Exposure Value in the M mode.
ŝ28Ş
Viewfinder Indications
11. EV compensation
: Appears when EV compensation is available or in use.
12. Flash Exposure Compensation
: Appears when Flash Exposure is compensated.
13. AE Lock indicator
: Appears when AE is locked.
14. ISO sensitivity warning
: Appears when warning value is exceeded.
15. Number of recordable images / EV compensation
:
Show the number of recordable images with current quality and recorded pixel setting. (p.122, 123)
Show the number of continuous shooting recordable images. (p.144)
The differences between the compensated Exposure and proper exposure will display.
In the M mode, the exposure value can be different.
In the Sensitivity priority mode / Shutter & Aperture Priority mode, ISO sensitivity will display.
ƃ The red indication of the focus point used for autofocus lights up and is superimposed on the view
when the shutter release button is pressed halfway.
ƃ When [AF Button Function] of the [CUSTOM1 MENU] menu is set to [Cancel AF], MF icon will
display while AF button is pressed. (p.132)
ƃ In any mode with the exception of Sensitivity priority mode and Shutter & Aperture priority mode,
ISO sensitivity will display on No. 14 position while the OK button is pressed.
INFORMATION
ŝ29Ş
LCD Panel Indications
1. Shutter speed (p.199)
2. Aperture (p.200)
3. Flash mode (p.70)
: Built-in flash is ready
(when blinking, flash should be
used; or incorrect lens is
mounted)
: Red-eye reduction flash on
: Flash off
: Auto discharge
SLOW : First curtain synchro
4. Drive mode (p.60)
: Single frame
: Continuous Shot
: Self-timer
: Remote control mode
5. Exposure Bar (p.184)
6. Auto Bracket (p.206)
7. Flash Exposure Compensation indicator
(p.75)
8. Exposure compensation (p.204)
9. Battery status (p.36)
10. White Balance (If Auto WB is selected, no
icon will display) (p.76)
±: White Balance Compensation
11. ISO sensitivity warning (p.138)
12. RAW + button : RAW + (p.144)
13. Number of recordable images / EV
compensation value / PC (Pb)
(PC=Personal Computer (mass storage))
(Pb=PictBridge)
14. Multi exposure (p.127)
ƈ The following information appears in the LCD panel on top of the camera.
ŝ30Ş
MEMO
31
This chapter explains your first steps from purchasing the camera to taking pictures. Be sure to
read it and follow the instructions.
Attaching the Strap ōōōōōōōōōōōōōōōōōōōōōōōōōōōō32
Connecting to a Power Source ōōōōōōōōōōōōōōōōōōōōōō33
Using the memory card ōōōōōōōōōōōōōōōōōōōōōōōōōō38
Turning the Camera On and Offōōōōōōōōōōōōōōōōōōōōōō41
Initial Settings ōōōōōōōōōōōōōōōōōōōōōōōōōōōōōōō42
Attaching the Lens ōōōōōōōōōōōōōōōōōōōōōōōōōōōōō46
Adjusting the Viewfinder Dioptreōōōōōōōōōōōōōōōōōōōōōō48
2
Getting Started
ŝ32Ş
Attaching the Strap
1. Pass the end of the strap through the strap lug, then secure on the
inside of the clasp.
2. Pass the other end of the strap through the other strap lug on the
camera, then secure on the inside of the clasp.
ŝ33Ş
Connecting to a Power Source
ƈ Use the supplied rechargeable battery (SLB-1674). When the battery is used for the first time or is not
used for a long time, a [Low Battery] message will display.
1. Rotate the Battery cover unlock lever as shown in the
illustration (ڹ) and open the cover (ں).
ƃ Use the specified battery. Problems caused by using the other battery are not covered by the
Samsung warranty.
ƃ Do not open the battery cover or remove the batteries while the power is on.
ƃ Remove the batteries when you will not use the camera for a long while. The batteries may leak.
ƃ If the date and time settings have been reset when you insert new batteries after a long while,
follow the procedure for “Setting the Date and Time”.
ƃ Insert batteries correctly. Batteries inserted incorrectly may cause a camera breakdown. Wipe the
electrodes of the batteries before inserting.
ƃ When the battery is removed, turn off the camera first or the stored data may be deleted.
INFORMATION
Inserting the Battery
Model Name SLB-1674
Battery Type Lithium-ion
Capacity 1620mAh
Voltagy 7.4V
Charging time
(When the camera power is off)
About 150-180 Min.
ŝ34Ş
1. Insert the supplied AC cord to the power outlet and DC input port of the charger.
Connecting to a Power Source
3. Close the Battery cover and rotate the battery cover lock lever
as shown (ڹ).
2. Insert the batteries according to the + / - indicators in the
battery cover. Have the Ɗ mark on the battery facing toward
the LCD monitor and insert the battery by pressing the battery
lock lever as shown (ڹ). Insert the battery until the battery lock
is locked. To remove the battery press the battery lock lever as
shown (ڹ). When the battery pops up slightly, remove the
battery.
ƃ We recommend using AC adapter when the camera is used for a long time or is connected to a
computer.
INFORMATION
How to charge the exclusive rechargeable battery
Battery lock lever
ŝ35Ş
Connecting to a Power Source
ſ If the charging LED of the AC Charger does not turn on or
blink after inserting the rechargeable battery, please check
whether the battery is inserted correctly.
ſ You must check the battery charging status with the Charging
LED.
Charging LED Status
Being Charged Red LED is on
Charging is complete The LED is off
Charging error Red LED is blinking
Charging LED
2. Put the battery on the charger as shown.
ƃ Proper operating temperatures of the Charger are 0°C ~ 40°C. The battery may not be charged
under or over the operating temperature (Red LED is blinking). This is not the camera
malfunction.
ƃ The period of quality guarantee of charger is 1 year and Lithium ion rechargeable battery is 6
months.
ƃ A Lithium ion battery is expendable. If the working duration of a fully charged battery decreases
sharply, purchase a new one.
INFORMATION
Rated input AC100-240V (50Hz-60Hz)
Rated output DC 8.4 V/700 mA
Dimensions 60Ŧ90Ŧ30.2 mm
Weight 86 g
Charger (SBC-L6)
ŝ36Ş
ƈ You can confirm remaining battery level by checking the displayed on the LCD panel.
lit : Battery is full.
Ɛ
lit : Battery is running low.
Ɛ
lit : Battery is almost empty.
Ɛ
blink : The camera turns off after displaying a message.
ƈ The still picture storage capacity is based on measuring conditions in accordance with CIPA
standards and the playback time is based on SAMSUNG measuring conditions. Some deviation from
the above figures may occur in actual use depending on shooting mode and shooting conditions.
23Ű
Approx. 510 Min. Approx. 440 Min. Approx. 320 Min. Approx. 300 Min.
Normal
recording
Battery
Operating
Temperature
Rechargeable battery
(SLB-1674)
Playback time
Flash photography
50% use
100% use
ƃ Battery performance temporarily decreases while being used in cold conditions. When using the
camera in cold climates, have extra batteries on hand and keep them warm in your pocket.
Battery performance will return to normal when returned to room temperature.
ƃ Have extra batteries ready when travelling overseas, taking pictures in cold climates, or when you
will be taking a lot of pictures.
INFORMATION
Battery Level Indicator
Approximate Playback Time (new batteries)
Connecting to a Power Source
ŝ37Ş
1. Make sure the camera is turned off before opening the terminal cover.
2. Connect the DC terminal on the AC adapter to the DC input terminal on the camera.
3. Connect the AC plug cord to the AC adapter.
4. Plug the AC cord into the power outlet.
ƃ Make sure the camera is turned off before connecting or disconnecting the AC adapter.
ƃ Make sure connections are secure between the camera, AC adapter, AC plug cord terminal and
the power outlet. Memory Card and data will be corrupted if disconnected while camera is
recording or reading data.
ƃ Be sure to read the AC adapter SAC-82 operating manual when using the AC adapter.
ƃ The rechargeable batteries in your camera will not charge when connected to the AC adapter.
INFORMATION
1
2
3
4
ƈ AC adapter (SAC-82, optional) for PENTAX DSLR cameras can be used with SAMSUNG DSLR
cameras.
Using the Optional AC Adapter
Connecting to a Power Source
ŝ38Ş
Using the memory card
ƈ SD / SDHC memory card and Multi Media Card can be used with this camera.
ƈ Captured images are recorded on the Memory Card. Make sure the camera is turned off before
inserting or removing the Memory Card.
1. Lift up the Card Cover Lock as shown (ڹ) and rotate it to the
OPEN direction (ں) (Card cover opens ڻ).
2. Have the front of the memory card facing toward the LCD
monitor and insert the memory card.
ſ To remove the card, push it as shown.
3. Close the Card cover.
ſ Close the Card cover firmly or the camera will not turn on.
ƃ Do not remove the Memory Card while card access lamp is lit.
ƃ Always format new Memory Cards before use. Also format Memory Cards used with other
cameras. Refer to “Formatting the Memory Card” (p.150) for details on formatting.
INFORMATION
Inserting / Removing the Memory Card
ŝ39Ş
Using the memory card
ƃ The Memory Card is equipped with a write-protect switch. Setting the
switch to LOCK protects the existing data by preventing the recording
of new data, deletion of existing data or formatting of the card.
ƃ Care should be taken when removing the Memory Card immediately
after using the camera because the card may be hot.
ƃ Do not remove the Memory Card or turn the camera off while data is
being saved to the card, images are being played back, or the
camera is connected to a computer with the USB cable. This may cause the data to be lost or the
card to be damaged.
ƃ Do not bend the Memory Card or subject it to violent impact. Keep it away from water and store away
from high temperatures.
ƃ Do not remove the Memory Card during formatting. The card may be damaged beyond use.
ƃ Data on the Memory Card may be deleted in the following circumstances.
Samsung Camera does not accept any liability for data that is deleted if
(1) the Memory Card is mishandled by the user.
(2) the Memory Card is exposed to static electricity or electrical interference.
(3) the card has not been used for a long time.
(4) the card is ejected or the battery is removed while the data on the card is being recorded or
accessed.
ƃ The Memory Card has a limited service life. If it is not used for a long time, the data on the card may
become unreadable. Be sure to regularly make a backup of important data on a computer.
ƃ Avoid using or storing the card where it may be exposed to static electricity or electrical interference.
ƃ Avoid using or storing the card in direct sunlight or where it may be exposed to rapid changes in
temperature or to condensation.
ƃ For information on compatible Memory Cards, visit the Samsung Camera website or contact your
nearest Samsung Camera customer service centre.
ƃ Always format new Memory Cards. Also format Memory Cards used with other cameras.
ȵ Formatting the Memory Card (p.150)
Write-protect
switch
Precautions When Using the Memory Card
ŝ40Ş
Using the memory card
ƈ Choose the number of pixels (size) and quality level (data compression rate) of pictures according to
how you intend to use the pictures you have taken.
Pictures with larger recorded size or the more are clearer when printed.
The number of pictures that can be taken (the number of pictures that can be recorded on an
Memory Card) becomes less with larger file sizes.
The quality of the captured photo or printed picture depends on the quality level, exposure control,
resolution of the printer and a variety of other factors so you do not need to select more than the
required number of pixels. For example, to print in postcard size, 2M (1824X1216) is adequate.
Set the appropriate recorded size and quality level depending on purpose.
Choose the appropriate number of recorded pixels and quality level for images on the [CAPTURE
MENU] menu.
Ҹ Setting the Recorded Pixels (p.122)
Ҹ Setting the Quality Level (p.123)
- The above table shows the approximate image storage capacity and recording time when using a
512 MB SD Memory Card.
- The above figures may vary depending on the subject, shooting conditions, shooting mode, Memory
Card and other factors.
ƃ Recorded Pixels, Quality Level and Approximate Image Storage Capacity
30 - - -
- 104 178 306
- 174 297 512
- 474 802 1360
(3872x2592)
(3008x2000)
(1824x1216)
Recorded Pixels
Quality Level
RAW
Best Better Good
Recorded Pixels and Quality Level
ƃ Any images in excess of 500 on a single card will be saved in a new folder. But, in the Auto
Bracket mode, folders are not made though the numbers of images are over 500 until the Auto
Bracket shots are finished.
INFORMATION
10M
6M
2M
ŝ41Ş
ƈ Move the main switch to the [ON] position.
The camera will turn on. Move the main switch to the [OFF]
position to turn off the camera.
ƃ Always turn the camera off when not in use.
ƃ The power will automatically turn off when you do not perform any operations within a set period
of time. (Default setting is 1 minute) You can change the setting on the [Auto Power Off] menu of
the [SETUP MENU] menu.
To turn on the camera again, rotate the main switch or refer to the followings.
- Press the shutter button halfway down
- Press the Playback mode button
- Press the INFO button
INFORMATION
Turning the Camera On and Off
INITIAL SETTING
: Set : Cancel
Language/
Deutsch
Español
Português
Italiano
Svenska
󰶆󰵹
ŝ42Ş
Initial Settings
ƈ The first time the camera is turned on after purchasing, the “Initial Settings” screen appears on the
LCD monitor. Follow the procedure below to set the language displayed on the LCD monitor and the
current date and time. Once setting is done, these will not need to be set again when turning your
camera on.
ƈ You can choose the language in which the menus, error messages, etc. are displayed from the
following :
English, Korean, Chinese (traditional / simplified), French, German, Spanish, Portuguese, Italian,
Swedish, Dutch, Danish, and Russian.
1. Language selection menu displays.
2. Select a menu by using the four way controller (ƊƌȜȞ).
The default setting is English.
3. Press the OK button.
Setting the Display Language
4. Press the ƌ button. The menu cursor will shift to menu.
5. Press the ȜȞ button to select a city.
English
Français
INITIAL SETTING
: Set : Cancel
Language/
English
󰶆󰵹
Seoul
DST
INITIAL SETTING
: Set : Cancel
Language/
Deutsch
Español
Português
Italiano
Svenska
󰶆󰵹
English
Français
ŝ43Ş
Initial Settings
6. Press the ƌ button. The menu cursor will shift to Summer
Time menu.
ƃ When the Date / Time is not set :
If an incorrect language is selected, you can change the language on the initial menu.
1. Press the Menu button and cancel the City, Date and Time menu.
2. Turn on the camera again.
3.
The initial menu will display. Select a desired language by pressing the four way controller (ƊƌȜȞ)
and press the OK button.
ƃ When the Date / Time is set :
You can not set the initial settings again after the Date / Time was set.
In this case, do the followings to reset the initial settings.
1. Turn on the camera again.
2. Select the [ SETUP MENU] menu by pressing the Menu button.
3. Select [Language/ ] menu by pressing the four way controller (Ɗƌ).
Select a desired language by pressing the four way controller (ƊƌȜȞ) and press the OK button.
Sub menu for selecting the language displays. The language is changed.
To change the City and Date / Time, refer to the following pages.
- Refer to page 153 for changing the City
- Refer to page 152 for changing the Date / Time
INITIAL SETTING
: Set : Cancel
Language/
English
󰶆󰵹
Seoul
DST
7. Select (on) or (off) menu by pressing the four way controller.
8. Press the OK button. The screen for setting the date and time will be displayed.
󰶆󰵹
ŝ44Ş
1. Press the four-way controller (Ȟ).
The frame moves to [yy/mm/dd].
2. Use the four-way controller (Ɗƌ) to choose the date style.
3. Press the four-way controller (Ȟ).
The frame moves to [24h].
4. Use the four-way controller (Ɗƌ) to select 24h (24 hour
display) or 12h (12-hour display).
5. Press the four-way controller (Ȟ).
The frame returns to [Date Style].
6. Press the four-way controller (ƌ).
The frame moves to [Date].
ƈ Set the current date and time and the display style.
Initial Settings
Setting the Date and Time
7. Press the four-way controller (Ȟ).
The frame moves to the year.
ƃ If you press the Menu button during the initial settings, the menu set at the moment is cancelled.
In this case, the [Language/ ] menu will display when the camera is turned on.
INFORMATION
INITIAL SETTING
Date & Time
: Set : Cancel
Date Style yy/mm/dd
Date 2006
Time
00
00
01 01
24h
INITIAL SETTING
Date & Time
: Set : Cancel
Date Style yy/mm/dd
Date 2006
Time 00 00
01 01
24h
INITIAL SETTING
Date & Time
: Set : Cancel
Date Style yy/mm/dd
Date 2006
Time 00 00
01 01
24h
󰶆󰵹
ŝ45Ş
Initial Settings
8. Use the four-way controller (Ɗƌ) to set the year. Set the month and year in the same manner.
9. Press the Ȟ button. The frame returns to the [Date] menu.
10. Press the ƌ button. The frame returns to the [Time] menu.
11. Press the Ȟ button. Use the Ɗƌ buttons to set the time.
12. Press the OK button. The camera is ready to take pictures. If you set the date and time with the
menu operations, the screen will return to the [SETUP MENU] menu. Press the OK button again.
ƃ You can cancel the setting operation and switch to Capture mode during initial settings by
pressing the MENU button. In this case, the Initial Settings screen will appear again the next time
you turn the camera on.
ƃ When you finish the settings and press the OK button, the camera clock is reset to 00 seconds.
ƃ To set the exact time, press the OK button when the time signal (on the TV, radio, etc.) reaches
00 seconds.
ƃ
You can change the language and date and time settings with the menu operations. (p.152, 156)
INFORMATION
INITIAL SETTING
Date & Time
: Set : Cancel
Date Style yy/mm/dd
Date 2006
Time
00 00
01
01
24h
INITIAL SETTING
Date & Time
: Set : Cancel
Date Style yy/mm/dd
Date 2006
Time 00 00
01 01
24h
ŝ46Ş
Attaching the Lens
ƈ Only D-XENON, D-XENOGON lenses can be used with this camera.
Some functions are restricted when lenses are not set to Aperture A (Auto). Also see “Notes on
[Using Aperture Ring]”. Other lenses and accessories will not be available with factory default
settings. To allow shutter release, set [Use Aperture Ring] in [CUSTOM2 MENU] menu.
1. Check that the camera is off.
2. Remove the body mount cover (ڹ) and lens mount cover (ں).
Be sure to put the lens down with the lens mount side facing
upward to avoid damage.
3. Align the red dots on the camera and the lens, and secure by
turning the lens clockwise until it clicks.
After attaching, check that the lens is secure. Also check that
the red dots of the lens are on top and the attached portion
does not move sideways.
ƃ Turn the camera off before attaching or removing the lens to prevent unexpected lens problems.
INFORMATION
ŝ47Ş
Attaching the Lens
4. Remove the front lens cap by pushing the indicated portions
inward.
To detach the lens, hold down the lens unlock button (ڻ) and
turn the lens counterclockwise.
ƃ The body mount cover (ڹ) is a cover to prevent damage during shipping.
ƃ We assume no responsibility nor liability for accidents, damages and malfunctions resulting from
the use of lenses made by other manufacturers.
ƃ The camera body and lens mount incorporate lens information contacts and an AF coupler.
Dirt, dust, or corrosion may damage the electrical system.
Clean the contacts with a soft dry cloth.
INFORMATION

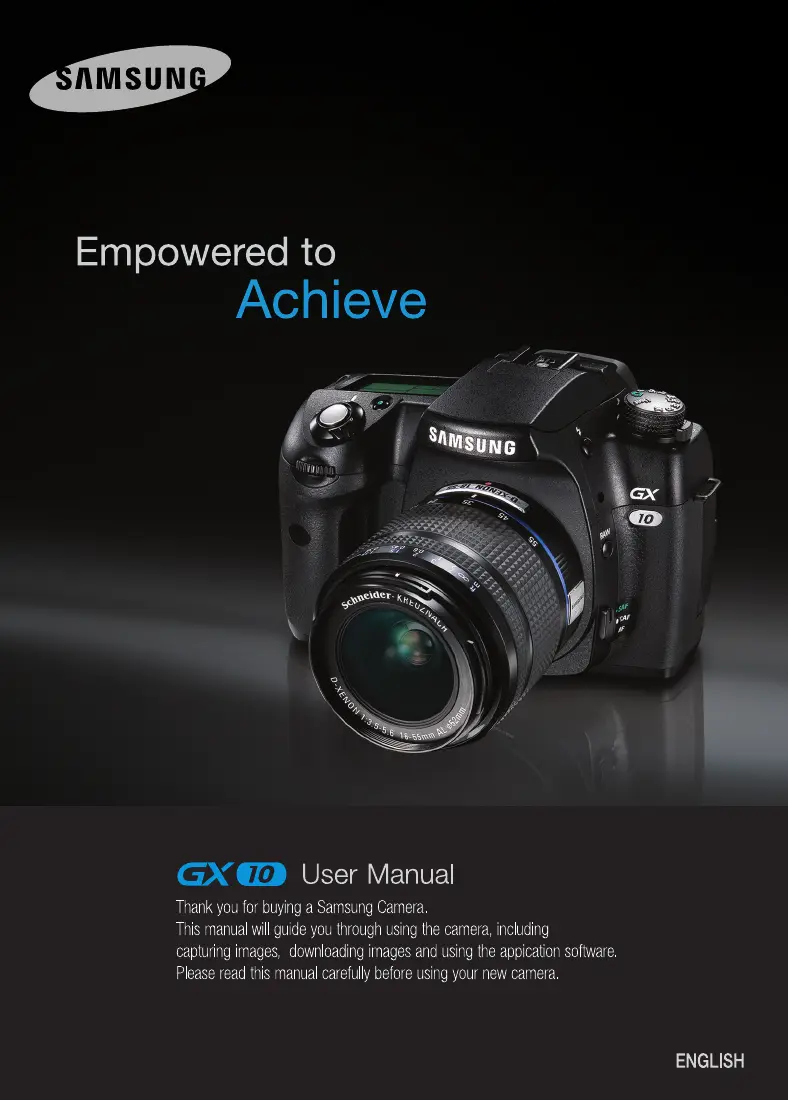
Produkspesifikasjoner

Merke: Samsung
Kategori: Ikke kategorisert
Modell: GX10
Vekt: 710 g
Bredde: 142 mm
Dybde: 71.5 mm
Høyde: 101 mm
Strømkilde: SLB-1674
Maksimal bildeoppløsning: 3872 x 2592 piksler
Digital zoom: 0 x
Optisk zoom: 10 x
Innebygd blits: Ja
Hvitbalanse: auto, Cloudy, custom modes, daylight, flash, Fluorescent, Incandescent, Shade, Tungsten
PictBridge: Ja
Bilderedigering: Roterende
Linsesystem: PENTAX KAF2
Batteriteknologi: Lithium-Ion (Li-Ion)
Sensortype: CCD
Produktfarge: Sort
Minnekortenhet: mmc, sd
Skjermdiagonal: 2.5 "
Driftstemperatur (T-T): 0 - 40 °C
Lukkerhastighet: 0.00025 - 30, 3 s
Megapiksel: 10.2 MP
Justering av fokus: Manuell
Relativ luftfuktighet under drift (H-H): 0 - 85
Videoopptaksgrensesnitt: USB 2.0, Video Output: NTSC, PAL, DC Power Input Connector
Display: LCD
Kamelukkertype: Elektronisk
Forstørring: 0.95 x
Videofunksjon: Nei
Forsinkelse selvutløser: 2, 12 s
Kameraavspilling: single image, slide show, thumbnails
Autofokus (AF)-lås: Ja
ISO-sensitivitet: 1600
Blitsmodusene: auto, fill-in, Flash off, Red-eye reduction
Autofokus (AF)-innstillinger: continuous auto focus, single auto focus
Digital SLR: Ja
Maksimalt internt minne: 512 MB
Minneoppgradering: 4 GB

Trenger du hjelp?

Hvis du trenger hjelp med Samsung GX10 still et spørsmål nedenfor, og andre brukere vil svare deg


Ikke kategorisert Samsung Manualer

Ikke kategorisert Manualer

Nyeste Ikke kategorisert Manualer