Sony ACC-HDCSN Bruksanvisning
Sony
Annet kameratilbehør
ACC-HDCSN
Les nedenfor 📖 manual på norsk for Sony ACC-HDCSN (3 sider) i kategorien Annet kameratilbehør. Denne guiden var nyttig for 27 personer og ble vurdert med 4.3 stjerner i gjennomsnitt av 14 brukere
Side 1/3
2
3
5
4
1
3
6
お買い上げいただきありがとうございます。
電気製品は安全のための注意事項を守ら
ないと、火災や人身事故になることがあ
ります。
この取扱説明書には、事故を防ぐための重要な注意事項
と製品の取り扱いかたを示しています。この取扱説明書
をよくお読みのうえ、製品を安全にお使いください。お
読みになったあとは、いつでも見られるところに必ず保
管してください。
ACC-CSBN
は以下のアクセサリーを同梱しています。
リチャージャブルバッテリーパック(
NP-BN1
)
(1)
バッテリーチャージャー(
BC-CSN/BC-CSNB
)
(1)
印刷物一式
各部名称
1
バッテリー
マーク
2
バッテリー
3
電源プラグ
4
チャージャー
マーク
5 CHARGE
ランプ
6
コンセント
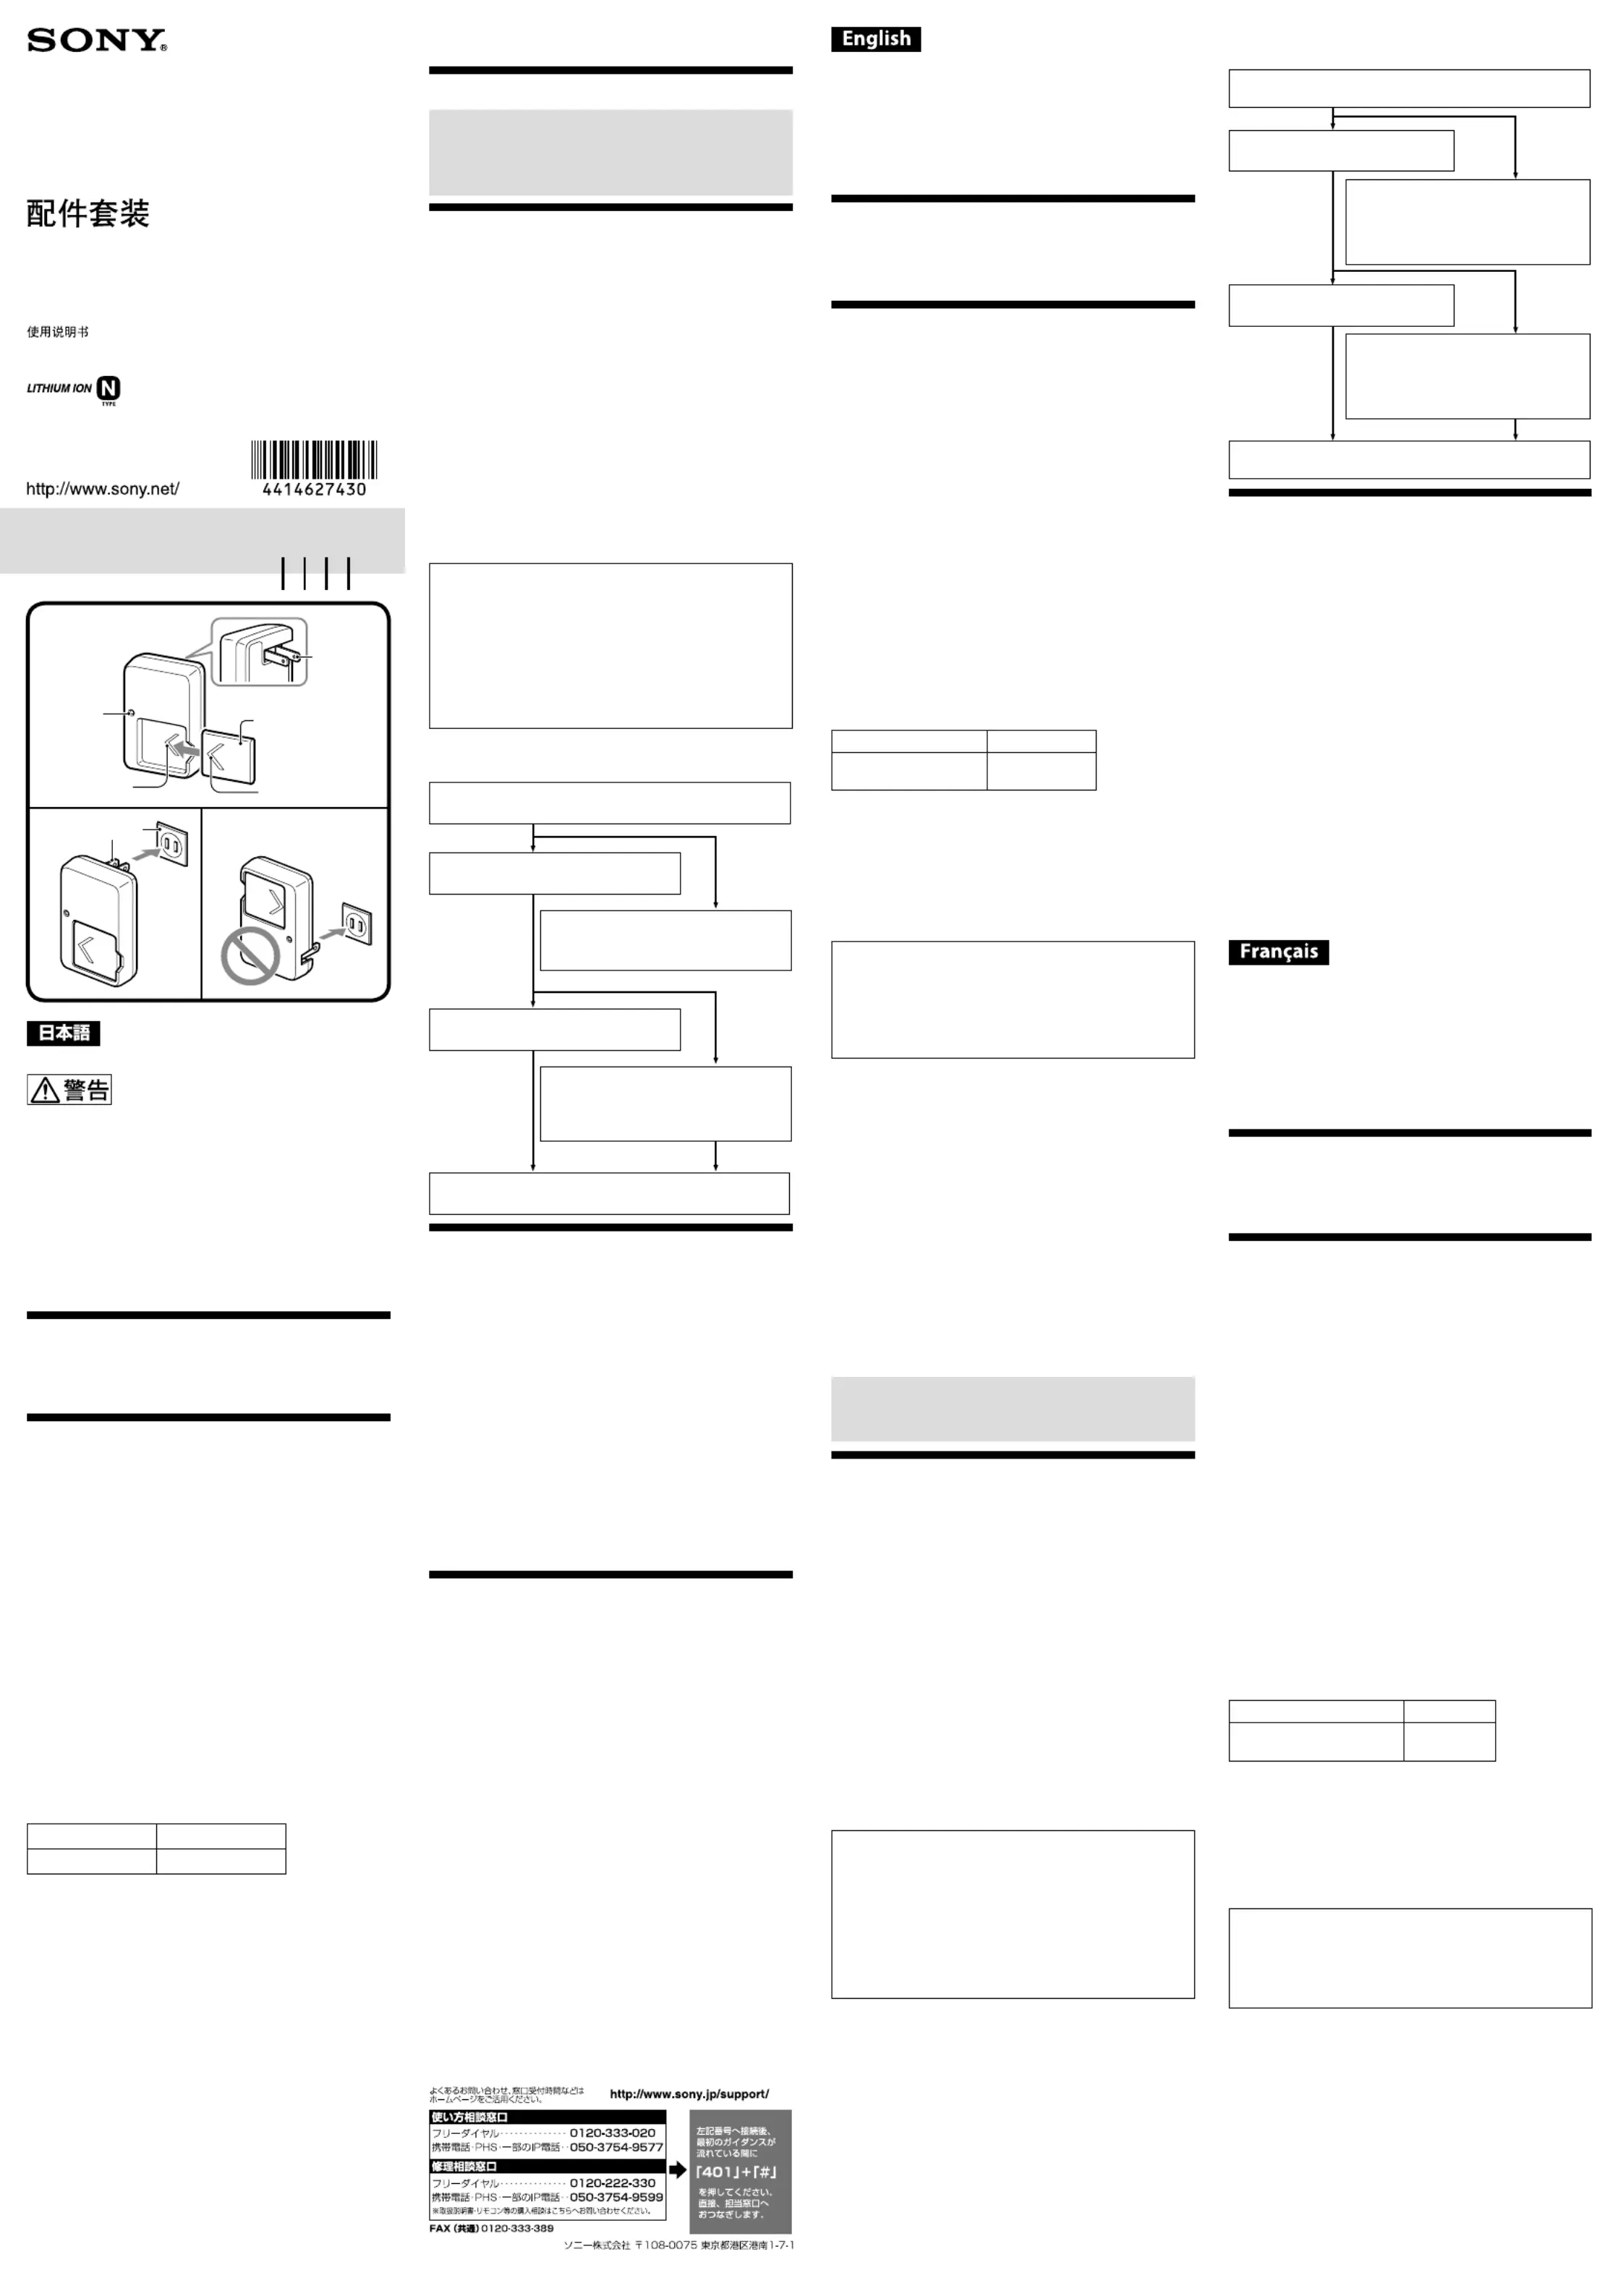
バッテリーを充電する
1
バッテリーを取り付ける
バッテリーの マークを本機の マークの方向に合わ
せて、矢印方向にカチッと音がするまでスライドさせ
てください。(イラスト )
2
電源プラグを引き起こし、コンセントへ差し込む
電源プラグを上側にして差し込んでください。(イラ
スト )
電源プラグを下側にして差し込まないでください。
(イラスト )
充電が始まると、
CHARGE
ランプ(オレンジ色)が点
灯します。
充電が終了すると
CHARGE
ランプが消えます(実用
充電)。
続けて約
1
時間充電するとさらに長く使えます(満充
電)。
バッテリーを取りはずすとき
取り付けたときと反対の方向にスライドさせ、取りはず
してください。
充電時間について
バッテリー
NP-BN1
実用充電時間約
185
分
本機を使用し、使い切ったバッテリーを
25
℃の室温で
ˎ
充電したときの時間です。
周囲の温度やバッテリーの状態によっては、上記の充
ˎ
電時間と異なる場合があります。
急いで使いたいとき
バッテリーは、充電が完了する前でも必要なときに取り
はずして使えます。ただし、充電時間によってお使いに
なれる時間が異なります。
ご注意
CHARGE
ランプが点灯しないときはバッテリーがしっ
ˎ
かり取り付けられているか確認してください。しっか
り取り付けられないと、充電されないことがあります。
すでに充電を完了しているバッテリーを取り付けたと
ˎ
き、
CHARGE
ランプが
1
度点灯してから消えます。
長期間使用していないバッテリーを充電する場合は、
ˎ
充電時間が長くなることがあります。
充電したバッテリーは使わなくても少しずつ放電して
ˎ
います。撮影機会を逃さないためにも、ご使用前に充
電し
てください。
バッテリー保護のため、充電が完了しましたら、本機か
ˎ
らバッテリーを取りはずしてください。
海外へお持ちになる方へ
本機は
100V-240V
のワールドワイド対応です。
本機を海外旅行者用の電子式変圧器(トラベルコン
バーター)に接続しないでください。発熱や故障の原
因となります。
故障かな?と思ったら
もう
1
度点検してみましょう。それでも正常に動作しな
いときは、ソニーの相談窓口にご相談ください。
CHARGE
ランプには
2
つの点滅パターンがあります
遅い点滅・・・・・・約
1.5
秒の点灯と消灯を繰り返す
速い点滅・・・・・・約
0.15
秒の点灯と消灯を繰り返す
CHARGE
ランプの点滅パターンによって対処の方法が
異なります。
CHARGE
ランプが遅い点滅を繰り返す場合
充電が一時停止した待機状態になっています。
室温が充電に適した温度範囲外のとき、自動的に充電が
一時停止されます。
充電に適切な温度の範囲内に戻ると、
CHARGE
ランプが
点灯し充電が再開されます。
バッテリーの充電は、周囲温度が
10
℃〜
30
℃の環境で
行うことをおすすめします。
CHARGE
ランプが速い点滅を繰り返す場合
以下のような場合、
1
度目の充電では
CHARGE
ラン
プが速い点滅になる場合があります。
その場合は
1
度バッテリーをバッテリーチャー
ジャーからはずし、再度充電を行ってください。
長期間バッテリーを放置した場合
長期間バッテリーをカメラ本体に取り付けたまま
放置した場合
お買い上げ直後
それでも速い点滅になる場合は、以下の手順に従って確
認してください。
充電中のバッテリーを取りはずし、もう1度、同じ
バッテリーを確実に取り付けてください。
異常があると思われる商品について、ソニーの相談窓口
にご相談ください。
再び点滅した場合
別のバッテリーを取り付けてください。
点灯後、再び点滅しなかった場合
充電時間が過ぎてCHARGEランプが
消えていれば、異常はありません。
再び点滅した場合
本機に異常があると思われます。
点灯後、再び点滅しなかった場合
充電時間が過ぎてCHARGEランプが
消えていれば、はじめに取り付けたバッ
テリーに異常があると思われます。
主な仕様
バッテリーチャージャー(
BC-CSN/BC-CSNB
)
ˎ
定格入力
AC 100 V
−
240 V
50 Hz/60 Hz
4 VA
−
7 VA
2 W
定格出力
DC 4.2 V
0.25 A
使用温度
0
℃〜
40
℃
保存温度
-20
℃〜
+60
℃
外形寸法(約)
55
mm×
83
mm×
23.5
mm
(幅/高さ/奥行き)
質量
約
55 g
リチャージャブルバッテリーパック(
NP-BN1
)
ˎ
最大電圧:
DC 4.2 V
/公称電圧:
DC 3.6 V
/定格容量:
2.2 Wh
(
600 mAh
)/使用温度:
0
℃〜
40
℃/最大
外形寸法(約):
35.5 mm
×
4.9 mm
×
40.8 mm
(幅×
高さ×奥行き)/質量:約
15 g
仕様および外観は、改良のため予告なく変更することが
ありますが、ご了承ください。
保証書とアフターサービス
保証書について
この製品には保証書が添付されていますので、お買い
ˎ
上げの際、お受け取りください。
所定事項の記入および記載内容をお確かめのうえ、大
ˎ
切に保存してください。
保証期間は、お買い上げ日より
1
年間です。
ˎ
アフターサービスについて
調子が悪いときはまずチェックを
この取扱説明書をもう一度ご覧になってお調べくださ
い。
それでも具合の悪いときは
ソニーの相談窓口にご相談ください。
ご相談になるときは、次のことをお知らせください。
型名:
BC-CSN/BC-CSNB
ˎ
故障の状態:できるだけ詳しく
ˎ
お買い上げ日
ˎ
保証期間中の修理は
保証書の記載内容に基づいて修理させていただきます。
詳しくは保証書をご覧ください。
記録内容は補償できません
万一、本機の不具合により記録や再生がされなかった場
合、画像や音声などの記録内容の補償については、ご容赦
ください。
4-414-627- (1)43
アクセサリーキット
Accessory Kit
Kit d’accessoires
取扱説明書
Operating Instructions
Mode d’emploi
ACC-CSBN
© 2012 Sony Corporation
Printed in China
ank you for purchasing the Sony Battery charger.
Before operating this Battery charger, please read this
manual thoroughly and retain it for future reference.
e ACC-CSBN comes with the following accessories:
Rechargeable Battery Pack (NP-BN1) (1)
Battery Charger (BC-CSN/BC-CSNB) (1)
Set of printed documentation
Identifying the parts
1 Battery mark
2 Battery pack
3 Power plug
4 Charger mark
5 CHARGE lamp
6 Wall outlet (wall socket)
To Charge the Battery Pack
1 Attach the battery pack.
Keeping the battery mark in the same direction as
the charger mark , insert the battery pack until it
clicks into place. (See illustration ).
2 Pull the power plug up, and then connect it to
a wall outlet (wall socket).
Always connect the power plug with the prongs at the
top (See illustration ).
Do not connect the power plug with the prongs at the
bottom (See illustration ).
e CHARGE lamp (orange) lights up and charging
begins.
When the CHARGE lamp goes out, normal charging is
completed ( ).Normal charge
For a full charge, which allows you to use the battery
pack longer than usual, leave the battery pack in place
for approximately another one hour (Full charge).
To remove the battery pack
Remove the battery pack by sliding it in the opposite
direction to when you attached it.
Charging time
Battery pack NP-BN1
Normal charging time
(Approx.)
185 min
For more about the battery life, see the instruction ˎ
manual of your camera.
e charging time may dier depending on the ˎ
condition of the battery pack or the ambient
temperature.
e times shown are for charging an empty battery pack, ˎ
which has been run down with a camera, using this unit
at an ambient temperature of 25 °C (77 °F).
Charging temperature
e temperature range for charging is 0 °C to 40 °C
(32 °F to 104 °F).
For maximum battery eciency, the recommended
temperature range when charging is 10 °C to 30 °C
(50 °F to 86 °F).
To use the battery pack quickly
You can remove the battery pack from this unit and use it
even if charging is not completed. However, the charging
time aects the time that the battery pack can be used.
Notes
If the CHARGE lamp does not light up, check if the ˎ
battery pack is rmly attached to this unit.
When a fully charged battery pack is installed, the ˎ
CHARGE lamp lights up once and then goes out.
A battery pack that has not been used for a long time ˎ
may take longer than usual to charge.
e charged battery pack gradually discharges even if ˎ
you do not use it. Charge the battery pack before use to
avoid missing any recording opportunities.
Unplug this unit from the wall outlet (wall socket) aer ˎ
use. Hold this unit when you unplug it from the wall
outlet (wall socket).
is unit supports worldwide voltages 100 V to 240 V.
Do not use an electronic voltage transformer, as this
may cause a malfunction.
Troubleshooting
When the CHARGE lamp blinks, check through the
following chart.
The CHARGE lamp blinks in two ways.
Blinks slowly: Turns on and o repeatedly every
1.5 seconds
Blinks quickly: Turns on and o repeatedly every
0.15 seconds
e action to be taken depends on the way the CHARGE
lamp blinks.
When the CHARGE lamp keeps blinking slowly
Charging is pausing. is unit is in the standby state.
If the room temperature is out of the appropriate
temperature range, charging stops automatically.
When the room temperature returns to the appropriate
range, the CHARGE lamp lights up and charging restarts.
We recommend charging the battery pack at 10 °C to 30 °C
(50 °F to 86 °F).
When the CHARGE lamp keeps blinking quickly
When charging the battery pack for the rst time in
one of the following situations, the CHARGE lamp may
blink quickly.
If this happens, remove the battery pack from this unit,
reattach it and charge it again.
When the battery pack is le for a long time
When the battery pack is le installed in the camera
for a long time
Immediately aer purchase
If the CHARGE lamp keeps blinking quickly, check
through the following chart.
Please contact your nearest Sony dealer in connection with the
product that may have a problem.
Remove the battery pack that is being charged and then rmly
attach the same battery pack again.
The CHARGE lamp blinks again:
Install another battery .pack
The CHARGE lamp lights up and does
not blink again:
If the CHARGE lamp goes out because the
charging time has passed, there is no
problem.
The CHARGE lamp blinks again:
e problem is with this unit.
The CHARGE lamp lights up and does
not blink again:
If the CHARGE lamp goes out because the
charging time has passed, the problem is
with the battery pack rst installed.
Specications
Battery Charger (BC-CSN/BC-CSNB) ˎ
Input rating 100 V - 240 V AC 50 Hz/60 Hz
4 VA - 7 VA 2 W
Output rating Battery charge terminal:
4.2 V DC 0.25 A
Operating temperature 0 °C to 40 °C (32 °F to 104 °F)
Storage temperature –20 °C to +60 °C (–4 °F to
+140 °F)
Dimensions (Approx.) 55 mm × 83 mm × 23.5 mm
(w/h/d)
(2 1/4 in. × 3 3/8 in. × 15/16 in.)
Mass Approx. 55 g (2 oz)
Rechargeable Battery Pack (NP-BN1) ˎ
Maximum output voltage: DC 4.2 V / Mean output
voltage: DC 3.6 V / Maximum charge voltage:DC 4.25V /
Maximum charge current: 0.9 A / Capacity: 2.2 Wh
(600 mAh) / Operating temperature: 0 °C to 40 °C
(32 °F to 104 °F) / Dimensions (Approx.): 35.5 mm ×
4.9 mm × 40.8 mm (w/h/d) (1 7/16 in. × 7/32 in. ×
1 5/8 in.) / Mass: Approx. 15 g (0.6 oz.)
Design and specications are subject to change without
notice.
Merci pour l’achat de ce chargeur de batterie Sony.
Avant d’utiliser ce chargeur de batterie, veuillez lire
attentivement ce manuel et le conserver pour toute
référence future.
L’ ACC-CSBN est livré avec les accessoires suivants :
Batterie rechargeable (NP-BN1) (1)
Chargeur de batterie (BC-CSN/BC-CSNB) (1)
Jeu de documents imprimés
Identication des éléments
1 Repère de la batterie
2 Batterie rechargeable
3 Fiche d’alimentation
4 Repère du chargeur
5 Témoin CHARGE
6 Prise murale
Pour charger la batterie
rechargeable
1 Insérez la batterie rechargeable.
Alignez le repère de la batterie dans la direction du
repère du chargeur et insérez la batterie de sorte
qu’elle s’encliquette. (Voir l’illustration ).
2 Relevez la che d’alimentation, puis branchez-
la sur une prise murale.
Raccordez toujours la che d’alimentation avec les
broches orientées vers le haut (Voir l’illustration ).
Ne raccordez pas la che d’alimentation avec les
broches orientées vers le bas (Voir l’illustration ).
Le témoin CHARGE (orange) s’allume et la recharge
commence.
Lorsque le témoin CHARGE s’éteint, la charge normale
est terminée ( ).Charge normale
Pour une charge complète, qui permet d’utiliser la
batterie rechargeable plus longtemps que la normale,
laissez la batterie rechargeable en place pendant encore
une heure environ (Charge complète).
Pour retirer la batterie rechargeable
Retirez la batterie en la faisant glisser dans le sens opposé
de l’insertion.
Temps de charge
Batterie rechargeable NP-BN1
Temps de charge normale
(environ)
185 min
Pour de plus amples informations sur l’autonomie ˎ
d’une batterie, reportez-vous au mode d’emploi de votre
appareil photo.
Le temps de charge peut être diérent selon l’état de la ˎ
batterie rechargeable ou la température ambiante.
Les temps indiqués correspondent à la charge d’une ˎ
batterie rechargeable vide, usée sur une caméra, à une
température ambiante de 25 °C (77 °F).
Température de charge
La température doit se situer entre 0 °C et 40 °C (32 °F
à 104 °F) pour la charge. Pour une ecacité maximale
de la batterie, la température conseillée pour la charge
est de 10 °C à 30 °C (50 °F à 86 °F).
Pour utiliser rapidement la batterie
rechargeable
Vous pouvez retirer la batterie rechargeable de cet
appareil et l’utiliser même si la charge n’est pas terminée.
Cependant, le temps de charge a une inuence sur
l’autonomie de la batterie rechargeable.
(Suite à la page arrière)
Produkspesifikasjoner
| Merke: | Sony |
| Kategori: | Annet kameratilbehør |
| Modell: | ACC-HDCSN |
Trenger du hjelp?
Hvis du trenger hjelp med Sony ACC-HDCSN still et spørsmål nedenfor, og andre brukere vil svare deg
Annet kameratilbehør Sony Manualer
3 Oktober 2025

23 Desember 2024

23 Desember 2024

23 Desember 2024

23 Desember 2024

23 Desember 2024

23 Desember 2024

23 Desember 2024

23 Desember 2024

23 Desember 2024
Annet kameratilbehør Manualer
Nyeste Annet kameratilbehør Manualer

15 September 2025

31 August 2025
6 August 2025
4 August 2025

2 April 2025

25 Februar 2025

18 Januar 2025

18 Januar 2025

18 Januar 2025

17 Januar 2025