StarTech.com SSPMSVESA Bruksanvisning
StarTech.com
Flatpanelstøtte
SSPMSVESA
Les nedenfor 📖 manual på norsk for StarTech.com SSPMSVESA (2 sider) i kategorien Flatpanelstøtte. Denne guiden var nyttig for 37 personer og ble vurdert med 4.8 stjerner i gjennomsnitt av 19 brukere
Side 1/2
Quick-Start Guide
To view manuals, FAQs, videos, drivers, downloads, technical drawings, and more, visit www.startech.com/support.
Manual Revision: July 24, 2019 3:57 PM
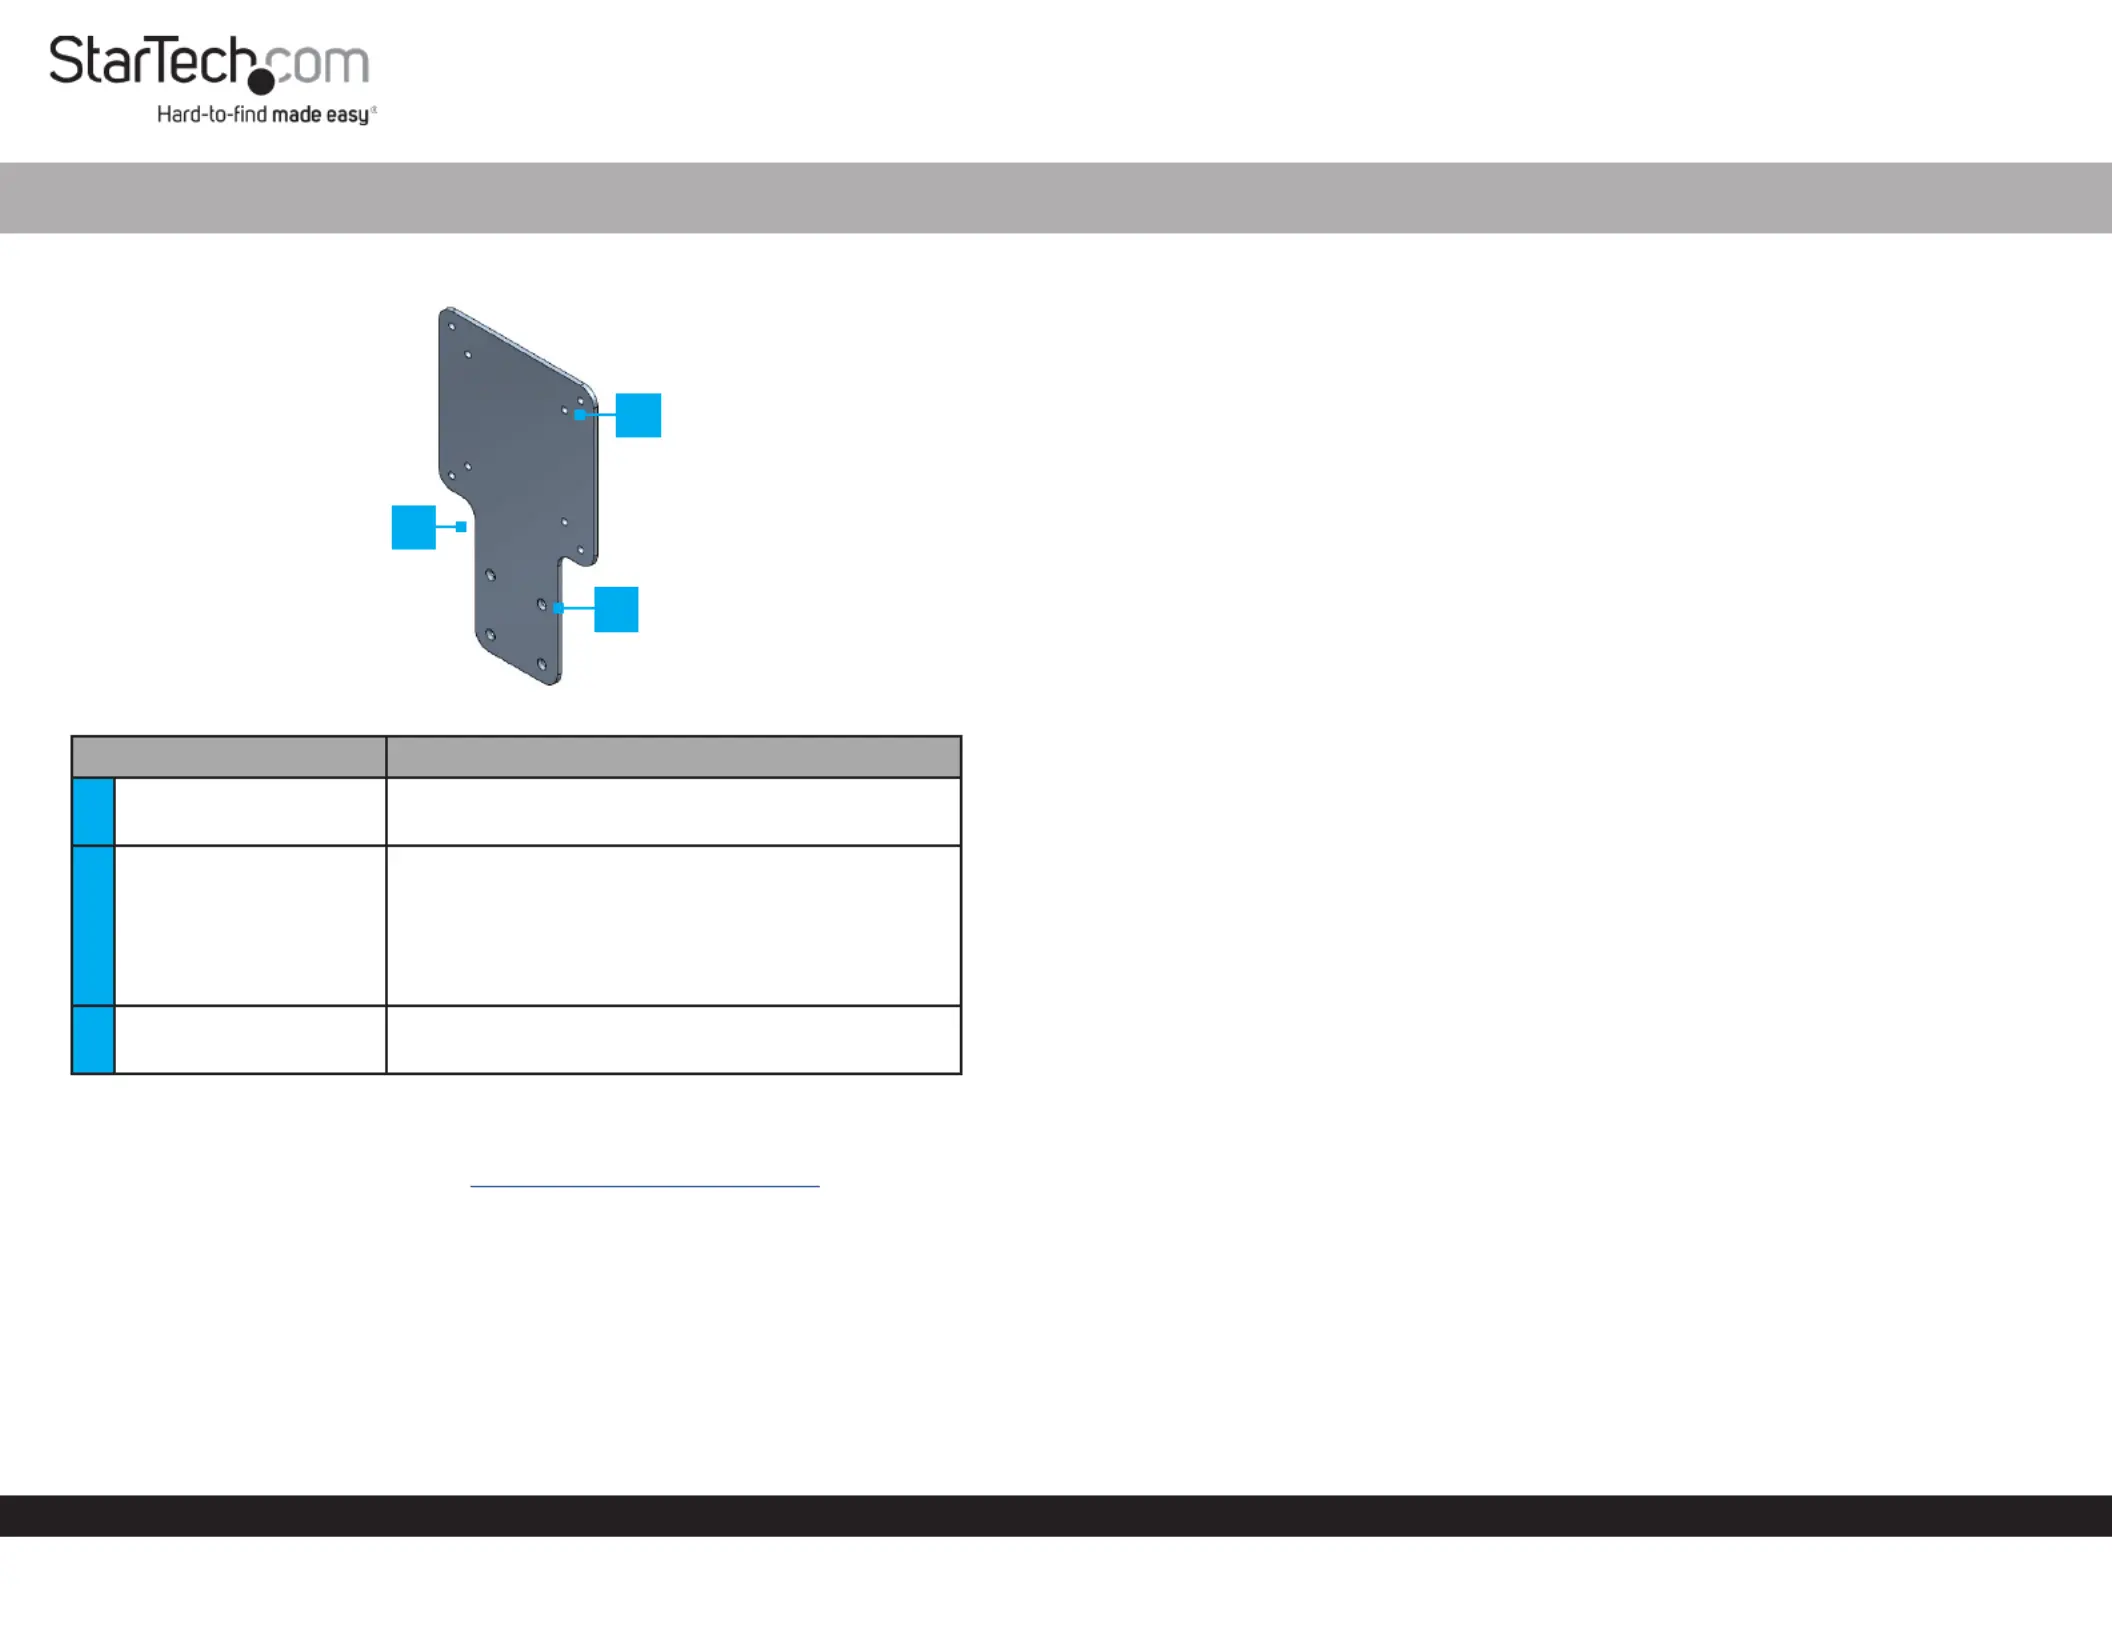
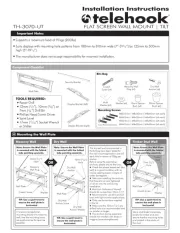
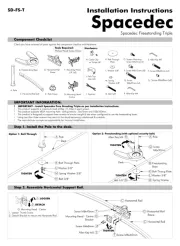
Product Diagram (SSPMSVESA)
Component Function
1
VESA Mounting
Bracket
• Used to mount a StarTech.com Docking
Station Hub Monitor or to the back of a .
2VESA Mounting Holes
• Used to mount the to the back of a Adapter
Monitor Monitor’s VESA Mounting , using the
Pattern.
Note: VESA mounting sizes are 75x75 and
100x100.
3Mounting Holes
• Used to mount a StarTech.com Docking
Station Hub Adapter or to the .
Requirements
For the latest requirements, please visit www.startech.com/SSPMSVESA
If you are using a that covers the on the back of Monitor Stand VESA Mounting Holes
the , a VESA compatible monitor mount will be require to use the .Monitor Adapter
Package Contents
• VESA Mounting Bracket x 1
• M3 x 5 mm Screws x 4
• M4 x 12 mm Screws x 4
• M4 x 20 mm Screws x 4
VESA Mount Adapter for StarTech.com Docking Stations and Hubs
• Spacers x 4
• Quick-Start Guide x 1
Attaching a StarTech.com Docking Station or Hub
1. Align the on the with the on the Mounting Holes Adapter Mounting Holes
StarTech.com Docking Station Hub or . The recessed hole pattern should be facing
outward so the will t properly.M3 x 5 mm (Countersunk) Screws
2. Insert the four through the on the M3 x 5 mm Screws Mounting Holes Adapter
and into the on the or .Mounting Holes Startech.com Docking Station Hub
3. Using a (sold separately) tighten the , Phillips Head Screwdriver M3 x 5 mm Screws
being careful not to over-tighten the .M3 x 5 mm Screws
Mounting the Adapter (Flush)
1. Place the screen facing down on a at, clean, and secure surface.Monitor
2. Align the on the with the on the Mounting Holes Adapter VESA Mounting Holes
back of the .Monitor
3. Align the with the on the back of the VESA Monitor Mount VESA Mounting Hole
Adapter, Adapter VESA Monitor Mount sandwiching the between the and the
back of the . Monitor
4. Insert four of the through the and the M4 x 12 mm Screws VESA Monitor Mount
Adapter Mounting Holes Monitor and into the on the back of the .
5. Using a , tighten the , being careful Phillips Head Screwdriver M4 x 12 mm Screws
not to over-tighten the .M4 x 12 Screws
Mounting the Adapter (Recessed)
Note: The and provided with the can be installed on Spacers Screws Adapter
monitors with VESA mounting holes with a maximum depth of 7mm.
1. Place the screen facing down on a at, clean, and secure surface.Monitor
2. Place the four over the on the back of the .Spacers VESA Mounting Holes Monitor
3. Align the on the with the on the back on the Mounting Holes Adapter Spacers
Monitor.
4. Align the with the on the back of the VESA Monitor Mount VESA Mounting Hole
Adapter Adapter VESA Monitor Mount, sandwiching the between the and the
Spacers.
2
1
3
Produkspesifikasjoner
| Merke: | StarTech.com |
| Kategori: | Flatpanelstøtte |
| Modell: | SSPMSVESA |
Trenger du hjelp?
Hvis du trenger hjelp med StarTech.com SSPMSVESA still et spørsmål nedenfor, og andre brukere vil svare deg
Flatpanelstøtte StarTech.com Manualer

20 Februar 2025

17 Januar 2025

17 Januar 2025

17 Januar 2025

17 Januar 2025

15 Januar 2025

15 Januar 2025

15 Januar 2025

15 Januar 2025

15 Januar 2025
Flatpanelstøtte Manualer
- LG
- Kogan
- SilverStone
- Iiyama
- Hama
- Essentiel B
- Icy Box
- Insignia
- Sven
- CTA Digital
- V7
- Peerless-AV
- Mount-It!
- Ateca
- Multibrackets
Nyeste Flatpanelstøtte Manualer
16 Oktober 2025

11 Oktober 2025
10 Oktober 2025
10 Oktober 2025
10 Oktober 2025
10 Oktober 2025
10 Oktober 2025

10 Oktober 2025
10 Oktober 2025
10 Oktober 2025