Techno Line WS 9118 Bruksanvisning

Techno Line WS 9118

Les nedenfor 📖 manual på norsk for Techno Line WS 9118 (4 sider) i kategorien . Denne guiden var nyttig for 24 personer og ble vurdert med 4.5 stjerner i gjennomsnitt av 2 brukere

Side 1/4
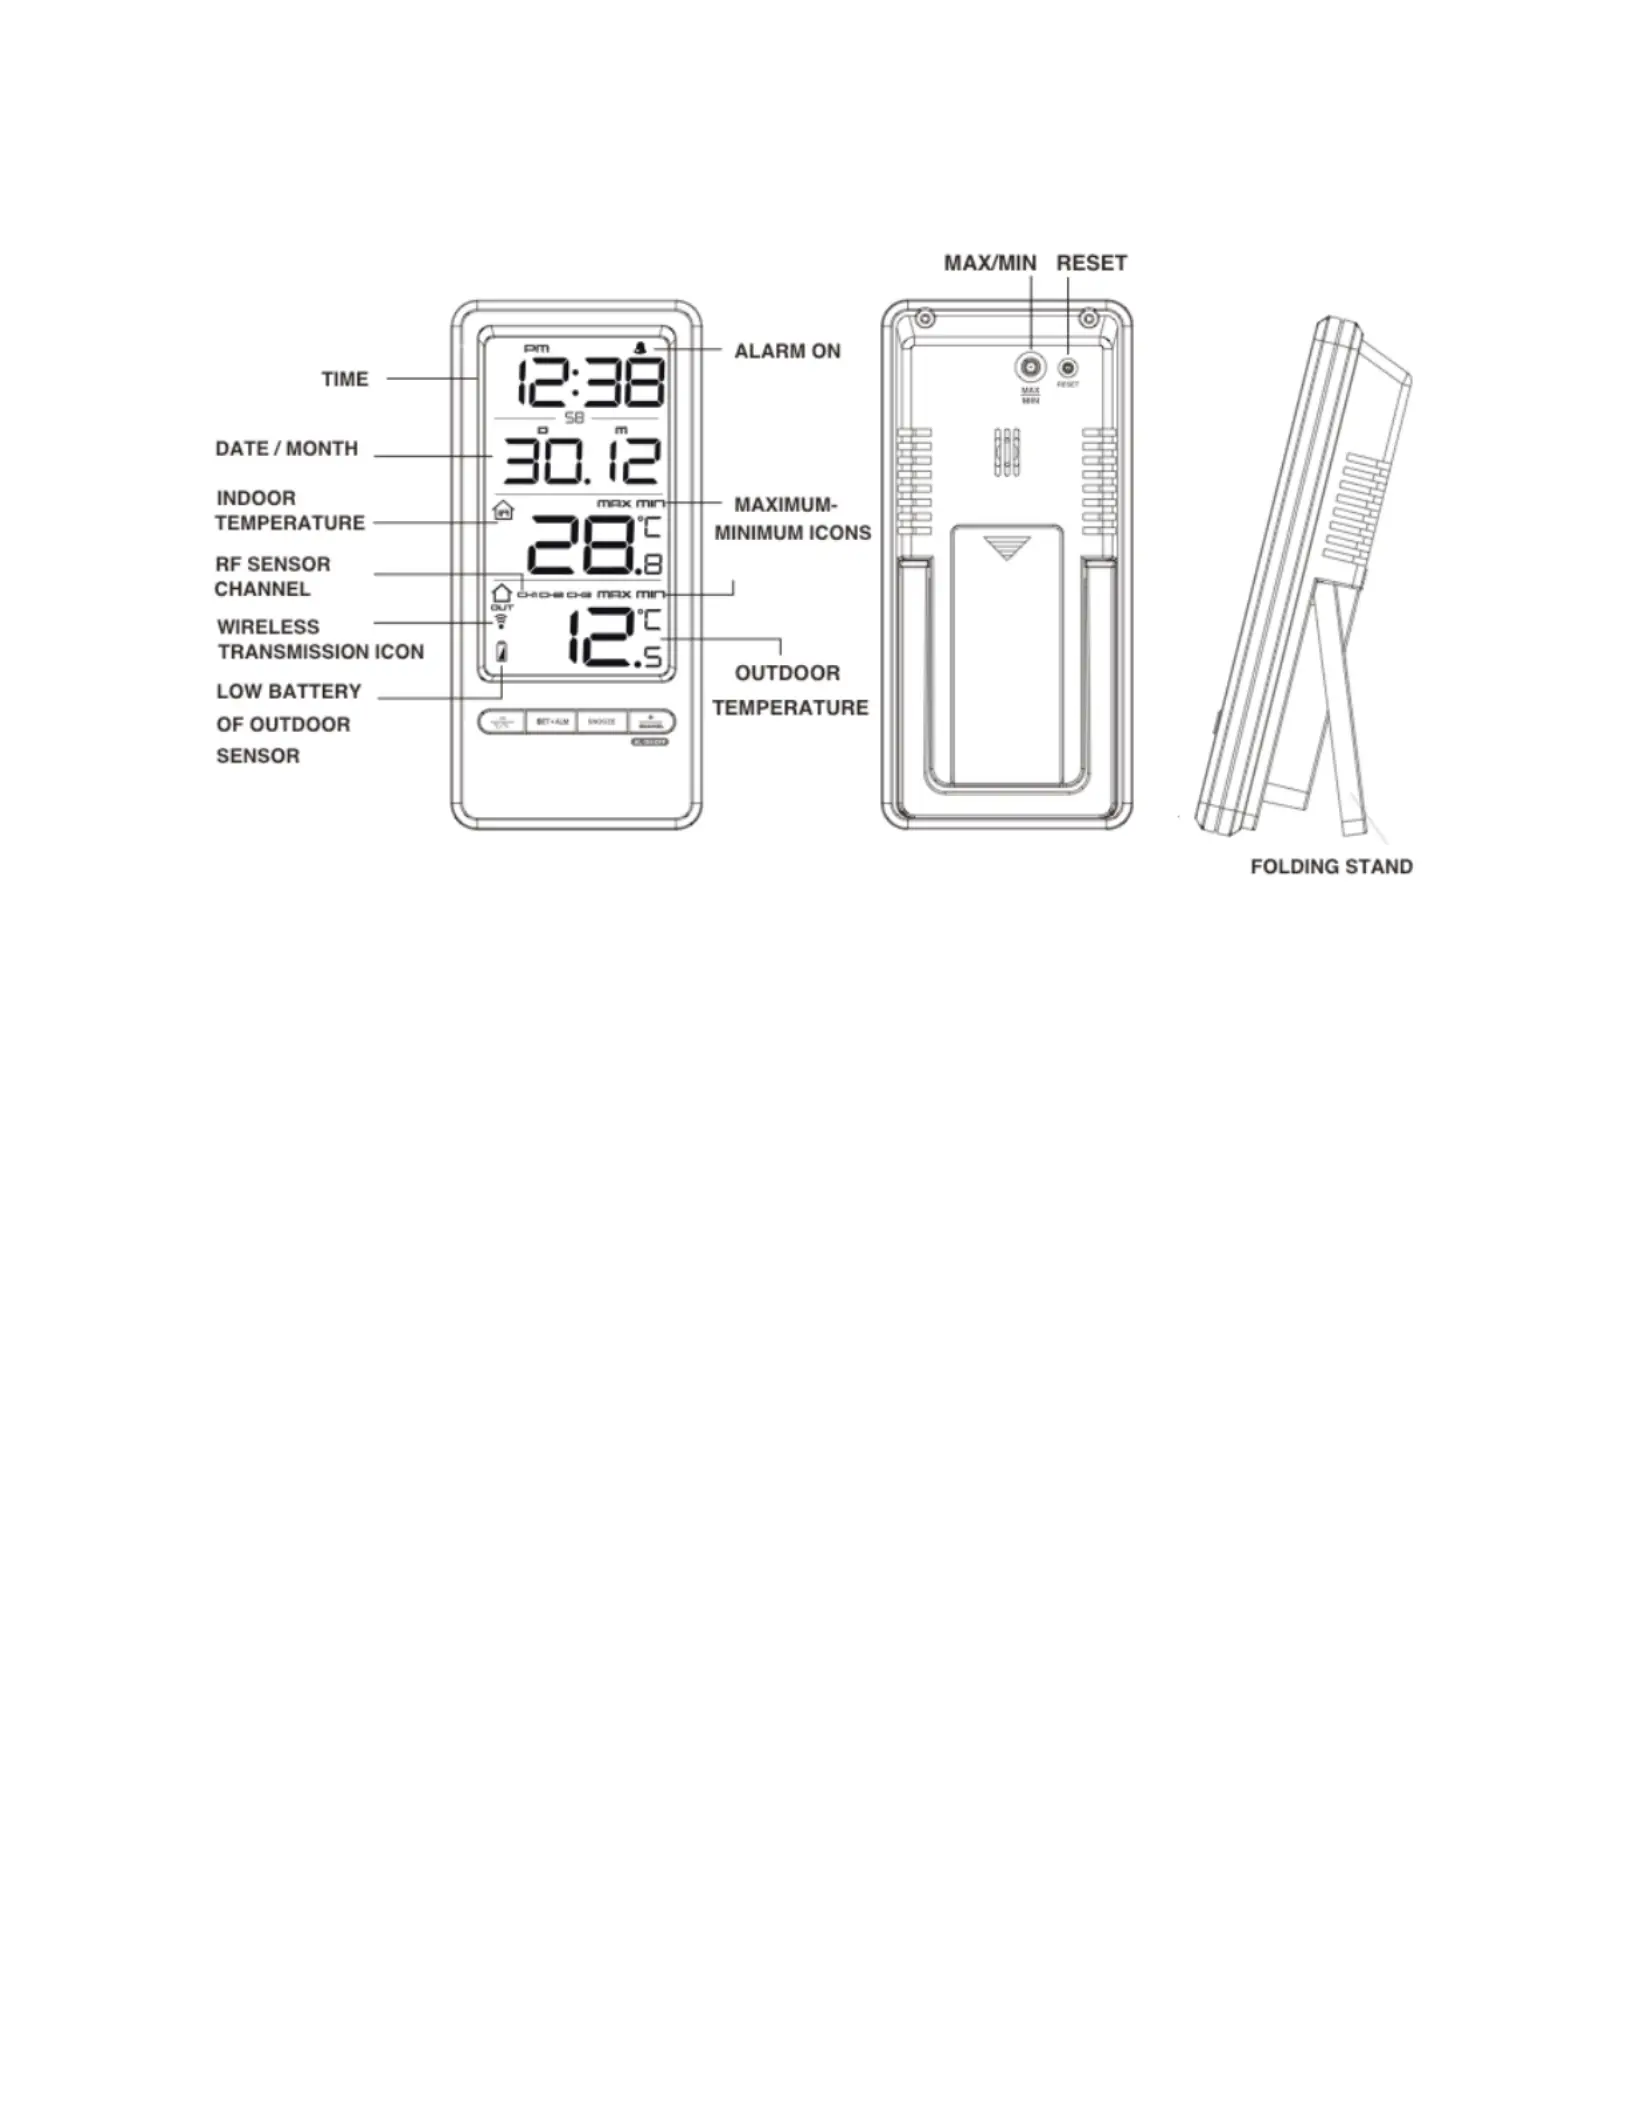
INSTRUCTION MANUAL OF WS 9118
Wireless Indoor and Outdoor Thermometer-Clock
BUTTONS
- (C/F)
SET / ALARM
SNOOZE
+ / CHANNEL / ALM ON-OFF
MAX-MIN
QUICK START
1. Slide open the battery cover at the back of your wireless thermometer-clock.
2. Insert 2 x AAA batteries into the battery compartment by observing the correct + / - polarity
signs inside the battery compartment.
3. Replace the battery cover. In few seconds the LCD shows the default time, calendar and
the current indoor temperature and it starts to search for outdoor temperature signal.
4. Then insert 2 x AA batteries into the outdoor sensor. The outdoor temperature will be
displayed with CH1 shown on the lower line of the LCD. Your Thermometer-
clock will be synchronized with outdoor sensor at Channel 1, the outdoor temperature will be
display.
TO SET CALENDAR, 12/24 TIME AND TIME
1. Press and hold SET / ALM SET for 2 seconds, time digits change to year 2008 YR and
flash. Press + / - to set year.
2. Then press SET / ALM SET once again, month digits flash. Press +/- button to set month.
3. Then press SET / ALM SET once again, date digits flash. Press +/- button to set date.
4. Press SET / ALM SET once again, time digits change 24 Hr, press +/- to select
12 Hr time format or 24 Hr time format. When 12 Hr is selected, AM / PM icon will be
displayed.
5. Then press SET / ALM SET once again, time digits changes to 00, press +/- to select your
time zone.
6. Then press SET / ALM SET once again, time digits 0:00 show up and the hour digits flash.
Press +/- to set the hours.
7. Then press SET / ALM SET once again, minute digits flash. Press +/- button to set the
minutes.
8. Press SET / ALM SET to return to normal mode, or it will return to normal mode in around 30
seconds if no press of any other buttons.
TO SET ALARM TIME
Press SET / ALM SET once, time digits change to alarm time digits AM 7:00 AL. Then press
and hold SET / ALM SET for 2 seconds, the hour digits flash. Press +/- to set your desired hours
of alarm time.
Press SET / ALM SET again, alarm minute digits flash. Press +/- to set alarm minutes.
Press SET / ALM SET again, time digits change to 05 and flash. Press +/- to set the snooze
duration from 1 to 20 minutes.
Press SET / ALM SET to return to normal mode, or it will return to normal mode in around 30
seconds if no further press of any other buttons.
TO TURN ON OR OFF YOUR ALARM
Press SET / ALM SET once to display the alarm time. When alarm time is displayed, press + to
turn on / off the daily alarm. When the alarm function is turned on, the Bell icon appears
between the hour and minute digits.
TO USE SNOOZE ALARM
When time reaches your set alarm time, your clock will give beep sound to wake you up. The
Bell icon will flash.
1) Press SNOOZE once to stop the alarm temporarily, the Bell icon keeps flashing. The alarm
will beep again in 5 minutes.
2) To stop the alarm, press + / CHANNEL (ALM On-Off) once, the alarm beep will stop and the
Bell icon become static, alarm will beep again same time next day.
Alarm Duration : 2 minutes
TO DISPLAY TEMPERATURE IN DEGREE C OR F
Simply press (C/F) to display temperature in degree C or degree F.
To Read the Maximum-Minimum Temperature Records
Press MAX/MIN at the back once to view the indoor-outdoor maximum or minimum
temperatures.
When the maximum indoor-outdoor temperatures are displayed, press and hold the MAX will
clear the maximums and the unit will start to record and display fresh data again.
When the minimum indoor-outdoor temperature and humidity are displayed, press and hold the
MIN will clear the minimums and the unit will start to record and display fresh data again.
TO SYNCHRONIZE YOUR CLOCK WITH MULTIPLE OUTDOOR SENSORS
Your wireless thermometer-clock is equipped with one outdoor sensor. You could
purchase second or third outdoor sensor to work with this thermometer-clock at the same
time.
1. Press + / CHANNEL (ALM On-Off) once, the lowest line of the LCD shows CH2
and show --. Then press and hold + / CHANNEL / ALM On-Off for 2 seconds.
Then insert 2 x AA batteries into the second outdoor sensor. The temperature of
second outdoor sensor will be displayed on the lower LCD.
2. You could repeat the same step to synchronize third outdoor sensor at CH3.
TROUBLE SHOOTING
1. In case your wireless thermometer-clock shows irrelevant information or digits, it
maybe affected by electrostatic discharge or interferences from other devices. Press
the RESET at the back of your unit. Your unit will be reset to default setting
of time and calendar and you need set time and calendar again.
2. In case the outdoor temperature shows -- :-
2.1) press + / CHANNEL (ALM On-Off) to view the correct channel i.e. CH1 is your
default channel
2.2) If Outdoor temperature shows -- at CH1, press and hold + / CHANNEL (ALM ON-
OFF) for 2 seconds. The outdoor temperature should be displayed in around 1
minute.
2.3) if the above do not work, repeat 2.2), then bring in the outdoor sensor and press
RESET on the outdoor sensor.
Remark : if you observe a Low Battery icon on the lower left LCD, which means
your outdoor sensor is at low battery level, replace the batteries of your wireless
transmitter with fresh batteries.
CARE OF YOUR WEATHER SATATION CLOCK
1. Do not expose the unit to extreme temperature, water or direct sunlight
2. Avoid contact with any corrosive materials
3. Do not subject the unit to excessive force, dust or humidity
4. Do not open the inner back case or tamper with any components of this unit
SPECIFICATIONS
Indoor Temp. Range -10°C to +50°C (+14.2°F to +122°F)
Outdoor Temp. Range -50°C to + 70°C (-58°F to +158°F)
Out of Range Display Temperature : HH.H / LL.L

Produkspesifikasjoner

Merke: Techno Line
Kategori:
Modell: WS 9118

Trenger du hjelp?

Hvis du trenger hjelp med Techno Line WS 9118 still et spørsmål nedenfor, og andre brukere vil svare deg