Toa WB-RM500 Bruksanvisning
Toa
Ikke kategorisert
WB-RM500
Les nedenfor 📖 manual på norsk for Toa WB-RM500 (1 sider) i kategorien Ikke kategorisert. Denne guiden var nyttig for 6 personer og ble vurdert med 4.6 stjerner i gjennomsnitt av 3.5 brukere
Side 1/1
WB-RM500WALL MOUNTING BRACKET
INSTALLATION MANUAL
1. SAFETY PRECAUTIONS
• Before installation or use, be sure to carefully read all the instructions in this section for
correct and safe operation.
• Be sure to follow all the precautionary instructions in this section, which contain important
warnings and/or cautions regarding safety.
• After reading, keep this manual handy for future reference.
Indicates a potentially hazardous situation which, if mishandled, could
result in moderate or minor personal injury, and/or property damage.
CAUTION
Indicates a potentially hazardous situation which, if mishandled,
could result in death or serious personal injury.
WARNING
• Install the unit only in a location that can structurally support the weight of the unit and the
mounting bracket. Doing otherwise may result in the unit falling down and causing personal
injury and/or property damage.
• Since the unit is designed for indoor use, do not install it outdoors. If installed outdoors, the
aging of parts causes the unit to fall off, resulting in personal injury. Also, when it gets wet
with rain, there is a danger of electric shock.
•Donotuseothermethodsthanspeciedtomountthebracket.Extremeforceisappliedto
the unit and the unit could fall off, possibly resulting in personal injuries.
•Tighten each nut and bolt securely. Ensure that the bracket has no loose joints after
installation to prevent accidents that could result in personal injury.
•Avoidtouchingtheunit’ssharpmetaledgetopreventinjury.
2. SPECIFICATIONS
Finish Stainless steel
Dimensions 146(w)x113(h)x23.9(d)mm(5.75"x4.45"x0.94")
Weight 170g(0.37lb)
Accessories 4x25tappingscrew(fordirectwallmounting) 2 .......................
M4x20machinescrew(formountingtotheswitchbox) 2 .......
Usable Unit ConrmonTOADATALibraryathttps://www.toa-products.com/international/.
Note: Thedesignandspecicationsaresubjecttochangewithoutnoticeforimprovement.
URL:https://www.toa.jp/
133-04-00050-00
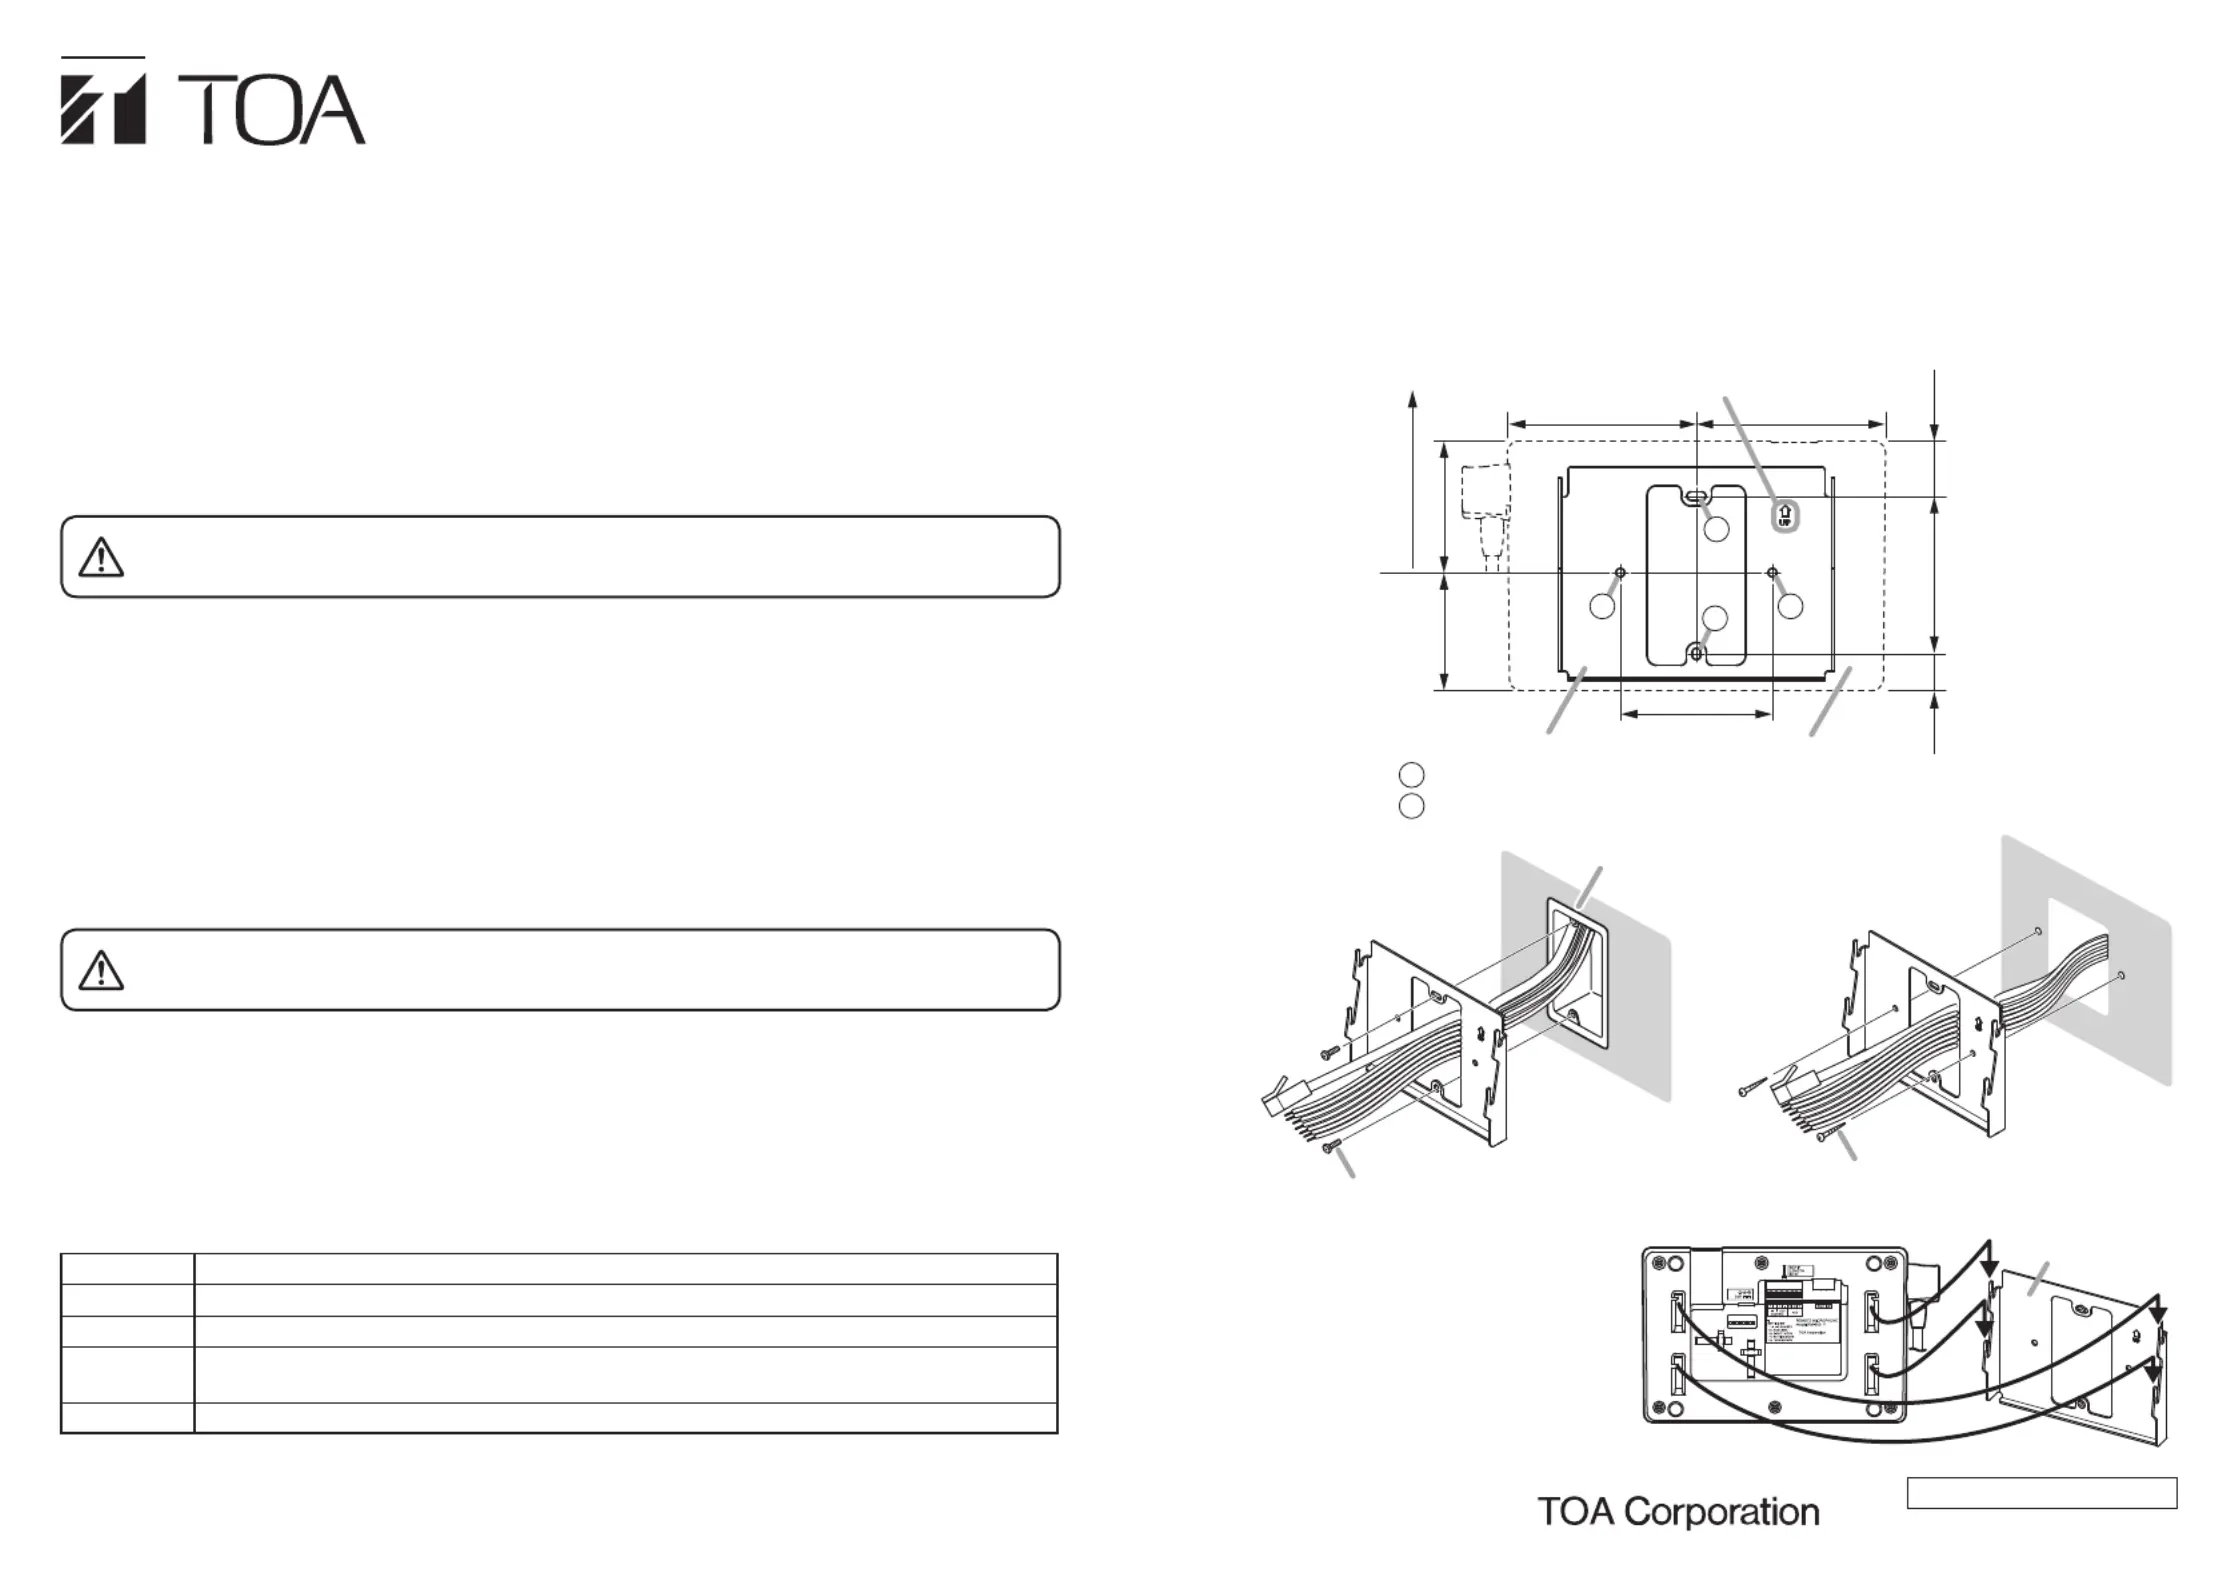
3. INSTALLING THE REMOTE MICROPHONE ON A WALL
Step 1. InstalltheWB-RM500onthewall.
Whenattachingtotheswitchbox,usethesuppliedtwoM4x20machinescrews.
Whendirectlymountingonthewallsurface,usethesuppliedtwo4x25tappingscrews.
If the supplied screws cannot be used depending on the wall materials, use the commercially
available anchor bolts according to the wall material.
Note
Install the WB-RM500 taking at least 90 mm (3.54") long space up from its direct wall
mounting hole.
Insufcientspacewillnotallowtheinstallationoftheremotemicrophone.
Step 2. Hang the remote microphone onto
theWB-RM500.
Securely insert 4 mounting holes
in the remote microphone into 4
protrusions of the WB-RM500
aligning them with each other.
62.4 (2.46) 69.6 (2.74)
100 (3.94)
80.5 (3.17)
100 (3.94)
29.1
(1.15)
19.4
(0.76)
83.5 (3.29)
Take at least 90 mm
(3.54") long space.
Remote microphoneWB-RM500
Direct wall mounting hole
UP mark
Unit: mm (in)
Hole for the switch box (Also used for direct wall mounting)
1
1
1
2
2
2
4 x 25 tapping screw (accessory)
Wall
M4 x 20 machine screw (accessory)
Switch box
Wall
WB-RM500
Remote microphone
Produkspesifikasjoner
| Merke: | Toa |
| Kategori: | Ikke kategorisert |
| Modell: | WB-RM500 |
Trenger du hjelp?
Hvis du trenger hjelp med Toa WB-RM500 still et spørsmål nedenfor, og andre brukere vil svare deg
Ikke kategorisert Toa Manualer
15 Oktober 2025
5 Oktober 2025
5 Oktober 2025
5 Oktober 2025
4 Oktober 2025
4 Oktober 2025
4 Oktober 2025

4 Oktober 2025
4 Oktober 2025
4 Oktober 2025
Ikke kategorisert Manualer
- HyperX
- Sumiko
- Elbro
- Metabo
- Ocean Way Audio
- Olight
- Foreo
- Michigan
- NANO Modules
- Newland
- Manfrotto
- Nostalgia
- SurgeX
- ServIt
- Mikrotik
Nyeste Ikke kategorisert Manualer

23 Oktober 2025

23 Oktober 2025

23 Oktober 2025

23 Oktober 2025

23 Oktober 2025

23 Oktober 2025

23 Oktober 2025

23 Oktober 2025

23 Oktober 2025

23 Oktober 2025