Trevi EC 882 Bruksanvisning
Trevi
Klokkeradio
EC 882
Les nedenfor 📖 manual på norsk for Trevi EC 882 (20 sider) i kategorien Klokkeradio. Denne guiden var nyttig for 48 personer og ble vurdert med 4.8 stjerner i gjennomsnitt av 24.5 brukere
Side 1/20

* Per informazioni integrative e aggiornamenti di questo prodotto vedi: www.trevi.it
* For additional information and updates of this product: www.trevi.it
EC 882
Guida d’uso
User guide
OROLOGIO DIGITALE CON DISPLAY LED
ALARM CLOCK WITH LED DISPLAY
RÉVEIL AVEC ÉCRAN LED
WECKER MIT LED ANZEIGE
RELOJ DESPERTADOR CON PANTALLA LED
ita
eng
fra
deu
esp

EC 882
2_
WARNING!
UK PLUG ONLY
WIRES CONNECTIONS TO A THREE-PIN
PLUG
The wires in this mains lead are coloured in accordance with
the following wiring codes:
Blue: .................................................................... Neutral
Brown: ................................................................Live
The wires in this mains lead must be connected to the terminals
in the plug as follows:
Blue wire: .......................................................... N or Black
Brown wire: ...................................................... L or Red
Neither wire is to be connected to the earth (E or W) terminal
of three-pin plug.
Should the fuse fail in the plug remove the plug form the wall
socket and replace the fuse with a 3 Amp. ASTA approved
BS 1362 fuse.
PELIGRO DE CHOQUES
ELECTRICOS NO EXPO-
NER A LLUVIA Y HUMEDAD
ATENCION: NO ABRIR EL APARATO, EN SU INTERIOR
NO HAY MANDOS QUE PUEDAN SER MANIPULADOS POR
EL USUARIO NI PARTES DE REPUESTO. PARA TODAS LAS
OPERACIONES DE SERVICIO DIRIGIRSE A UN CENTRO DE
ASISTENCIA AUTORIZADO TREVI.
RISCHIO DI SCOSSE
ELETTRICHE NON ESPORRE
A PIOGGIA E UMIDITÀ
ATTENZIONE: NON APRIRE L’APPARECCHIO. ALL’INTERNO
NON VI SONO COMANDI MANIPOLABILI DALL’UTENTE NE
PARTI DI RICAMBIO. PER TUTTE LE OPERAZIONI DI SERVIZIO
RIVOLGERSI AD UN CENTRO DI ASSISTENZA AUTORIZZATO
TREVI
CAUTION
DANGER OF ELECTRIC
SHOCK! DO NOT EXPOSE
TO RAIN OR HUMIDITY
WARNING: DO NOT OPEN THE UNIT. THERE ARE NO
USER-SERVICEABLE CONTROLS OR SPARE PARTS INSIDE.
FOR ALL SERVICE OPERATIONS CONTACT AN AUTHORI-
SED TREVI SERVICE CENTRE
ATENÇÃO
PERIGO DE CHOQUES
ELÉTRICOS NÃO EXPOR A
CHUVA E UMIDADE
ATENÇÃO: NÃO ABRIR O APARELHO. NO INTERIOR DO
MESMO NÃO EXISTEM COMANDOS OU PEÇAS DE SUBSTI-
TUIÇÃO QUE POSSAM SER MANIPULADOS PELO USUÁRIO.
EM CASO DE EVENTUAL OPERAÇÃO DE SERVIÇO, DIRIGIR-SE
A UM CENTRO DE ASSISTÊNCIA AUTORIZADO TREVI
ATTENTION
DANGER DE CHOC ÉLEC-
TRIQUE ! NE PAS EXPOSER
À LA PLUIE OU À L’HU-
MIDITÉ
ATTENTION: NE PAS OUVRIR L’APPAREIL. SON INTERIEUR
NE CONTIENT AUCUNE COMMANDE DESTINEE A
L’UTILISATEUR NI DE PIECES DE RECHANGE. POUR TOUTE
OPERATION D’ASSISTANCE CONTACTER UN CENTRE
D’ASSISTANCE AGREE TREVI.
ACHTUNG
GEFAHR EINES
STROMSCHLAGS! NICHT
AUSSETZEN REGEN ODER
FEUCHTIGKEIT AUSSETZEN
ACHTUNG: DAS GERÄT NICHT ÖFFNEN. IM INNERN
BEFINDEN SICH KEINE VOM BENUTZER SELBST INSTAN-
DSETZBAREN TEILE UND AUCH KEINE ERSATZTEILE. FÜR
JEGLICHE SERVICEARBEITEN, WENDEN SIE SICH BITTE AN
EINE TREVI AUTORISIERTEN KUNDENDIENSTSTELLE.
ATTENZIONE ATENCIÓN

_3
EC 882
NOTE D'USO
Questo apparecchio è uno strumento elettronico di alta precisione, evitate quindi
di utilizzarlo nei seguenti casi:
• Vicino a campi magnetici.
• Vicino a fonti di calore come caloriferi e stufe.
• In luoghi molto umidi come stanze da bagno, piscine, ecc...
• In luoghi molto polverosi.
• In luoghi soggetti a forti vibrazioni.
• Posizionare l’apparecchio in modo che ai suoi lati ci sia sempre abbastanza
spazio per la libera circolazione di aria (almeno 5cm).
• Primadiaccenderel’apparecchio,vericaresemprecheilcavodialimentazione
sia installato correttamente.
• Il cavo di alimentazione deve essere collegato a una presa vicina all’apparecchio
e deve essere facilmente accessibile.
• Nessunasorgentediammanuda,qualicandeleaccese,dovrebbeessereposta
sull’apparecchio.
• L’apparecchio non deve essere esposto a stillicidio o a spruzzi d’acqua e nessun
oggetto pieno di liquido, quali vasi, deve essere posto sull’apparecchio.
• Se dei liquidi penetrano all’interno dell’apparecchio scollegare immediatamente
la spina dalla presa e portare l’apparecchio al più vicino centro assistenza autori-
zato TREVI.
• Se si nota un calore eccessivo sul dispositivo, scollegare immediatamente la spina
dalla presa di corrente principale.
• Non tirare il cavo di alimentazione.
• Conservare il presente manuale per futuri riferimenti.
CURA E MANUTENZIONE
Per la pulizia si consiglia l’ uso di un panno morbido, leggermente inumidito. Evitate
solventi o sostanze abrasive.
IMPORTANTE
Questo dispositivo e' progettato per uso domestico. La buona costruzione di
questo apparecchio ne garantisce per lungo tempo il perfetto funzionamento. Se
tuttavia dovesse presentarsi qualche inconveniente, sarà opportuno consultare il
più vicino Centro Assistenza autorizzato TREVI.
TREVI persegue una politica di continua ricerca e sviluppo. Pertanto i prodotti
possono presentare caratteristiche diverse da quelle descritte.
NOTE D’USO E AVVERTENZE

EC 882
4_
NOTES OF USE
This appliance is a high precision electronic instrument, so avoid using it in the
following cases:
• Nearmagneticelds.
• Near heat sources such as heaters and stoves.
• In very humid places such as bathrooms, swimming pools, etc...
• In very dusty places.
• In places subject to strong vibrations.
• Position the appliance so that there is always enough space on its sides for free
circulation of air (at least 5cm).
• If liquids penetrate inside the appliance, immediately disconnect the plug from
the socket and take the appliance to the nearest TREVI authorized service
center.
• Always check that the power cables are installed correctly.
• Nonakedamesources,suchaslightedcandles,shouldbeplacedontheap-
pliance.
• The appliance must not be exposed to dripping or splashing water and no
objectslledwithliquid,suchasvases,mustbeplacedontheappliance.
• Before turning on the appliance, always check that the power cable and connec-
tion cable are installed correctly.
• The power cable must be connected to a socket close to the device and must
be easily accessible.
• If you notice excessive heat on the device, immediately disconnect the plug from
the main power outlet.
• Do not pull the power cord.
• Keep this manual for future reference.
CARE AND MAINTENANCE
For cleaning, we recommend using a soft, slightly damp cloth. Avoid solvents or
abrasive substances.
IMPORTANT
This device is designed for home use. The good construction of this device guaran-
tees its perfect functioning for a long time. However, should any problems arise, it
is advisable to consult the nearest TREVI authorized service center.
TREVI pursues a policy of continuous research and development. Therefore the
products may have characteristics different from those described.
NOTES OF USE

_5
EC 882
NOTES D’UTILISATION
Cet appareil est un instrument électronique de haute précision, évitez donc de
l’utiliser dans les cas suivants:
• Près de champs magnétiques.
• À proximité de sources de chaleur telles que radiateurs et poêles.
• Dans des endroits très humides comme les salles de bain, les piscines, etc.
• Dans des endroits très poussiéreux.
• Dans des endroits soumis à de fortes vibrations.
• Positionnezl’appareildemanièreàcequ’ilyaittoujourssufsammentd’espace
sur ses côtés pour une libre circulation de l’air (au moins 5cm).
• Si des liquides pénètrent à l’intérieur de l’appareil, débranchez immédiatement la
chedelapriseetapportezl’appareilaucentredeserviceagrééTREVIleplus
proche.
• Vérieztoujoursquelescâblesd’alimentationsontcorrectementinstallés.
• Aucunesourcedeammenue,tellequedesbougiesallumées,nedoitêtre
placée sur l’appareil.
• L’appareil ne doit pas être exposé à des gouttes d’eau ou des éclaboussures et aucun
objet rempli de liquide, comme des vases, ne doit être placé sur l’appareil.
• Avantd’allumerl’appareil,vérieztoujoursquelecâbled’alimentationetle
câbledeconnexionsontcorrectementinstallés.
• Lecâbled’alimentationdoitêtrebranchésurunepriseprochedel’appareilet
doit être facilement accessible.
• Si vous remarquez une chaleur excessive sur l’appareil, débranchez immédiate-
mentlachedelaprisesecteur.
• Ne tirez pas sur le cordon d’alimentation.
• Conservez ce manuel pour référence future.
SOIN ET MAINTENANCE
Pour le nettoyage, nous vous recommandons d’utiliser un chiffon doux légèrement
humide. Évitez les solvants ou les substances abrasives.
IMPORTANT
Cet appareil est conçu pour un usage domestique. La bonne construction de cet
appareil garantit son parfait fonctionnement pendant longtemps. Cependant, en cas
de problème, il est conseillé de consulter le centre de service agréé TREVI le plus
proche.
TREVI poursuit une politique de recherche et développement continue. Par
conséquent, les produits peuvent avoir des caractéristiques différentes de celles
décrites.
NOTES D’UTILISATION
EC 882
8_
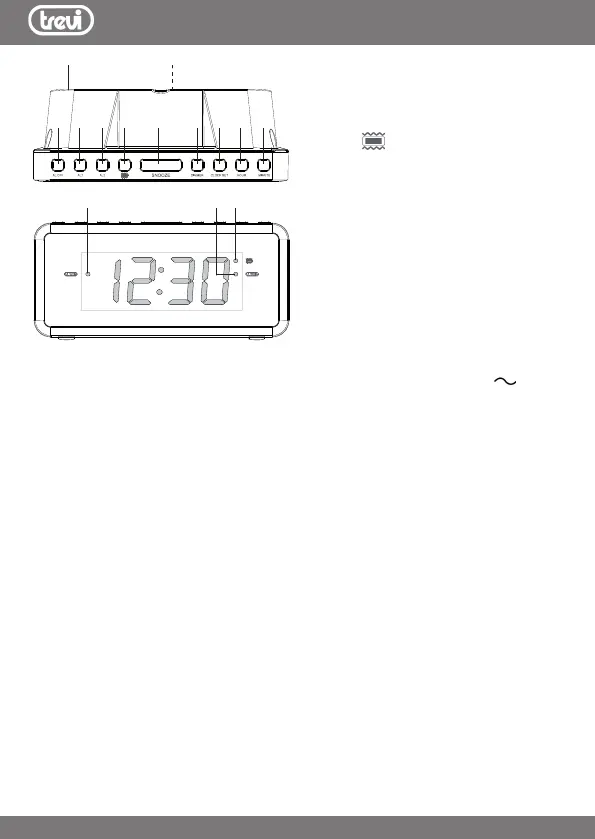
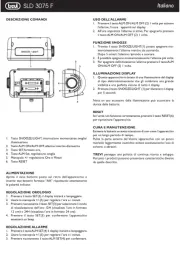
DESCRIZIONE COMANDI
1. Tasto AL OFF, spegnimento allarme
2. Tasto AL 1, impostazione allarme 1
3. Tasto AL 2, impostazione allarme 2
4. Tasto
, Vibrazione
5. Tasto SNOOZE
6. Tasto DIMMER, regolazione
luminosità display
7. Tasto CLOCK SET, impostazione orario
8. Tasto HOUR regolazione ora
9. Tasto MINUTE regolazione minuti
10. Altoparlante
11. Vano batterie (sul retro)
12. Indicatore Led allarme 1 attivo
13. Indicatore Led allarme 2 attivo
14. Indicatore Led vibrazione attiva
INSTALLAZIONE
Inserire la spina del cavo di alimentazione in una presa di corrente 230V
50Hz; il
displaylampeggerànoaquandol’orariononsaràregolato.
Per mantenere l’orario e la memorizzazione dell’allarme, anche durante una momen-
tanea man canza di energia elettrica, inserire due batterie “AAA” nell’apposito vano
(11) sul retro dell’apparecchio rispettando le polarità indicate.
Nota: durante il funzionamento a batterie, l’allarme sveglia non funziona.
REGOLAZIONE ORARIO
1. TenerepremutoiltastoCLOCKSET(7)percirca3secondinchèildisplaynon
lampeggia;
2. Premere ripetutamente il tasto HOUR (8) per impostare l’ora corrente;
3. Premere ripetutamente il tasto MINUTE (9) per impostare i minuti correnti;
4. Confermare premendo una volta il tasto CLOCK SET (7).
Nota: se durante la fase di regolazione (display lampeggiante) non viene premuto nessun
tasto per qualche secondo, l’apparecchio si riporterà, automaticamente, in modalità
display sso.
IMPOSTAZIONE SVEGLIA
Questa sveglia è dotata di due allarmi che possono essere impostati e utilizzati in
modo indipendente. La procedura per impostare entrambe le sveglie è la stessa.
Per impostare l’ora della sveglia 1, seguire le istruzioni riportate di seguito. Per la
sveglia 2, sostituire il tasto “AL 1” (2) con il tasto “AL 2” (3).
1. Premere il tasto AL1 (2), il display, con l’indicazione dell’orario di allarme, e il led
indicatore allarme 1 (12) cominceranno a lampeggiare;
ITALIANO
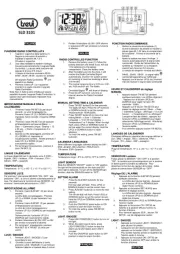
1 2 3 4 5 6 7
10
8 9
12 13 14
11

EC 882
10_
ENGLISH
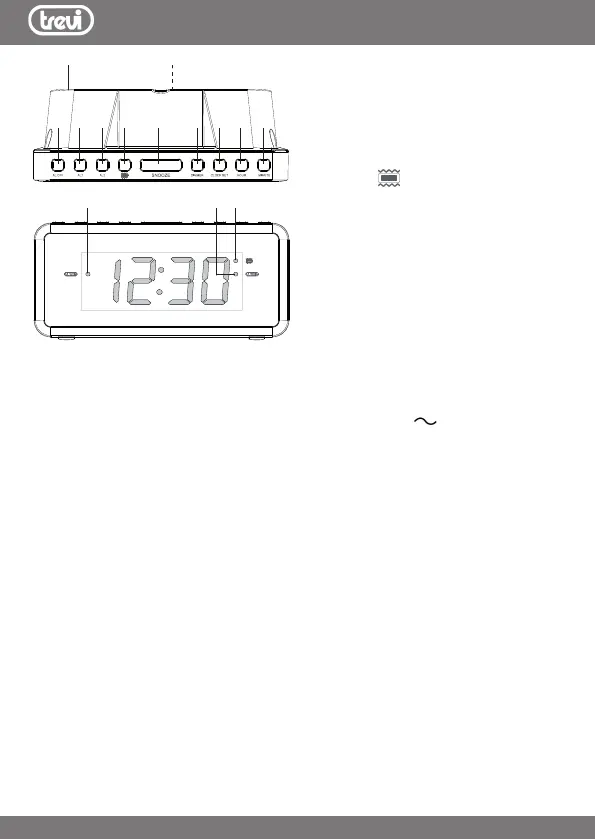
CONTROLS DESCRIPTION
1. AL OFF button, alarm switch Off
2. AL1 button
3. AL2 button
4.
button, Vibration
5. SNOOZE button
6. DIMMER button, display brightness
adjustment
7. CLOCK SET button
8. HOUR button, hour adjustment
9. MINUTE button, minutes adjustment
10. Speaker
11. Battery compartment (on the back)
12. Led Alarm 1 indicator
13. Led Alarm 2 indicator
14. Led indicator Vibration function
PREPARATION FOR USE
Insert the plug of the power cable into a 230V
50Hzsocket;thedisplaywillash
until the time is set.
To maintain the time and alarm memory even during a momentary power failure,
insert two ‘AAA’ batteries in the battery compartment (11) at the back of the
device, observing the indicated polarities.
Note: during battery operation, the wake-up alarm does not work.
SETTING THE TIME
1.ThedigitswillashafterconnectingtopowerorpressandholddownCLOCK
SETbutton(7)forapproximately3secondsuntilthedisplayashes;
2. Press HOUR button (8) repeatedly to change the hour setting;
3. Press MINUTE button (9) repeatedly to change the minute settin;
4. PressCLOCKSETbutton(7)toconrm.
Note: If no button is pressed for a few seconds during the setting phase (ashing display),
the device will automatically return to xed display mode.
SETTING ALARM TIME
Setting Alarm 1 and Alarm 2
This clock has dual alarms that can be set and used independently. The procedure
to set both alarms is the same. Follow the instructions below to set alarm time 1.
For alarm time 2, substitute “AL 1” button (2) with “AL 2” button (3).
1. Press AL1 button (2), the display, showing the alarm time, and the alarm indica-
torLED1(12)willstartashing;
1 2 3 4 5 6 7
10
8 9
12 13 14
11
EC 882
12_
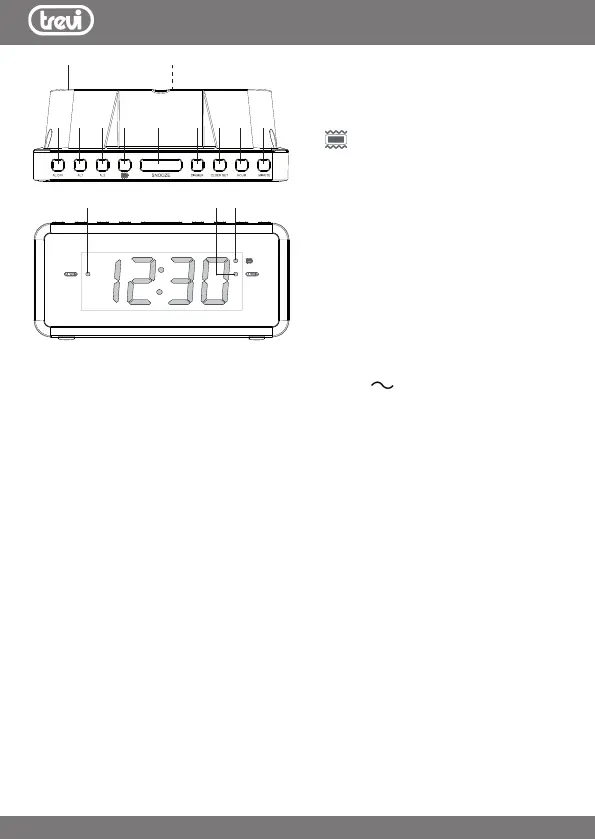
FRANÇAIS
DESCRIPTION DES
COMMANDES
1. Bouton AL OFF, pour désactiver
l’alarme
2. Bouton AL1, réglage d’alarme 1
3. Bouton AL2, réglage d’alarme 2
4. Bouton
, Vibration
5. Bouton SNOOZE
6. Bouton DIMMER, réglage de la
luminosité de l’écran
7. Bouton CLOCK SET
8. Bouton HOUR
9. Bouton MINUTE
10. Orateur
11. Compartiment à piles (à l’arrière)
12. Indicateur LED d’alarme 1
13. Indicateur LED d’alarme 2
14. Indicateur LED fonction de vibration
PRÉPARATION À L’UTILISATION
Insérezlacheducâbled’alimentationdansuneprise230V
50Hz; l’écran
clignote jusqu’à ce que l’heure soit réglée.
Pour conserver la mémoire de l’heure et de l’alarme même en cas de coupure de
courant momentanée, insérez deux piles “AAA” dans le compartiment à piles (11)
situé à l’arrière de l’appareil, en respectant les polarités indiquées.
Remarque: en cas de fonctionnement sur piles, l’alarme de réveil ne fonctionne pas.
RÉGLAGE DE L’HEURE
1. Les chiffres clignotent après la mise sous tension ou appuyez et maintenez
enfoncé le bouton CLOCK SET (7) pendant environ 3 secondes jusqu’à ce que
l’écran clignote;
2. AppuyerplusieursfoissurleboutonHOUR(8)pourmodierleréglagedel’heure;
3. AppuyerplusieursfoissurleboutonMINUTE(9)pourmodierleréglagedes
minutes;
4. AppuyezsurleboutonCLOCKSET(7)pourconrmer.
Remarque: Si aucune touche n’est actionnée pendant quelques secondes au cours de
la phase de réglage (afchage clignotant), l’appareil revient automatiquement en mode
d’afchage xe.
RÉGLAGE ET ACTIVATION DE L’ALARME
Cette horloge possède deux alarmes qui peuvent être réglées et utilisées indépen-
damment l’une de l’autre. La procédure de réglage des deux alarmes est la même.
1 2 3 4 5 6 7
10
8 9
12 13 14
11
EC 882
14_
DEUTCH
BEFEHLSBESCHREIBUNG
1. AL OFF-Taste, Alarmschalter aus
2. AL1-Taste
3. AL2-Taste
4.
-Taste, Vibrationsfunktion
5. SNOOZE-Taste
6. DIMMER-Taste, Helligkeitseinstel
lung anzeigen
7. CLOCK SET-Taste
8. HOUR-Taste, Stundeneinstellung
9. MINUTE-Taste, Minuteneinstellung
10. Lautsprecher
11. Batteriefach (auf der Rückseite)
12. LED Alarm 1 Anzeige
13. LED Alarm 2 Anzeige
14. LED-Anzeige Vibrationsfunktion
VORBEREITUNG ZUM GEBRAUCH
Stecken Sie den Stecker des Netzkabels in eine 230V
50Hz-Buchse. Die Anzeige
blinkt, bis die Uhrzeit eingestellt ist.
Um den Zeit- und Alarmspeicher auch bei einem kurzzeitigen Stromausfall
aufrechtzuerhalten, legen Sie zwei ‘AAA’-Batterien in das Batteriefach (11) auf der
Rückseite des Geräts ein und beachten Sie dabei die angegebenen Polaritäten.
Hinweis: Während des Batteriebetriebs funktioniert der Weckalarm nicht.
EINSTELLEN DER UHRZEIT
1. Die Ziffern blinken nach dem Anschluss an das Stromnetz oder halten Sie die
Taste CLOCK SET (7) ca. 3 Sekunden lang gedrückt, bis die Anzeige blinkt;
2. Drücken Sie die HOUR-Taste (8) wiederholt, um die Stundeneinstellung zu ändern;
3. Drücken Sie die MINUTE-Taste (9) wiederholt, um die Minuteneinstellung zu
ändern;
4. Drücken Sie die Taste CLOCK SET (7) zur Bestätigung.
Hinweis: Wenn während der Einstellphase (blinkende Anzeige) einige Sekunden lang keine
Taste gedrückt wird, kehrt das Gerät automatisch in den festen Anzeigemodus zurück.
ALARMEINSTELLUNG UND AKTIVIERUNG
Diese Uhr hat zwei Alarme, die unabhängig voneinander eingestellt und verwendet
werden können. Das Verfahren zum Einstellen beider Alarme ist das gleiche. Folgen
Sie den nachstehenden Anweisungen, um die Weckzeit 1 einzustellen. Für die
Weckzeit 2 ersetzen Sie die Taste “AL 1” (2) durch die Taste “AL 2” (3).
1. Drücken Sie die Taste AL1 (2), das Display zeigt die Alarmzeit an und die
Alarmanzeige-LED 1 (12) beginnt zu blinken;
1 2 3 4 5 6 7
10
8 9
12 13 14
11
_15
EC 882
2. Drücken Sie wiederholt die HOUR-Taste (8), um die Weckzeit einzustellen;
3. Drücken Sie wiederholt die Taste MINUTE (9), um die Weckminuten einzustellen;
4. Drücken Sie auf die Taste AL1 (2), um die Einstellung zu bestätigen. Der Alarm 1
wird aktiviert.
Die Alarmanzeige (12) leuchtet auf dem Display auf.
5. Drücken Sie auf die -Taste (4), um den Vibrationsmodus zusätzlich zum
Alarmton zu aktivieren. Die Anzeige (14) leuchtet auf dem Display auf.
Um den Alarm und die Anzeige (12) oder (13) vollständig zu deaktivieren, drücken
Sie wiederholt auf die Taste AL1 (2) oder AL 2 (3), bis sie sich ausschalten.
SNOOZE-FUNKTION UND ALARM-DEAKTIVIERUNG
- Drücken Sie, während der Alarm ertönt, die SNOOZE-Taste (5), um den Alarm
kurzzeitig abzustellen; die Alarmanzeige (12/13) beginnt zu blinken. Nach 9 Minu-
ten ertönt der Alarm erneut;
- Drücken Sie, während der Alarm ertönt, die Taste AL OFF (1), um den Alarm
endgültig abzustellen. Der Alarm bleibt aktiv und ertönt 24 Stunden später.
EINSTELLUNG DER DISPLAY-HELLIGKEIT
Drücken Sie die Taste DIMMER (6), um die Helligkeit des Displays zwischen hoch,
niedrig und aus zu wählen.
TECHNISCHE EIGENSCHAFTEN
Stromversorgung: ............................................. 230V
50Hz
Ersatzbatterie: ...................................................2x Größe AAA (nicht im Lieferumfang
enthalten) - DC 3V
Verbrauch: .......................................................... 4W
Abmessungen: ...................................................160x 550x 700 mm
Gewicht: .............................................................340 gr.
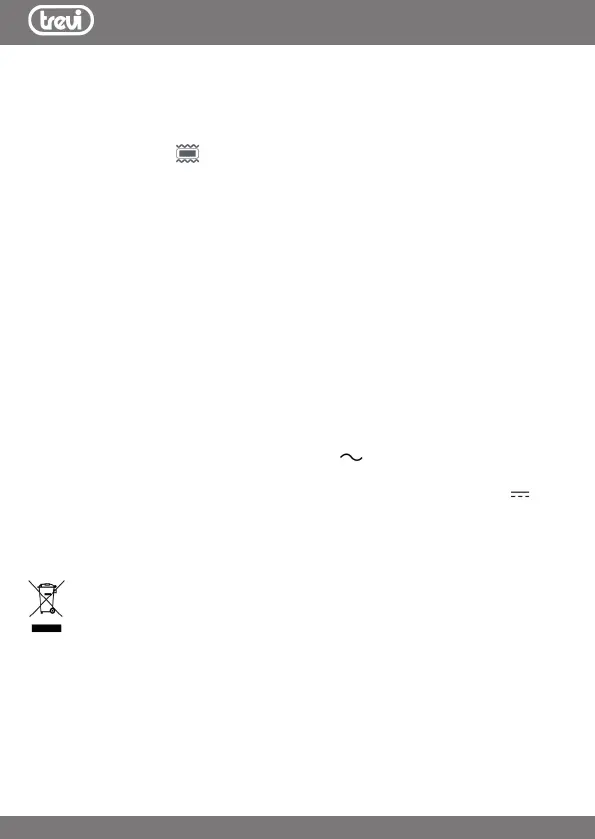
Hinweise zur ordnungsgemäßen Entsorgung des Produkts.
Das auf dem Gerät angebrachte Symbol weist darauf hin, dass das Altgerät “getrennt zu sam-
meln” ist und das Produkt daher nicht zusammen mit dem Gemeindeabfall entsorgt werden
darf. Der Benutzer muss das Produkt zu den entsprechenden, von der Gemeindeverwal-
tung eingerichteten “Wertstoffsammelstellen” bringen oder dem Händler beim Kauf eines
neuen Produkts übergeben. Die getrennte Müllsammlung und anschließende Aufbereitung,
Wiederverwertung und Entsorgung fördern die Herstellung von Geräten unter Verwendung
wiederverwerteter Materialien und vermindern die negativen Auswirkungen auf die Umwelt
und Gesundheit in Folge einer falschen Müllverwaltung.
Die widerrechtliche Entsorgung des Produkts führt zur Auferlegung von Verwaltungsstrafen.
Produkspesifikasjoner
| Merke: | Trevi |
| Kategori: | Klokkeradio |
| Modell: | EC 882 |
Trenger du hjelp?
Hvis du trenger hjelp med Trevi EC 882 still et spørsmål nedenfor, og andre brukere vil svare deg
Klokkeradio Trevi Manualer
26 August 2025
26 August 2025
25 August 2025

20 Januar 2025
Klokkeradio Manualer
- Lexibook
- Akai
- Fysic
- Hyundai
- Medisana
- Krüger&Matz
- Reflexion
- Vimar
- Emerson
- Sonic Alert
- Enhance
- Aiwa
- Blaupunkt
- Perel
- Hama
Nyeste Klokkeradio Manualer

6 Oktober 2025

6 Oktober 2025

5 Oktober 2025

5 Oktober 2025
5 Oktober 2025
5 Oktober 2025
5 Oktober 2025

5 Oktober 2025
5 Oktober 2025

5 Oktober 2025