Vimar ELVOX EBS3 Bruksanvisning
Vimar
Ikke kategorisert
ELVOX EBS3
Les nedenfor 📖 manual på norsk for Vimar ELVOX EBS3 (4 sider) i kategorien Ikke kategorisert. Denne guiden var nyttig for 5 personer og ble vurdert med 4.7 stjerner i gjennomsnitt av 3 brukere
Side 1/4

Viale Vicenza, 14
36063 Marostica VI - Italy
www.vimar.com
EBS3
S6I.EBS.300 01 1710
EBS3
Sblocco a chiave e serratura per attuatore KLYS 9CD per porta basculante
Releasing key and lock for KLYS 9CD up door actuator-and-over garage
Déblocage et serrure pour à clé actuateur KLYS 9CD pour portes basculantes
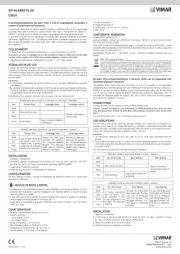
Per eseguire il montaggio dell’accessorio è necessario togliere il
carter di copertura dell’operatore.
PREDISPOSIZIONE FORI DI FISSAGGIO SBLOCCO
- Infilare la vite in dotazione M6x50 nella boccola all’estremità con
esagono incassato (Fig. 1).
- Inserire la boccola con la vite sull’asta della maniglia di sblocco
(Fig. 2).
- Utilizzando l’escursione della vite, appoggiarsi contro il manto
della porta basculante e tramite un pennarello segnare il diametro
della testa della vite M6x50 (Fig. 3).
1
2
3
Pour monter l’accessoire, il faut retirer le carter de protection de
l’opérateur.
PRÉPARATION DES ORIFICES DE FIXATION DÉBLOCAGE
- Insérer la vis fournie M6x50 dans la bague située à l’extrémité
portant un hexagone encastré (Fig. 1).
- Insérer la bague avec la vis sur la tige de la poignée de déblocage
(Fig. 2).
- En utilisant l’étendue de la vis, s’appuyer contre le revêtement de
la porte basculante et à l’aide d’un feutre, indiquer le diamètre de
la tête de la vis M6x50 (Fig. 3).
To assemble the accessory, it is necessary to remove the operator
cover carter.
PREPARATION OF RELEASE FASTENING PERFORATIONS
- Place the supplied M6x50 screw in the bushing on the edge with
the Allen wrench (Fig. 1).
- Insert the bushing with the screw on the shaft of the release
handle (Fig. 2).
- By moving the screw, rest it against the cover of the oscillator door
and use a marker to mark the diameter of the M6x50 screw head
(Fig. 3).
Manuale per il collegamento e l’uso - Installation and operation manual
Manuel pour le raccordement et l’emploi - Installations-und Benutzerhandbuch
Manual para el conexionado y el uso - Manual para la instalação e el uso
Produkspesifikasjoner
| Merke: | Vimar |
| Kategori: | Ikke kategorisert |
| Modell: | ELVOX EBS3 |
Trenger du hjelp?
Hvis du trenger hjelp med Vimar ELVOX EBS3 still et spørsmål nedenfor, og andre brukere vil svare deg
Ikke kategorisert Vimar Manualer
1 September 2025

25 August 2025

25 August 2025
25 August 2025

25 August 2025
25 August 2025

25 August 2025
25 August 2025

25 August 2025
25 August 2025
Ikke kategorisert Manualer
- SunPower
- POGS
- Icron
- Acros
- Truelife
- Advanced Network Devices
- Arthur Martin
- GoldAir
- Eartec
- DQ
- Roland
- Guzzanti
- ETA
- Atlantis Land
- GARDE
Nyeste Ikke kategorisert Manualer

23 Oktober 2025

23 Oktober 2025

23 Oktober 2025

23 Oktober 2025

23 Oktober 2025

23 Oktober 2025

23 Oktober 2025

23 Oktober 2025

23 Oktober 2025

23 Oktober 2025