Whirlpool WDPS8024SZ Bruksanvisning
Whirlpool
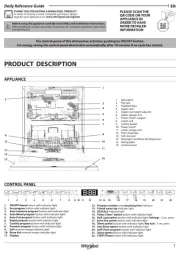
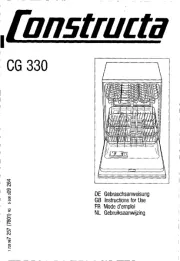
Oppvaskmaskin
WDPS8024SZ
Les nedenfor 📖 manual på norsk for Whirlpool WDPS8024SZ (16 sider) i kategorien Oppvaskmaskin. Denne guiden var nyttig for 19 personer og ble vurdert med 4.1 stjerner i gjennomsnitt av 10 brukere
Side 1/16
1
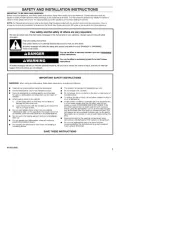
SAFETY AND INSTALLATION INSTRUCTIONS
IMPORTANT TO BE READ AND OBSERVED:
Before using the appliance, read these safety instructions. Keep them nearby for future reference. These instructions and the
appliance itself provide important safety warnings, to be observed at all times. The manufacturer declines any liability for failure to
observe these safety instructions, for inappropriate use of the appliance or incorrect setting of controls.
You can be killed or seriously injured if you don't immediately
You
can be killed or seriously injured if you don't
follow
All safety messages will tell you what the potential hazard is, tell you how to reduce the chance of injury, and tell you what can
happen if the instructions are not followed.
Your safety and the safety of others are very important.
We have provided many important safety messages in this manual and on your appliance. Always read and obey all safety
messages.
This is the safety alert symbol.
This symbol alerts you to potential hazards that can kill or hurt you and others.
All safety messages will follow the safety alert symbol and either the word “DANGER” or “WARNING.”
These words mean:
follow instructions.
instructions.
DANGER
WARNING
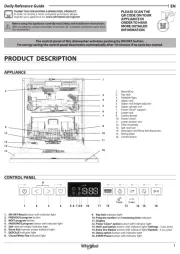
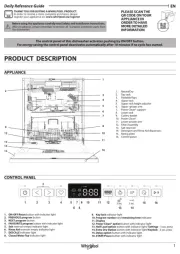
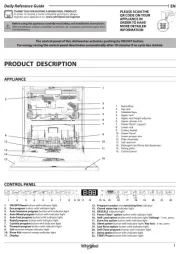
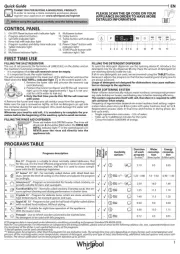
NOTE: For Operating Instructions, refer to the Quick Start Guide provided with the product and online documentation. How to
access the online documentation is located on the Quick Start Guide along with QR code on the product for future reference.
IMPORTANT SAFETY INSTRUCTIONS
WARNING: When using your dishwasher, follow basic precautions, including the following:
n Read all instructions before using the dishwasher.
n Use the dishwasher only for its intended function.
n Use only detergents or wetting agents recommended
for use in a dishwasher and keep them out the reach of
children.
n When loading items to be washed:
1. Locate sharp items so that they are not likely to
damage the door seal; and
2. Load sharp knives with the handles up to reduce the
risk of cut-type injuries.
n Do not wash plastic items unless they are marked
"dishwasher safe" or the equivalent. For plastic items not
so marked, check the manufacturer's recommendations.
n Do not touch the heating element during or immediately
after use.
n Do not operate your dishwasher unless all enclosure
panels are properly in place.
n Do not leave the dishwasher open when not loading or
unloading dishes.
n This product is intended for residential use only.
n Do not tamper with controls.
n Do not abuse, sit on, or stand on the door or dish racks of
the dishwasher.
n To reduce the risk of injury, do not allow children to play in
or on a dishwasher.
n Under certain conditions, hydrogen gas may be produced
in a hot-water system that has not been used for two
weeks or more. HYDROGEN GAS IS EXPLOSIVE. If the
hot-water system has not been used for such a period,
before using the dishwasher, turn on all hot-water faucets
and let the water ow from each for several minutes. This
will release any accumulated hydrogen gas. As the gas is
ammable, do not smoke or use an open ame during this
time.
n Remove the door to the washing compartment when
removing an old dishwasher from service or discarding it.
n Do not use replacement parts that have not been
recommended by the manufacturer (e.g. parts made at
home using a 3D printer).
SAVE THESE INSTRUCTIONS
W11651308C
Produkspesifikasjoner
| Merke: | Whirlpool |
| Kategori: | Oppvaskmaskin |
| Modell: | WDPS8024SZ |
Trenger du hjelp?
Hvis du trenger hjelp med Whirlpool WDPS8024SZ still et spørsmål nedenfor, og andre brukere vil svare deg
Oppvaskmaskin Whirlpool Manualer
6 Oktober 2025
5 Oktober 2025
5 Oktober 2025
4 Oktober 2025
4 Oktober 2025
6 September 2025
5 September 2025

15 August 2025
2 August 2025

13 Februar 2025
Oppvaskmaskin Manualer
- Dacor
- Silverline
- Zelmer
- Cosmo
- Bomann
- Blaupunkt
- Veripart
- Cove
- KitchenAid
- Baumatic
- Master Kitchen
- New World
- Electrolux
- Flavel
- Hoover
Nyeste Oppvaskmaskin Manualer
23 Oktober 2025
21 Oktober 2025
21 Oktober 2025
21 Oktober 2025
21 Oktober 2025
21 Oktober 2025

20 Oktober 2025

20 Oktober 2025

20 Oktober 2025

19 Oktober 2025