AmpliVox SS3230 Bruksanvisning
AmpliVox
Ikke kategorisert
SS3230
Les nedenfor 📖 manual på norsk for AmpliVox SS3230 (4 sider) i kategorien Ikke kategorisert. Denne guiden var nyttig for 11 personer og ble vurdert med 4.4 stjerner i gjennomsnitt av 6 brukere
Side 1/4
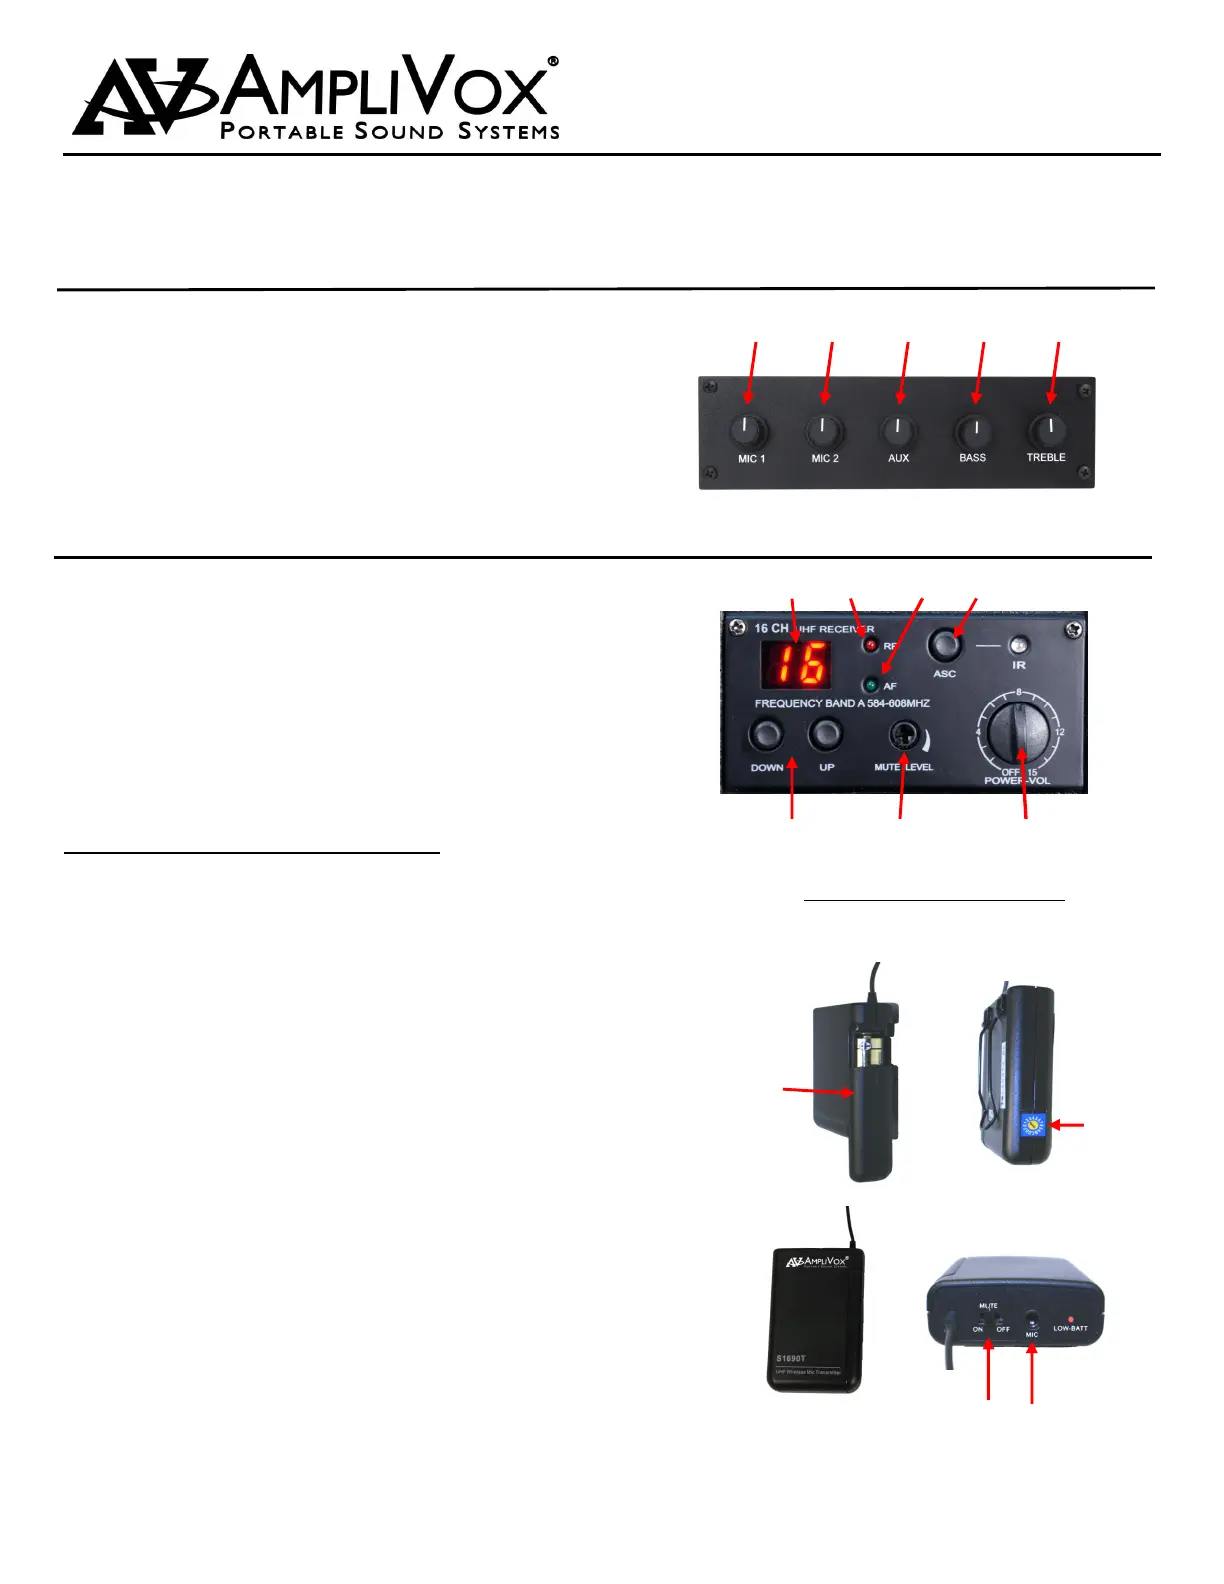
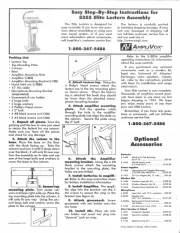
CONTROL PANEL
Electronic Instructions
Lectern
Your lectern may not contain all of the electronic modules as shown and explained here. Speakers and lectern
microphone are pre-wired. To install gooseneck microphone, pull out connector from microphone holder and
snap microphone into connector. Install back into microphone holder.
NEED HELP? Call 800-267-5486
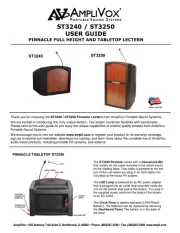
16 CHANNEL WIRELESS RECEIVER
1. MIC 1: Adjusts volume level of gooseneck microphone
on reading table.
2. MIC 2: Adjusts volume level of microphone plugged
into the MIC 2 input jack on amplifier.
3. AUX: Controls output level of device that is plugged
into the L/R RCA jacks.
4. BASS: This control cuts or boosts the bass level.
5. TREBLE: This control cuts or boosts the treble level.
RECEIVER / TRANSMITTER SETUP:
· The receiver has its own POWER / VOLUME Control (G).
Turn Power On. A Frequency Channel will appear in the Chan-
nel Display (A). Press Select Buttons (E) to select a channel.
Channel number must match channel number on wireless
transmitter.
· The transmitter bodypack is operated by 1 - "AA" 1.5 Volt alka-
line battery. Slide off battery cover (H) and install battery as
shown. Make certain the battery is fully seated in its compart-
ment so the cover slides in place easily. Battery life with alka-
line batteries is approximately 8 hours of operating time.
· Select a channel (1-16) on side panel (I) using the supplied
screw driver to select channel number. Channel selected
should match channel on receiver. When transmitter and
receiver are set to correct channel the RF indicator (B) will
glow red when transmitter is turned on.
· Plug the Lapel microphone into the Mic Input Jack (K). The
microphone can be clipped to a necktie or other clothing,
using the supplied clip. The lapel mic should be placed under
the chin, as close to the center of the body as possible.
· Slide the power ON/OFF switch (J) to the ON position (the
LED indicator light will illuminate green). Replace batteries
when this LED turns red.
● MUTE LEVEL (F) is set at half way mark when it leaves the
factory. If speaker sound is breaking up, turn level clockwise
with small screwdriver until condition improves.
· Channel Display (A)
· RF - Radio Frequency Indicator (B)
· AF - Audio Frequency Indicator (C)
· ASC / IR Auto Channel Select (Handheld Only) (D)
· Select Buttons - Manual Channel Selection (E)
· Mute Level Adjustment (F)
· Volume Control (G)
A
B
C D
E
F
G
1 2 3 4 5
Wireless Transmitter - Bodypack
Battery Cover
H
Channel Selector
I
Top Panel
J
K
Produkspesifikasjoner
| Merke: | AmpliVox |
| Kategori: | Ikke kategorisert |
| Modell: | SS3230 |
| Bredde: | 660.4 mm |
| Dybde: | 508 mm |
| Høyde: | 1117.6 mm |
| Anbefalt bruk: | PA-system |
| Produktfarge: | Eik |
| Modell/Type: | Multimedia-stativ |
Trenger du hjelp?
Hvis du trenger hjelp med AmpliVox SS3230 still et spørsmål nedenfor, og andre brukere vil svare deg
Ikke kategorisert AmpliVox Manualer
26 September 2025

26 September 2025
26 September 2025
26 September 2025
25 September 2025
25 September 2025

25 September 2025
25 September 2025
25 September 2025
25 September 2025
Ikke kategorisert Manualer
- Noyafa
- Morphor
- Moulinex
- AudioQuest
- Luxman
- Vermeiren
- LAS
- Steba
- Whirlwind
- Pulsar
- JAYS
- RCF
- Ledlenser
- BLUEPALM
- Gamma
Nyeste Ikke kategorisert Manualer

23 Oktober 2025

23 Oktober 2025

23 Oktober 2025

23 Oktober 2025

23 Oktober 2025

23 Oktober 2025

23 Oktober 2025

23 Oktober 2025

23 Oktober 2025

23 Oktober 2025