Crestron CCS-UCA-SMK Bruksanvisning
Crestron
Videokonferansesystem
CCS-UCA-SMK
Les nedenfor 📖 manual på norsk for Crestron CCS-UCA-SMK (2 sider) i kategorien Videokonferansesystem. Denne guiden var nyttig for 33 personer og ble vurdert med 4.2 stjerner i gjennomsnitt av 17 brukere
Side 1/2
DO GUIDE
CCS-UCA-SMK
Swivel Mount Kit for Crestron Mercury™ Tabletop Conference System
DO Prepare the Mounting Location
NOTE: The mounting surface should have a thickness of 1" (25 mm) to 1-3/8" (34 mm).
The kit includes a template that is used to mark the location of the mounting hole on top of the mounting surface, and the location of the stop plate under the
mounting surface. When using the template, make sure the arrow on the template points toward the front edge of the mounting surface.
1. Secure the template to a mounting location that allows the full pivot of the device on the top of the mounting surface and a close mounting location for
accessories beneath the mounting surface.
2. Place 2" painters tape (not included) on the hole location and mark the hole on the tape.
3. Drill a 1-3/16" (30 mm) mounting hole in the marked location on the tape.
4. Relocate the template to the underside of the mounting surface and orient it so that the arrow on the template points toward the front edge of the table.
Verify that the template location of the stop plate permits the Crestron Mercury™ device to swivel.
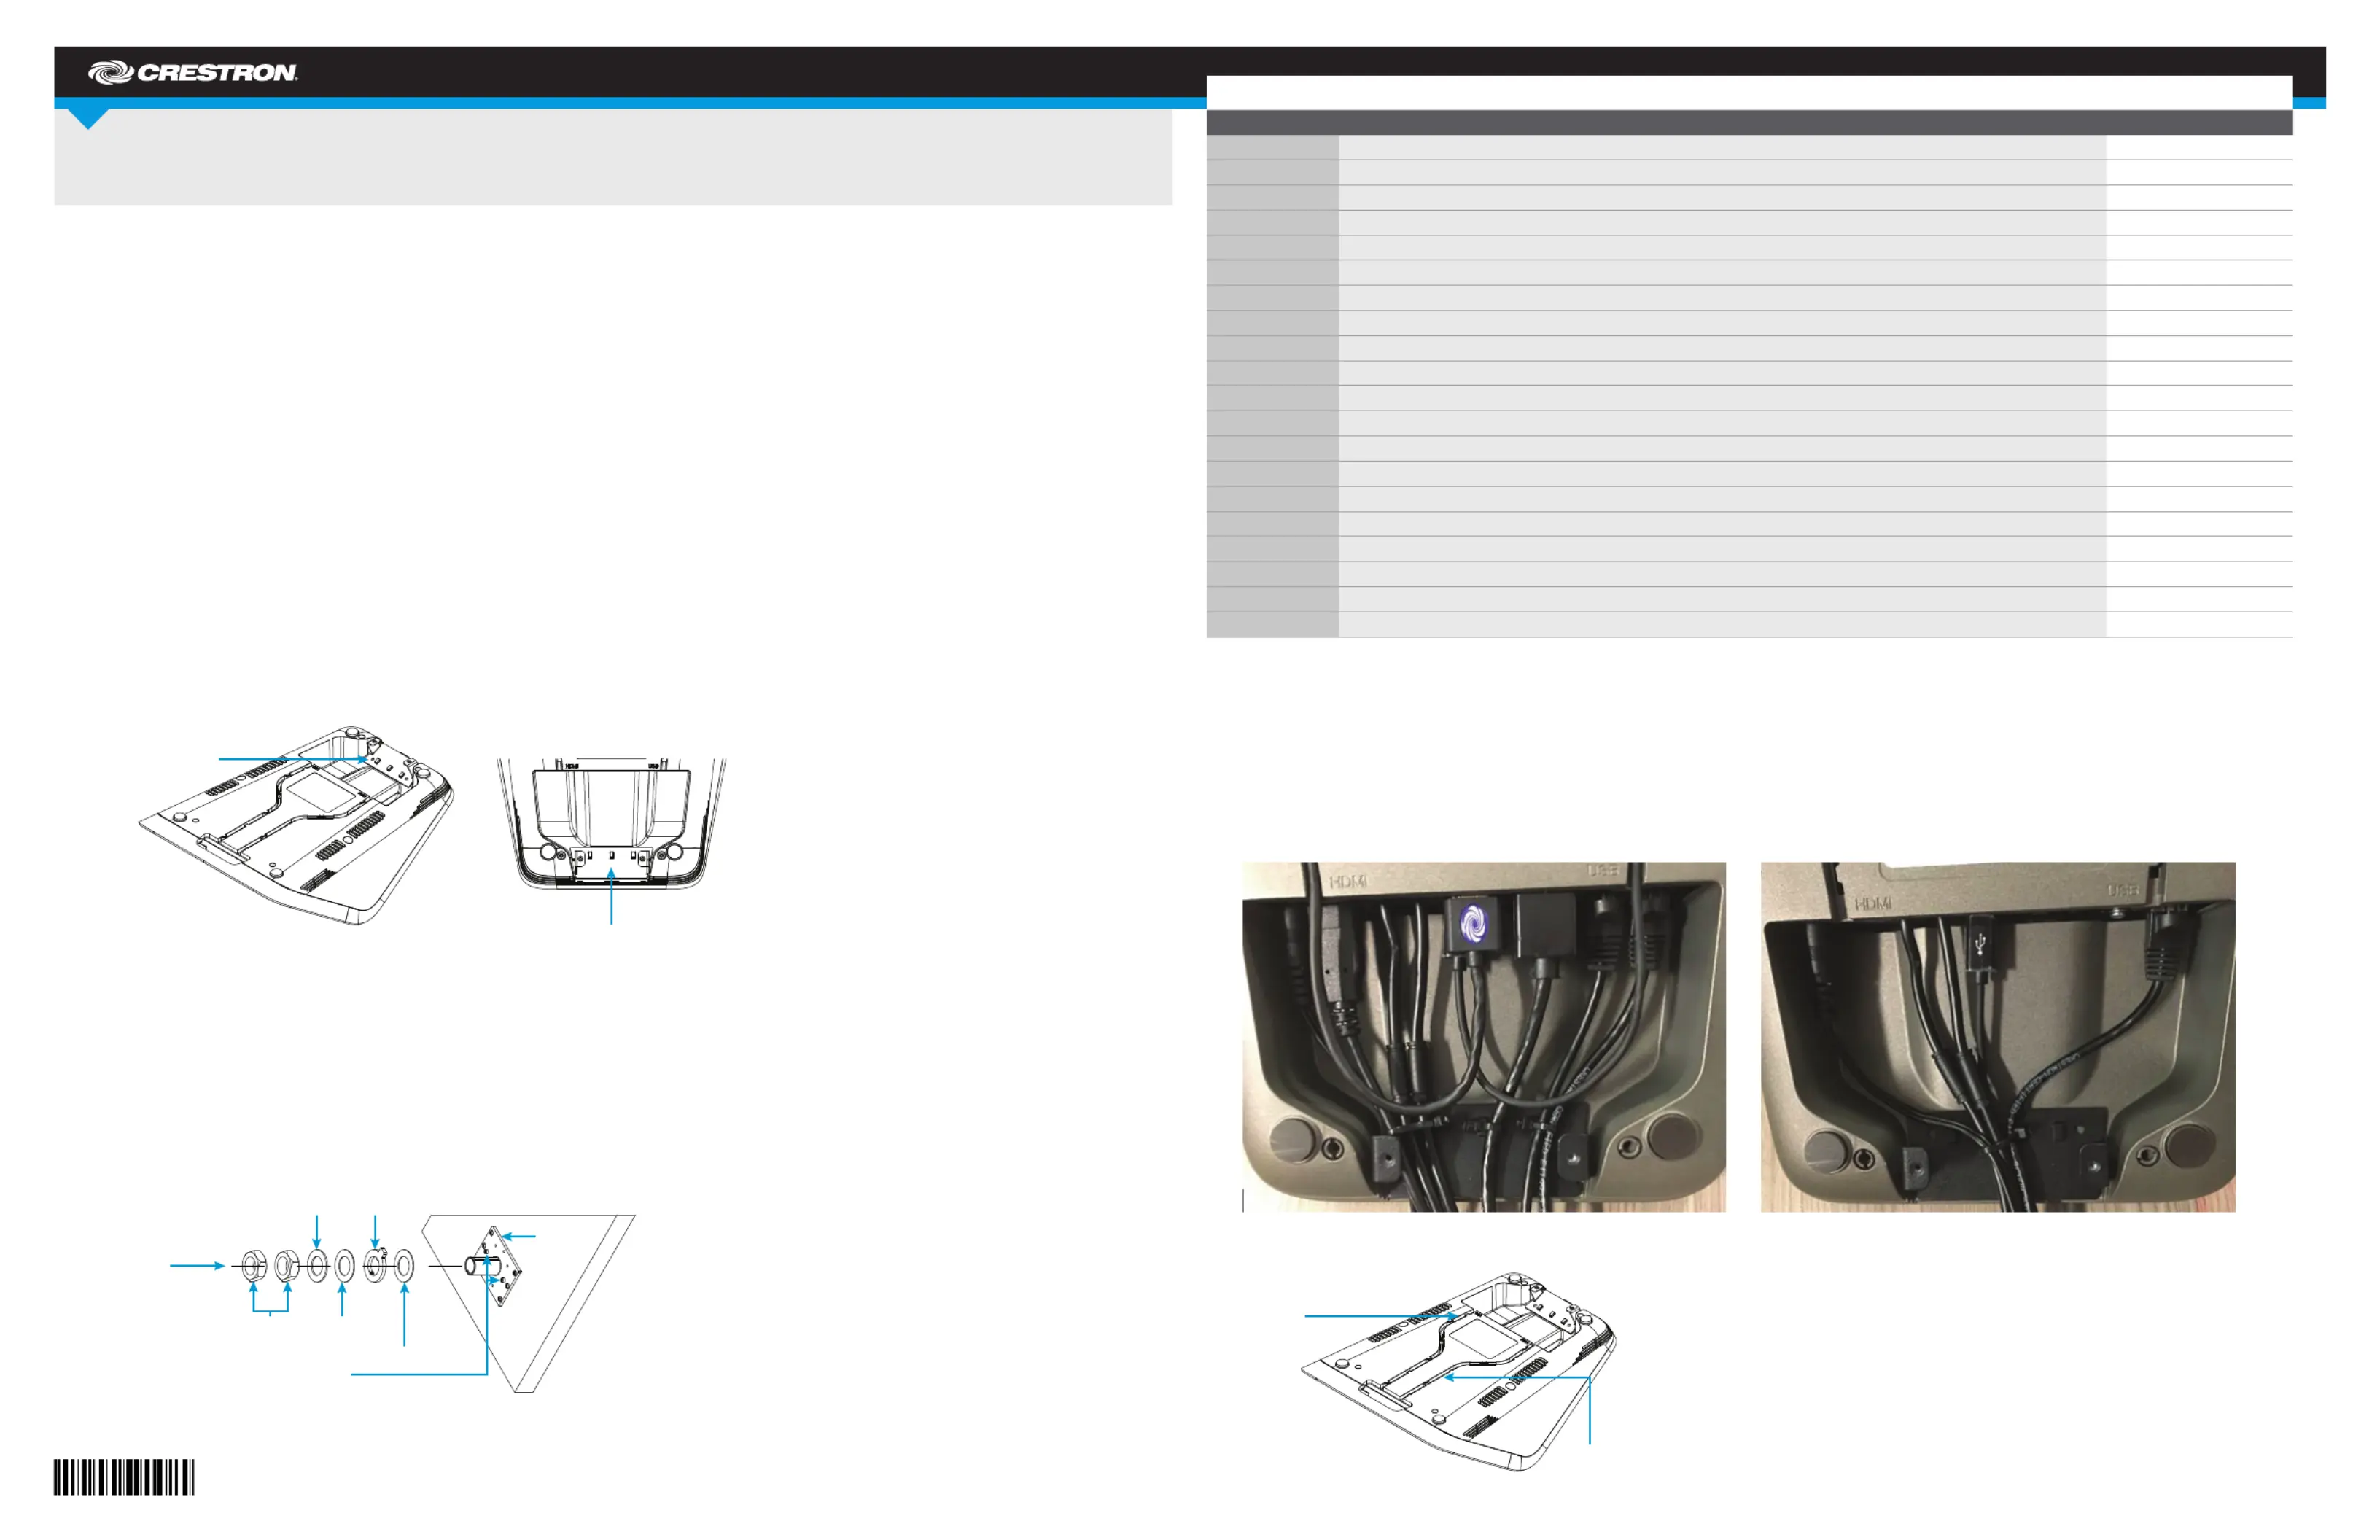
DO Install the Cable Retention Bracket
NOTE: If a cable retention plate is already installed, it must be removed. For new installations, skip to step 3. Otherwise, follow this procedure:
1. Use two small at head screwdrivers to slowly pry off the existing retention plate.
2. Remove all adhesive residue from the surface.
3. Clean the surface with an alcohol wipe (not supplied).
4. Remove the paper liner from the back of the cable retention bracket.
5. Install the cable retention bracket as shown in the following diagram.
6. Press rmly on the cable retention bracket for approximately 30 seconds.
CAUTION: When turning over the device, place the device on a soft surface to avoid damage to the unit.
DO Connect the Device
1. Drill pilot holes with a 1/8" bit in the stop plate’s mounting location and attach the stop plate to the underside of the mounting surface with the six
included 8-8B x 1/2" screws.
2. Place the swivel tube plate on the mounting surface.
3. Route all cables that connect to the Crestron Mercury device from underneath the mounting surface through the swivel kit hardware as shown below.
Cables with larger connectors should be routed rst, followed by cables with smaller connectors.
If the HDMI
®
input cable and the USB cable are to be routed to the front of the Crestron Mercury device, do not route these cables through the swivel kit
hardware.
DO Check the Box
QUANTITY PRODUCT COLOR PART NUMBER
1 Bit, Slotted 1/4" W 2049730
1 Bit, Slotted 23/64" W 2049474
1 Bracket, Cable Retention 4526653
1 Cable, HDMI, Male to Female Extender 2049637
4 Insert, Metal, M7, 6-32 Thread, 0.28" L 2049476
2 Insert, Metal, M10, 10-32 Thread, 0.41" L 2049328
2 Nut, 1-1/8"-12 2049390
2 Screw, 4-40 x 1/4", Pan Head, Phillips Black 2007158
2 Screw, 6-32 x 1/2", Pan Head, Phillips Black 2007238
2 Screw, 6-32 x 1", Truss Head, Phillips Black 2049649
6 Screw, 8-8B x 1/2", Pan Head, Phillips 2017784
2 Screw, 8-32 x 1/8", Cap Head, Socket Black 2017634
2 Screw, 10-32 x 1", Pan Head, Phillips Black 2049391
1 Stop Plate, Swivel, with Screws 4526651
1 Template, Cutout 4526654
5 Tie Wrap 2047935
1 Washer, Cork, 2.0" OD, 1.19" ID, 0.06" TH 2049448
1 Washer, Keyed 4526609
1 Washer, Metal, 2.0" OD, 1.19" ID, 0.10" TH 2049389
1 Washer, Rubber, 2.0" OD, 1.19" ID, 0.06" TH 2049449
If the Crestron Mercury device’s HDMI OUT port is to be used, perform the following procedure:
a. Connect the HDMI Extension Cable (2049637) to the HDMI OUT port.
b. Route the cable extender through the swivel tube.
c. Connect the HDMI cable provided with the Crestron Mercury device to the cable extender.
4. Make the necessary connections to the device. Refer to the DO Guide or Installation Guide included with the Crestron Mercury system.
5. Use the included tie wraps to secure all of the cables to the cable retention bracket that was installed in “DO Install the Cable Retention Bracket.”
6. If the front USB and HDMI input connections are to be used, press the USB and HDMI IN cables into the channels on the underside of the device as
shown in the following diagram (cables removed for clarity) so that the connectors can be routed to the front of the device.
Stop plate
Cork washer
Keyed washer
Nuts (2)
Permanently installed
limiting screws
Rubber washer
Flat washer
Thread cables
through here.
Standard Wiring Zoom Wiring
Cable retention bracket
Cable retention bracket
Route USB
cable here
Route HDMI
cable here
Produkspesifikasjoner
| Merke: | Crestron |
| Kategori: | Videokonferansesystem |
| Modell: | CCS-UCA-SMK |
Trenger du hjelp?
Hvis du trenger hjelp med Crestron CCS-UCA-SMK still et spørsmål nedenfor, og andre brukere vil svare deg
Videokonferansesystem Crestron Manualer
28 September 2025

1 April 2025

21 Desember 2024

21 Desember 2024

21 Desember 2024

27 Oktober 2024
Videokonferansesystem Manualer
- Yealink
- Middle Atlantic
- Alfatron
- Anchor Audio
- Plantronics
- Cisco
- Philips
- BZBGear
- MuxLab
- Ashton Bentley
- B-tech
- Vaddio
- HuddleCamHD
- PulseAudio
- Heckler
Nyeste Videokonferansesystem Manualer

6 Oktober 2025
3 Oktober 2025

3 Oktober 2025

2 Oktober 2025

2 Oktober 2025

1 Oktober 2025

1 Oktober 2025
1 Oktober 2025
1 Oktober 2025
1 Oktober 2025