Furuno TZTF19F Bruksanvisning
Furuno
Ikke kategorisert
TZTF19F
Les nedenfor 📖 manual på norsk for Furuno TZTF19F (20 sider) i kategorien Ikke kategorisert. Denne guiden var nyttig for 22 personer og ble vurdert med 4.4 stjerner i gjennomsnitt av 11.5 brukere
Side 1/20
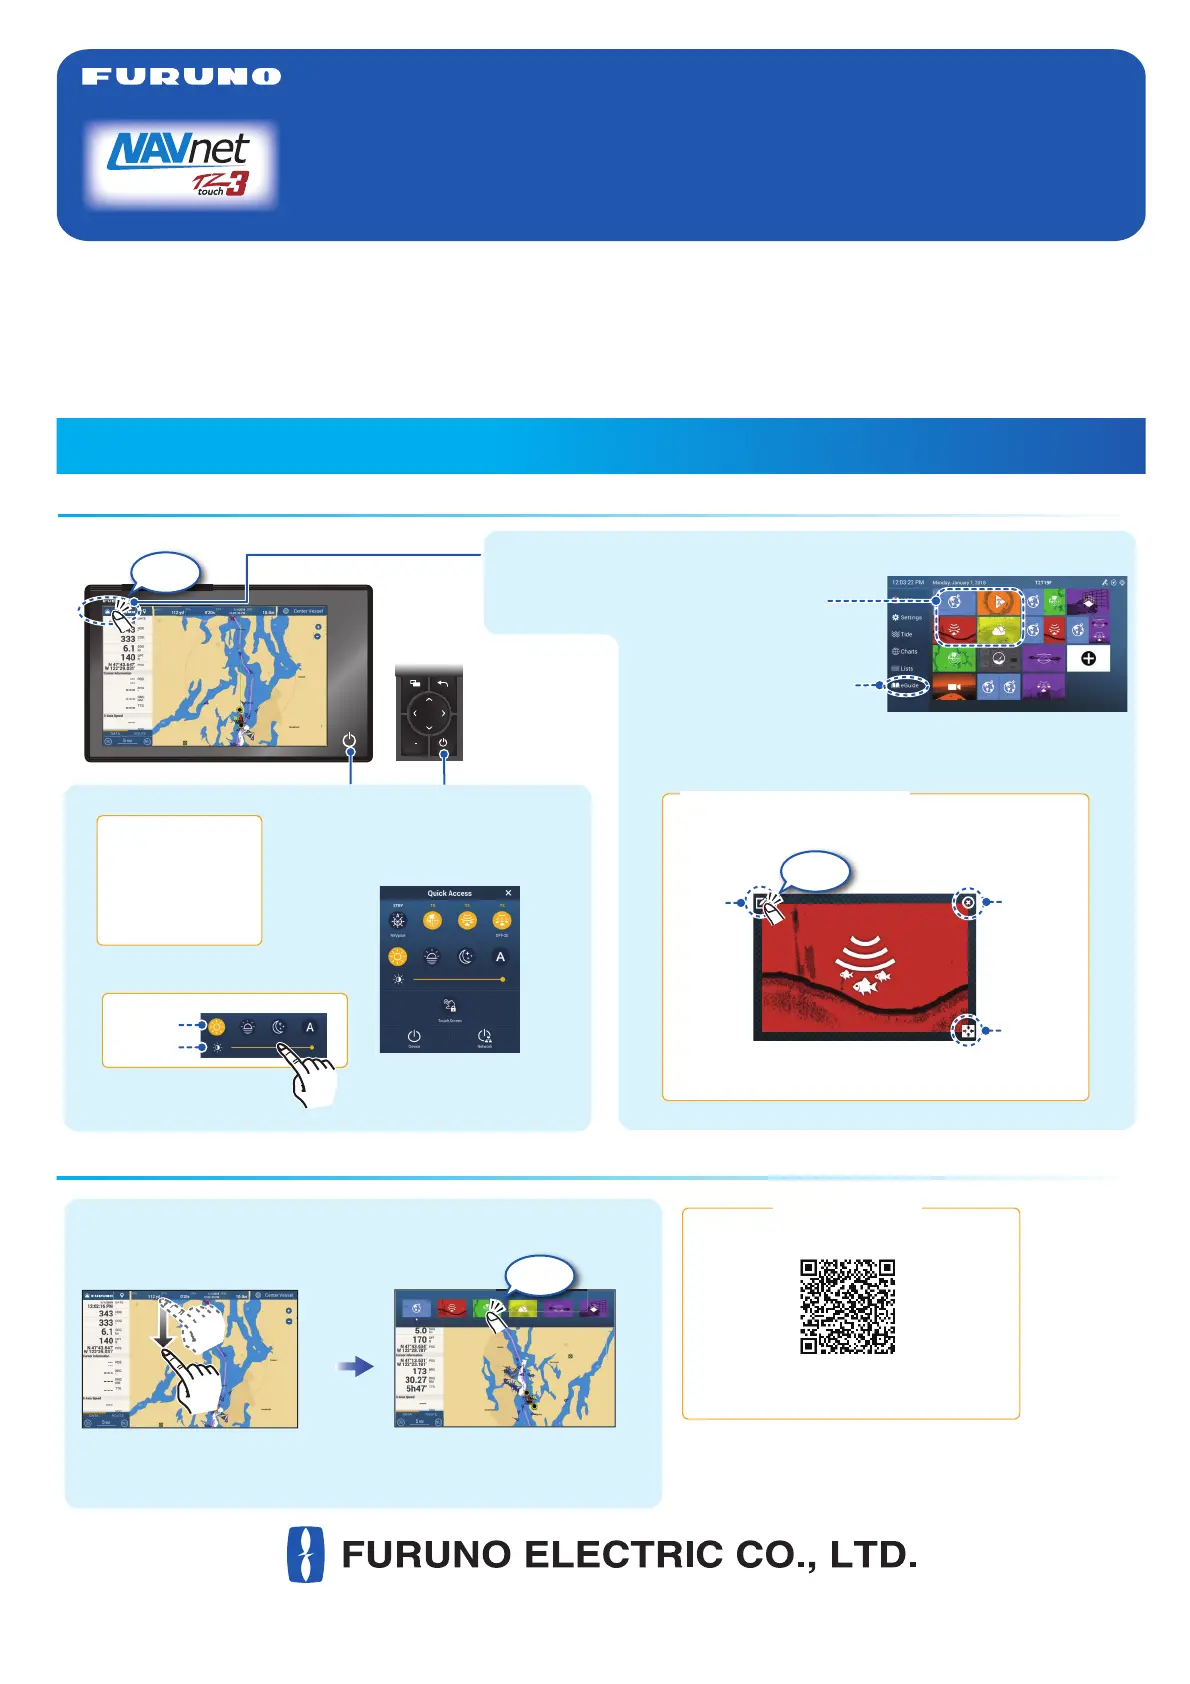
Icon (home/displays), power switch operations
Operational Overview
How to select a display
MULTI FUNCTION DISPLAY
TZT9F/TZT12F/TZT16F/TZT19F
Operator’s Guide
Model
This guide provides the basic operating procedures for this equipment. For detailed information, see the Operator’s
Manual on the WEB site. You can get the latest version of the manual by accessing the quick response code at the
bottom of this page. Connection of sensors required.
iPhone, iPod and iPad are trademarks of Apple Inc. Android is a trademark of Google Inc. All brand and product
names are trademarks, registered trademarks or service marks of their respective holders.
The screenshots used in this guide were mainly taken from the TZT19F.
Displays the
home screen.
FURUNO iconFURUNO icon
Home screenHome screenHome screenHome screenHome screen
Long tap a display icon to edit, delete, resize, or
change its location.
Display icon long tapped
Edit
Delete
Size
(large or
small)
location
.
Tap
How to edit a display iconHow to edit a display icon
www.furuno.com
Tap
TZT9F/
TZT12F
䠄
Right side of the Panel
䠅
TZT9F/
TZT12F
䠄
Right side of the Panel
䠅
TZT16F/TZT19FTZT16F/TZT19F
Swipe downward from
top of display.
Quick pageQuick pageQuick pageQuick pageQuick page
- Tap a display icon on the home screen (see illustration above).
- Tap a display icon on the Quick page.
- Tap a display icon on the home screen (see illustration above).
- Tap a display icon on the Quick page.
Operator’s Manual
Download Link
Power switchPower switch
- Turns on power.
- Shows [Quick Access] window.
Power offPower offPower offPower offPower off
Device: Powers off
this unit.
Network: Powers off
all NavNet TZtouch
series units in network.
Day
Brilliance, HueBrilliance, HueBrilliance, Hue
Hue:
Brilliance:
DRS6A_X-CLASS
BBDS1
Tap
Display icons
(max. 16 on home screen)
“eGuide” provides
an abbreviated
operator’s guide.
https://www.furuno.com/en/support/manuals/
?pc=navnet_mfd
Produkspesifikasjoner
| Merke: | Furuno |
| Kategori: | Ikke kategorisert |
| Modell: | TZTF19F |
Trenger du hjelp?
Hvis du trenger hjelp med Furuno TZTF19F still et spørsmål nedenfor, og andre brukere vil svare deg
Ikke kategorisert Furuno Manualer
21 September 2025
18 September 2025

4 August 2025
4 August 2025
4 August 2025

4 August 2025
Ikke kategorisert Manualer
- Godrej
- Zelmer
- Galaxy Audio
- Adler
- AudioControl
- Hensel
- Amazfit
- Avanti
- Casa Deco
- Aiwa
- Accucold
- OnePlus
- Einhell
- Ampeg
- Petsafe
Nyeste Ikke kategorisert Manualer

23 Oktober 2025

23 Oktober 2025

23 Oktober 2025

23 Oktober 2025

23 Oktober 2025

23 Oktober 2025

23 Oktober 2025

23 Oktober 2025

23 Oktober 2025

23 Oktober 2025