Metra JP-JLKT Bruksanvisning
Les nedenfor 📖 manual på norsk for Metra JP-JLKT (16 sider) i kategorien Bilkamera. Denne guiden var nyttig for 8 personer og ble vurdert med 4.0 stjerner i gjennomsnitt av 4.5 brukere
Side 1/16

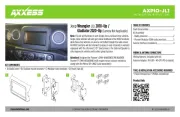
AXPIO -JL1
INSTALLATION INSTRUCTIONS
AxxessInterfaces.com © COPYRIGHT 2020 METRA ELECTRONICS CORPORATION REV. 12/1/20 INSTAXPIO-JL1
Product Info
TOOLS & INSTALLATION ACCESSORIES REQUIRED
• Panel removal tool • Phillips screwdriver
TABLE OF CONTENTS
Dash Disassembly ..................................................2
Kit Assembly
- Radio provision ...................................................2
- Pioneer Modular DDIN radio provision ..............3
Axxess Interface Installation .................................4
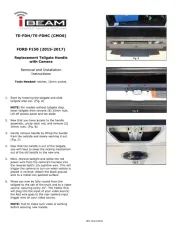
Jeep Wrangler (JL) 2018-Up /
Gladiator 2020-Up (Camera Not Applicable)
Note: This kit will function in both Single-Zone and Dual-Zone vehicles.
Single-Zone vehicles will only get status feedback of the HVAC functions
,
while Dual-Zone vehicles can also be controlled through the radio screen
.
All HVAC functions will be retained. Compass is only retained on vehicles
equipped with the UConnect 3 (5” touchscreen). The External Speaker is
only required in vehicles with safety group features
.
Attention! Designed for Pioneer’s DMH-W4600NEX/WC4660NEX.
Pioneer 9” DMH-WC6600NEX will require minor custom mounting
along with the Metra 109-UN02 (sold separately)
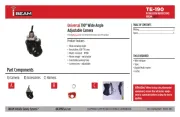
KIT COMPONENTS
• A) Radio bezel • B) Shallow mount brackets • C) Modular radio brackets • D) Panel clips (4)
A B C D
WIRING & ANTENNA CONNECTIONS
Wiring Harness: Included with kit
Antenna Adapter: 40-EU10 • 40-GPS-PIO (included)
Produkspesifikasjoner
| Merke: | Metra |
| Kategori: | Bilkamera |
| Modell: | JP-JLKT |
Trenger du hjelp?
Hvis du trenger hjelp med Metra JP-JLKT still et spørsmål nedenfor, og andre brukere vil svare deg
Bilkamera Metra Manualer
10 Oktober 2025
10 Oktober 2025
9 Oktober 2025
9 Oktober 2025
9 Oktober 2025
9 Oktober 2025

9 Oktober 2025
8 Oktober 2025
8 Oktober 2025

8 Oktober 2025
Bilkamera Manualer
- AEG
- Lamax
- Navman
- Orion
- Thinkware
- Alpine
- Nedis
- Kogan
- Pro-User
- Xblitz
- Transcend
- Osram
- Navitel
- Biltema
- Rollei
Nyeste Bilkamera Manualer
20 Oktober 2025
20 Oktober 2025
19 Oktober 2025
12 Oktober 2025
12 Oktober 2025
12 Oktober 2025
12 Oktober 2025
11 Oktober 2025
5 Oktober 2025
5 Oktober 2025