PAC RPK5-GM4101 Bruksanvisning
Les nedenfor 📖 manual på norsk for PAC RPK5-GM4101 (9 sider) i kategorien Bilsett. Denne guiden var nyttig for 18 personer og ble vurdert med 4.5 stjerner i gjennomsnitt av 9.5 brukere
Side 1/9
Page 1
PAC
®
| 866-931-8021 | support@pac-audio.com
©2017 Pacic Accessory Corporation
www.pac-audio.com
Rev. 010317
C
PAC is an AAMP power brand
RPK5-GM4101
Complete Radio Replacement Kit with
Integrated Climate Control Retention for
2010-2015 Chevrolet Camaro
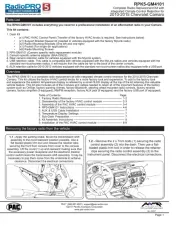
Removing the factory radio from the vehicle
1.1 - Apply the parking brake. Move the transmission shift
assembly to the most rearward position possible. Use a
at bladed plastic trim tool and release the retainer tabs
securing the front oor console front cover to the console
assembly. Lift the cover (1) up and rearward making sure that
the accessory power receptacle and the electronic traction
control switch clears the transmission shift assembly. It may be
necessary to pop them loose from the underside to achieve
clearance. Disconnect the electrical connections.
1.2 - Remove the 2 x 7mm bolts (1) securing the radio
control assembly (2) into the dash. Then use a at-
bladed plastic trim tool in order to release the retainer
clips securing the radio control assembly (2) to the
instrument panel. Disconnect the electrical connections.
Parts List
The RPK5-GM4101 includes everything you need for a professional installation of an aftermarket radio in your Camaro.
This kit contains:
1. Dash Kit
• (x1) PAC HVAC Control Panel (Transfer of the factory HVAC knobs is required. See instructions below)
• (x1) Support Bracket Spacer kit (needed in vehicles equipped with the factory MyLink radio)
• (x2) Radio Mounting Brackets (One left and one right)
• (x1) Pocket (For single din applications)
• (x8) Radio Mounting Screws
2. RP5-GM4101 (Camaro specic radio replacement module)
3. Camaro specic antenna adapter (BAA-DIN22).
4. Rear camera retention cable for vehicles equipped with the MyLink system.
5. USB retention cable. This cable is compatible with vehicles equipped with the MyLink radios and vehicles equipped with the
standard non-touchscreen radios. It will require that the cable be ran to the back of the center console.
6. AUX retention cable for 2010-2012 vehicles equipped with the standard non-touchscreen radios also equipped with a USB port.
Overview
The RPK5-GM4101 is a complete radio replacement kit with integrated climate control retention for the 2010-2015 Chevrolet
Camaro. This kit utilizes the factory HVAC control knobs for a more factory look and experience. To add to the factory look
and experience the exterior temperature display is retained by a small OLED display at the top of the kit retaining this valuable
vehicle feature. This kit also includes all of the modules and cables needed to retain all of the important features of the factory
system such as OnStar, factory warning chimes, factory Bluetooth, steering wheel mounted radio controls, factory reverse
camera, factory amplier (if equipped), AM/FM reception, factory AUX jack (if equipped) and the factory USB port (if equipped).
Table of Contents: Page:
1. Factory Radio Removal ------------------------------------------------------ 1-2
2. Disassembly of the factory HVAC control module --------------------- 2-3
3. Assembly of the PAC HVAC control module ---------------------------- 3-4
4. RP5-GM4101 Instructions --------------------------------------------------- 4-6
5. AUX & USB Cable Installation ------------------------------------------------ 7
6. Temperature Display Settings ------------------------------------------------- 7
7. Sub-Dash Preparation ----------------------------------------------------------- 7
8. Kit Assembly Instructions ------------------------------------------------------- 8
9. Installation of the PAC HVAC control module --------------------------- 8-9
Produkspesifikasjoner
| Merke: | PAC |
| Kategori: | Bilsett |
| Modell: | RPK5-GM4101 |
Trenger du hjelp?
Hvis du trenger hjelp med PAC RPK5-GM4101 still et spørsmål nedenfor, og andre brukere vil svare deg
Bilsett PAC Manualer
3 August 2025
Bilsett Manualer
- Cellular Line
- Belkin
- Biltema
- CRUX
- Metra
- Scosche
- Atdec
- Kogan
- Renegade
- Uniden
- Alpine
- ZZ-2
- T'nB
- Livoo
- HTC
Nyeste Bilsett Manualer
20 Oktober 2025
19 Oktober 2025
16 Oktober 2025
10 Oktober 2025

10 Oktober 2025
10 Oktober 2025
10 Oktober 2025
10 Oktober 2025
10 Oktober 2025
10 Oktober 2025