Ryobi IR002 Bruksanvisning
Ryobi
Håndverktøy
IR002
Les nedenfor 📖 manual på norsk for Ryobi IR002 (2 sider) i kategorien Håndverktøy. Denne guiden var nyttig for 33 personer og ble vurdert med 4.6 stjerner i gjennomsnitt av 17 brukere
Side 1/2
ONE WORLD TECHNOLOGIES, INC. P.O. Box 1288, Anderson, SC 29622 • Phone 1-800-525-2579
États-Unis, Téléphone 1-800-525-2579 • USA, Teléfono 1-800-525-2579 www.ryobitools.com
WARNING!
READ AND UNDERSTAND ALL INSTRUCTIONS.
WARNING:
Use of controls or adjustments or performance
other than those specified herein may result in
hazardous radiation exposure.
nAvoid direct eye exposure when using the laser
and do not project the laser beam directly into
the eyes of others. Serious eye injury could
result.
nDo not operate the laser around children or
allow children to operate the product. Serious
eye injury could result.
nDo not use for medical evaluations or to
measure body temperature. This product is
meant for household use only.
nNever aim the beam at a person or object
other than the target surface.
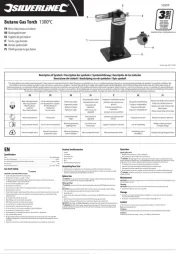
OPERATOR’S MANUAL
Non-Contact InfraRed
Thermometer IR002/IR002ID
FEATURES
PRODUCT SPECIFICATIONS
Temperature Range:
-4˚F to 600˚F (-20˚C to 315˚C)
Laser Certifications: Class II<1mW, 630-670 Nm
Ambient Operating
Temperature Range: 32˚F to 122˚F (0˚C to 50˚C)
OPERATION
MAINTENANCE
GENERAL SAFETY RULES
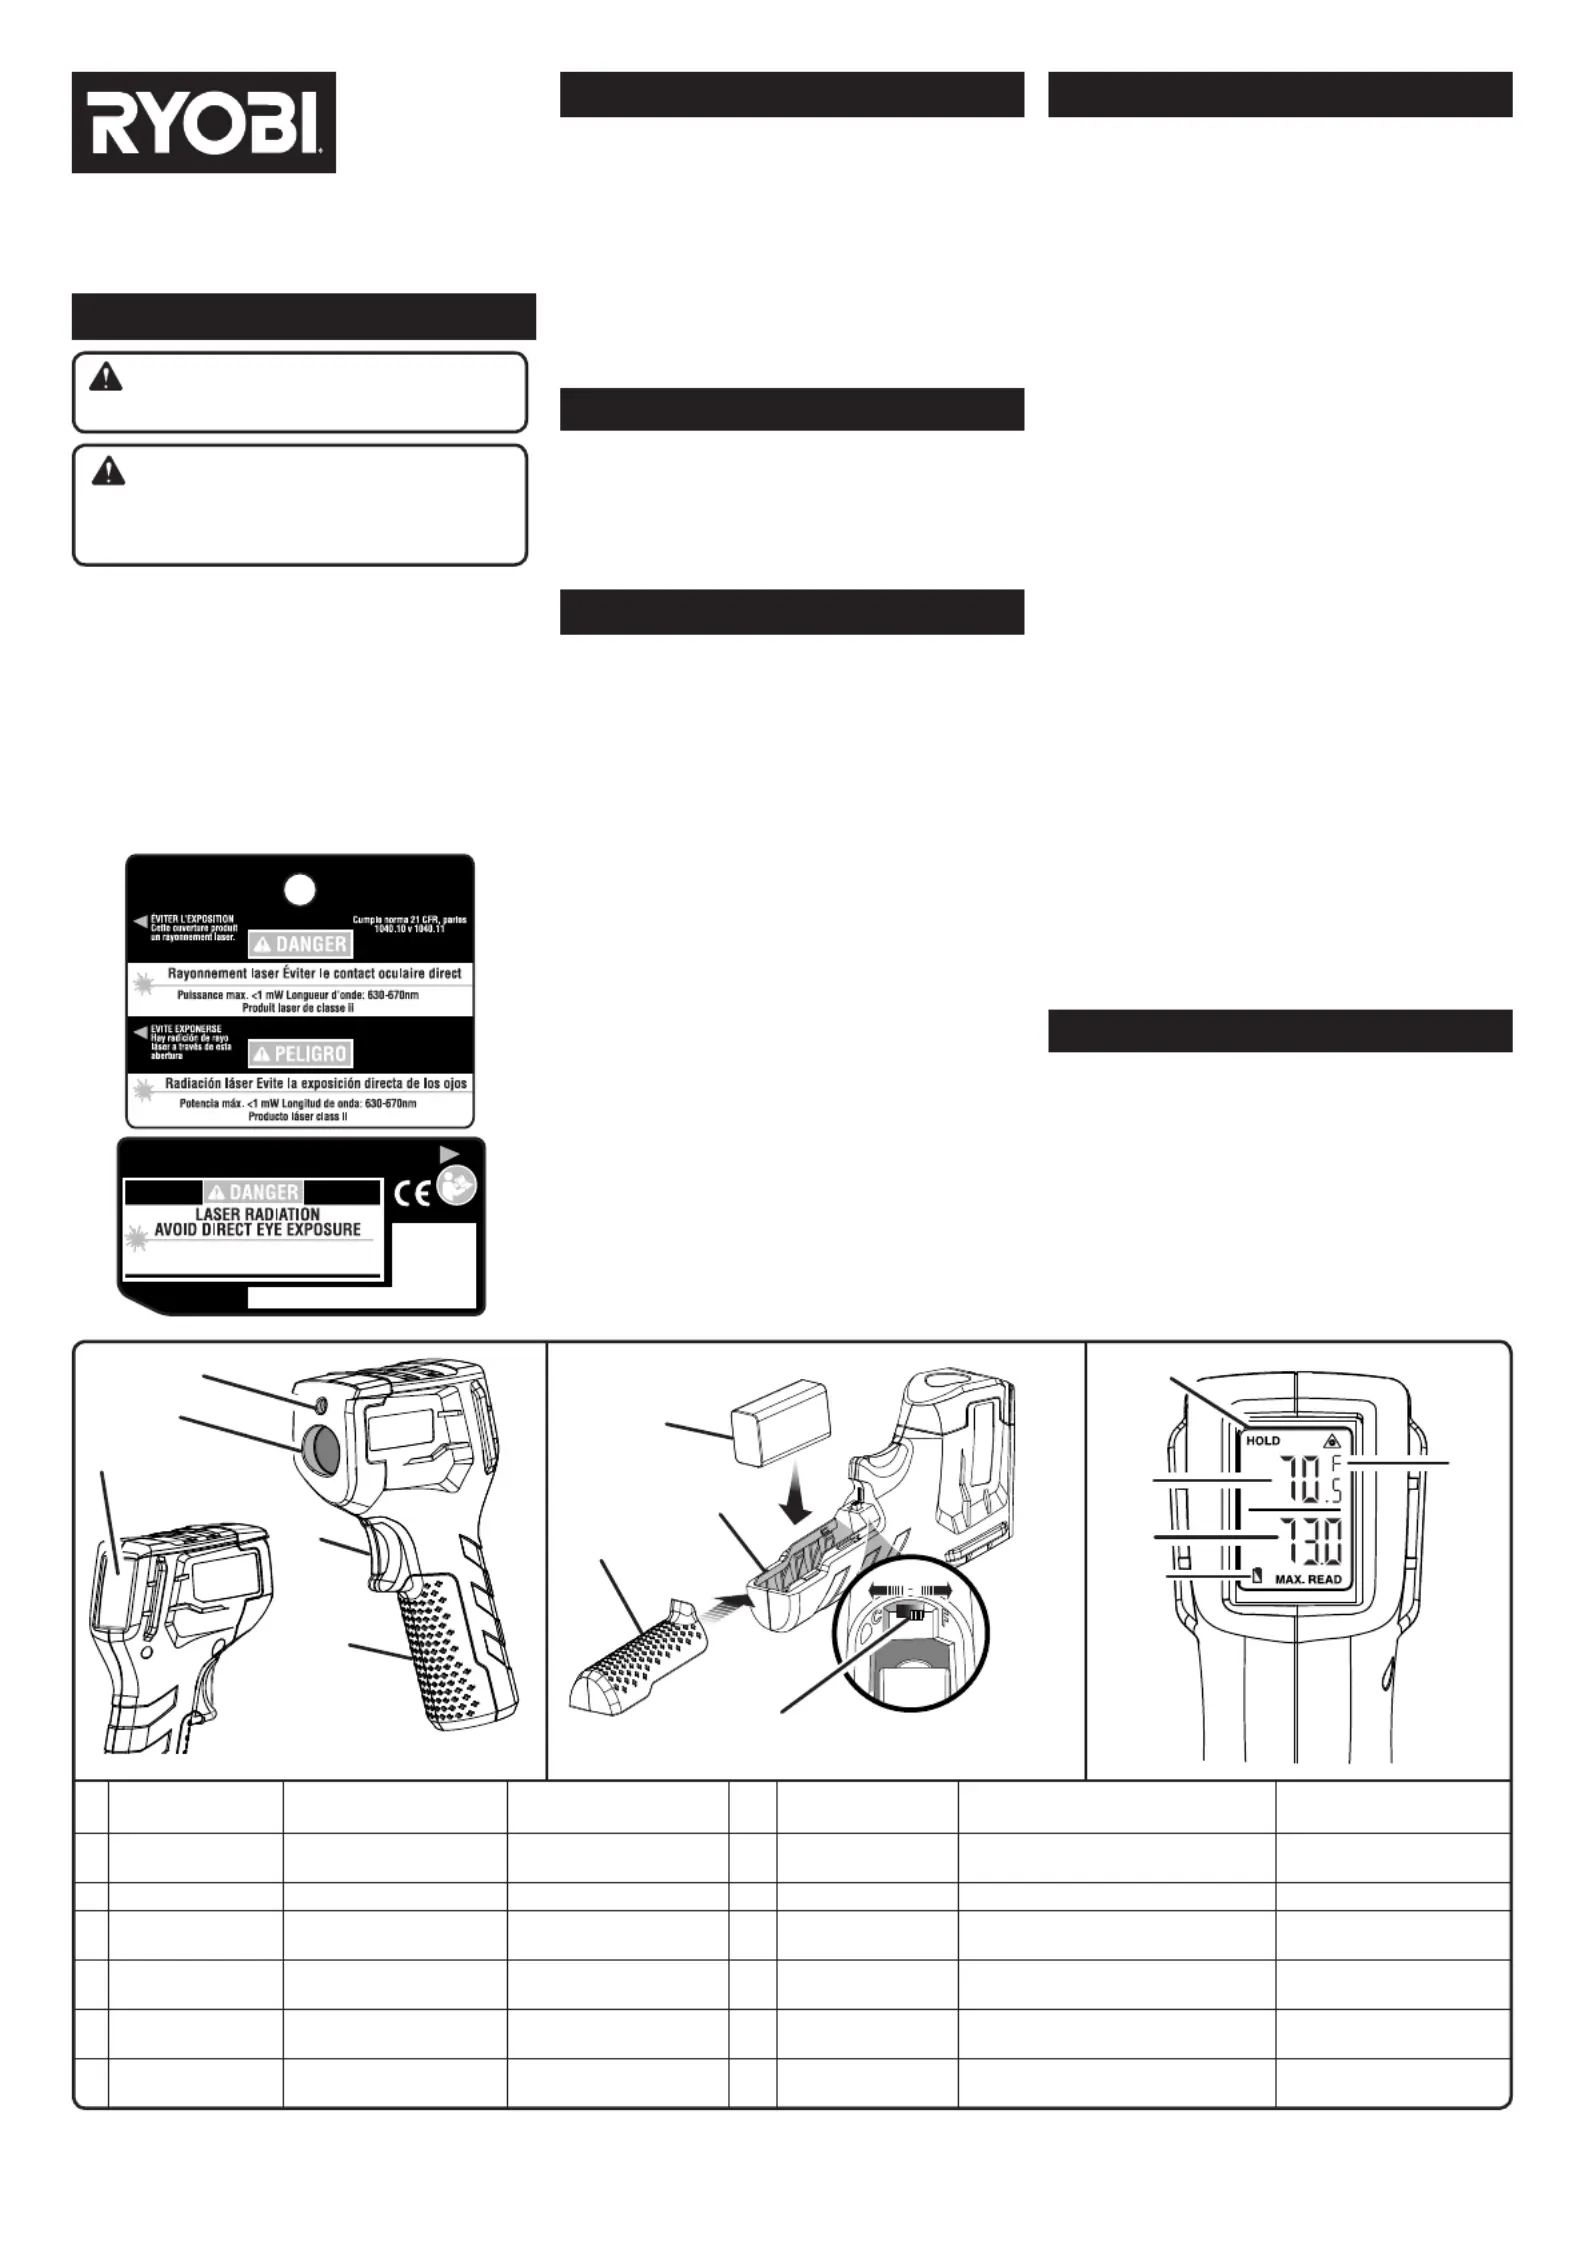
Fig. 1
APPLICATIONS
nDetects hot/cold spots in door and window
seals to help pinpoint draft areas or leakage of
warm or cool air
nCheck the temperature of air vents
nCheck the exterior/interior surfaces of house-
hold items and appliances
nAutomotive applications
INSTALLING THE BATTERY
See Figure 2.
A 9 Volt battery (included) must be installed
before using the thermometer.
To install the battery:
n
Slide the battery cover down, then up and
remove it from the handle of the thermometer.
n
Attach the battery terminals to their connectors
on the thermometer.
n
Slide the switch inside the handle to select
Fahrenheit or Celsius temperature readings as
shown in figure 2.
n
Close the battery compartment by sliding the
cover into place until it snaps closed.
TAKING TEMPERATURE READINGS
See Figure 3.
For the most accurate readings, follow these hints:
OPERATION
Fig. 3
Fig. 2
NOTE: Temperature readings can only be
measured on a target surface.
n
Place the unit less than two (2) feet from the
item you wish to read.
n
Accuracy of readings is plus ( + ) or minus ( - )
5°C of the actual temperature, assuming
ambient temperature of 25 + / - 1ºC.
n
Readings at distances greater than two (2)
feet may be less accurate due to external
light sources, surrounding air temperature and
reading of larger surface areas not intended to
be measured.
n
Cleaner surfaces will give more accurate
readings.
n
Allow 10-15 minutes to adjust to extreme
temperature changes when testing an item or
area out of the operating range 32˚F - 122˚F
(0˚C - 50˚C).
SPOT READINGS
NOTE: The laser beam will remain on as long as
the trigger is depressed.
n
Aim at the target item or surface.
n
Pull and release the trigger once.
n
The target temperature reading is displayed on
the screen for approximately 7 seconds after
the trigger is pulled.
CONTINUOUS READINGS
n
Aim at one location. Pull and hold the trigger.
Move the laser beam over another location.
n
The temperature will be displayed and will
change when the target object changes.
n
The maximum temperature read will also be
displayed.
n
The target temperature reading is displayed
on the screen for approximately seven (7) sec-
onds after the trigger is released.
Do not immerse the product in water. Clean only
the exterior using a damp cloth.
To ensure accurate readings, the battery should
be replaced when the battery indicator shows a
low battery.
To receive a replacement product, you must
present proof of purchase and return all original
equipment packaged with the original product.
The replacement product will be covered by the
limited warranty for the balance of the two year
period from the date of the original purchase.
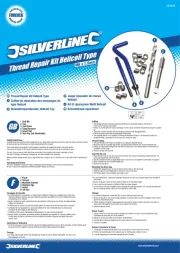
1 LASER BEAM FAISCEAU LASER RAYO LÁSER 8 BATTERY COVER
COUVERCLE DU COMPARTIMENT
DE LA BATTERIE
CUBIERTA DE LA BATERÍA
2
MEASURING
BEAM
FAISCEAU DE MESURE RAYO MEDIDOR 9
BATTERY
COMPARTMENT
COMPARTIMENT DE LA BATTERIE
COMPARTIMIENTO DE
LA BATERÍA
3 TRIGGER GÂCHETTE GATILLO 10 LASER INDICATOR INDICATEUR LASER INDICADOR LÁSER
4 LCD DISPLAY AFFICHEUR ACL
PANTALLA DE CRISTAL
LÍQUIDO
11
BATTERY
INDICATOR
INDICATEUR DE NIVEAU DE
CHARGE
INDICADOR DE BATERÍA
5
BATTERY
COMPARTMENT
COMPARTIMENT DE LA
BATTERIE
COMPARTIMIENTO DE
LA BATERÍA
12
MAXIMUM
TEMPERATURE
TEMPÉRATURE MAXIMUM TEMPERATURA MÁXIMA
6 C° / F° SELECTOR
SÉLECTEUR CELSIUS°/
FARENHEIT°
SELECTOR DE GRADO
CELSIUS O FARENHEIT
13 C° / F° C° / F° C° / F°
7 9 VOLT BATTERY BATTERIE DE 9 VOLT BATERÍA DE 9 V 14
CURRENT
TEMPERATURE
TEMPÉRATURE ACTUELLE TEMPERATURA ACTUAL
nDo not use this product as a precision
thermometer.
nAvoid exposing the unit to shock, continuous
vibration, or extreme hot or cold temperatures.
Damage to the product and/or serious injury to
the user could result.
nSave these instructions. Refer to them frequently
and use them to instruct others who may use this
product. If you loan someone this product, loan
them these instructions also to prevent misuse of
the product and possible injury.
GENERAL SAFETY RULES
12
1
2
4
3
5
7
10
13
14
11
8
9
6
AVOID POSEX URE: Laser ra ation di
is em ed itt fro his m t apert reu .
Maximum out utp <1 WamW velength: 63 0nm0-67
Class II las odu RYLDer pr ct
Sol iar Wde Industria tdl L .
CDW Building, Un -C, 8/Fits A 1
388 Castl e P oad Tsueak R , en Wan
New Territories, Hon ongg K
IR002
941 11002-09 1
Produkspesifikasjoner
| Merke: | Ryobi |
| Kategori: | Håndverktøy |
| Modell: | IR002 |
Trenger du hjelp?
Hvis du trenger hjelp med Ryobi IR002 still et spørsmål nedenfor, og andre brukere vil svare deg
Håndverktøy Ryobi Manualer
31 August 2025

16 Oktober 2024
Håndverktøy Manualer
- Panduit
- Nedis
- Craftsman
- Velleman
- IKEA
- Biltema
- Fluke
- Ideal
- DeWalt
- Klein Tools
- Chapin
- Jokari
- Ambiano
- Dremel
- Einhell
Nyeste Håndverktøy Manualer
28 September 2025
25 September 2025
24 September 2025
23 September 2025
23 September 2025
23 September 2025
23 September 2025
23 September 2025
23 September 2025
23 September 2025