Schneider WDE002478 Bruksanvisning
Les nedenfor 📖 manual på norsk for Schneider WDE002478 (6 sider) i kategorien Termostat. Denne guiden var nyttig for 3 personer og ble vurdert med 4.5 stjerner i gjennomsnitt av 2 brukere
Side 1/6

EAV56173-00 11/14
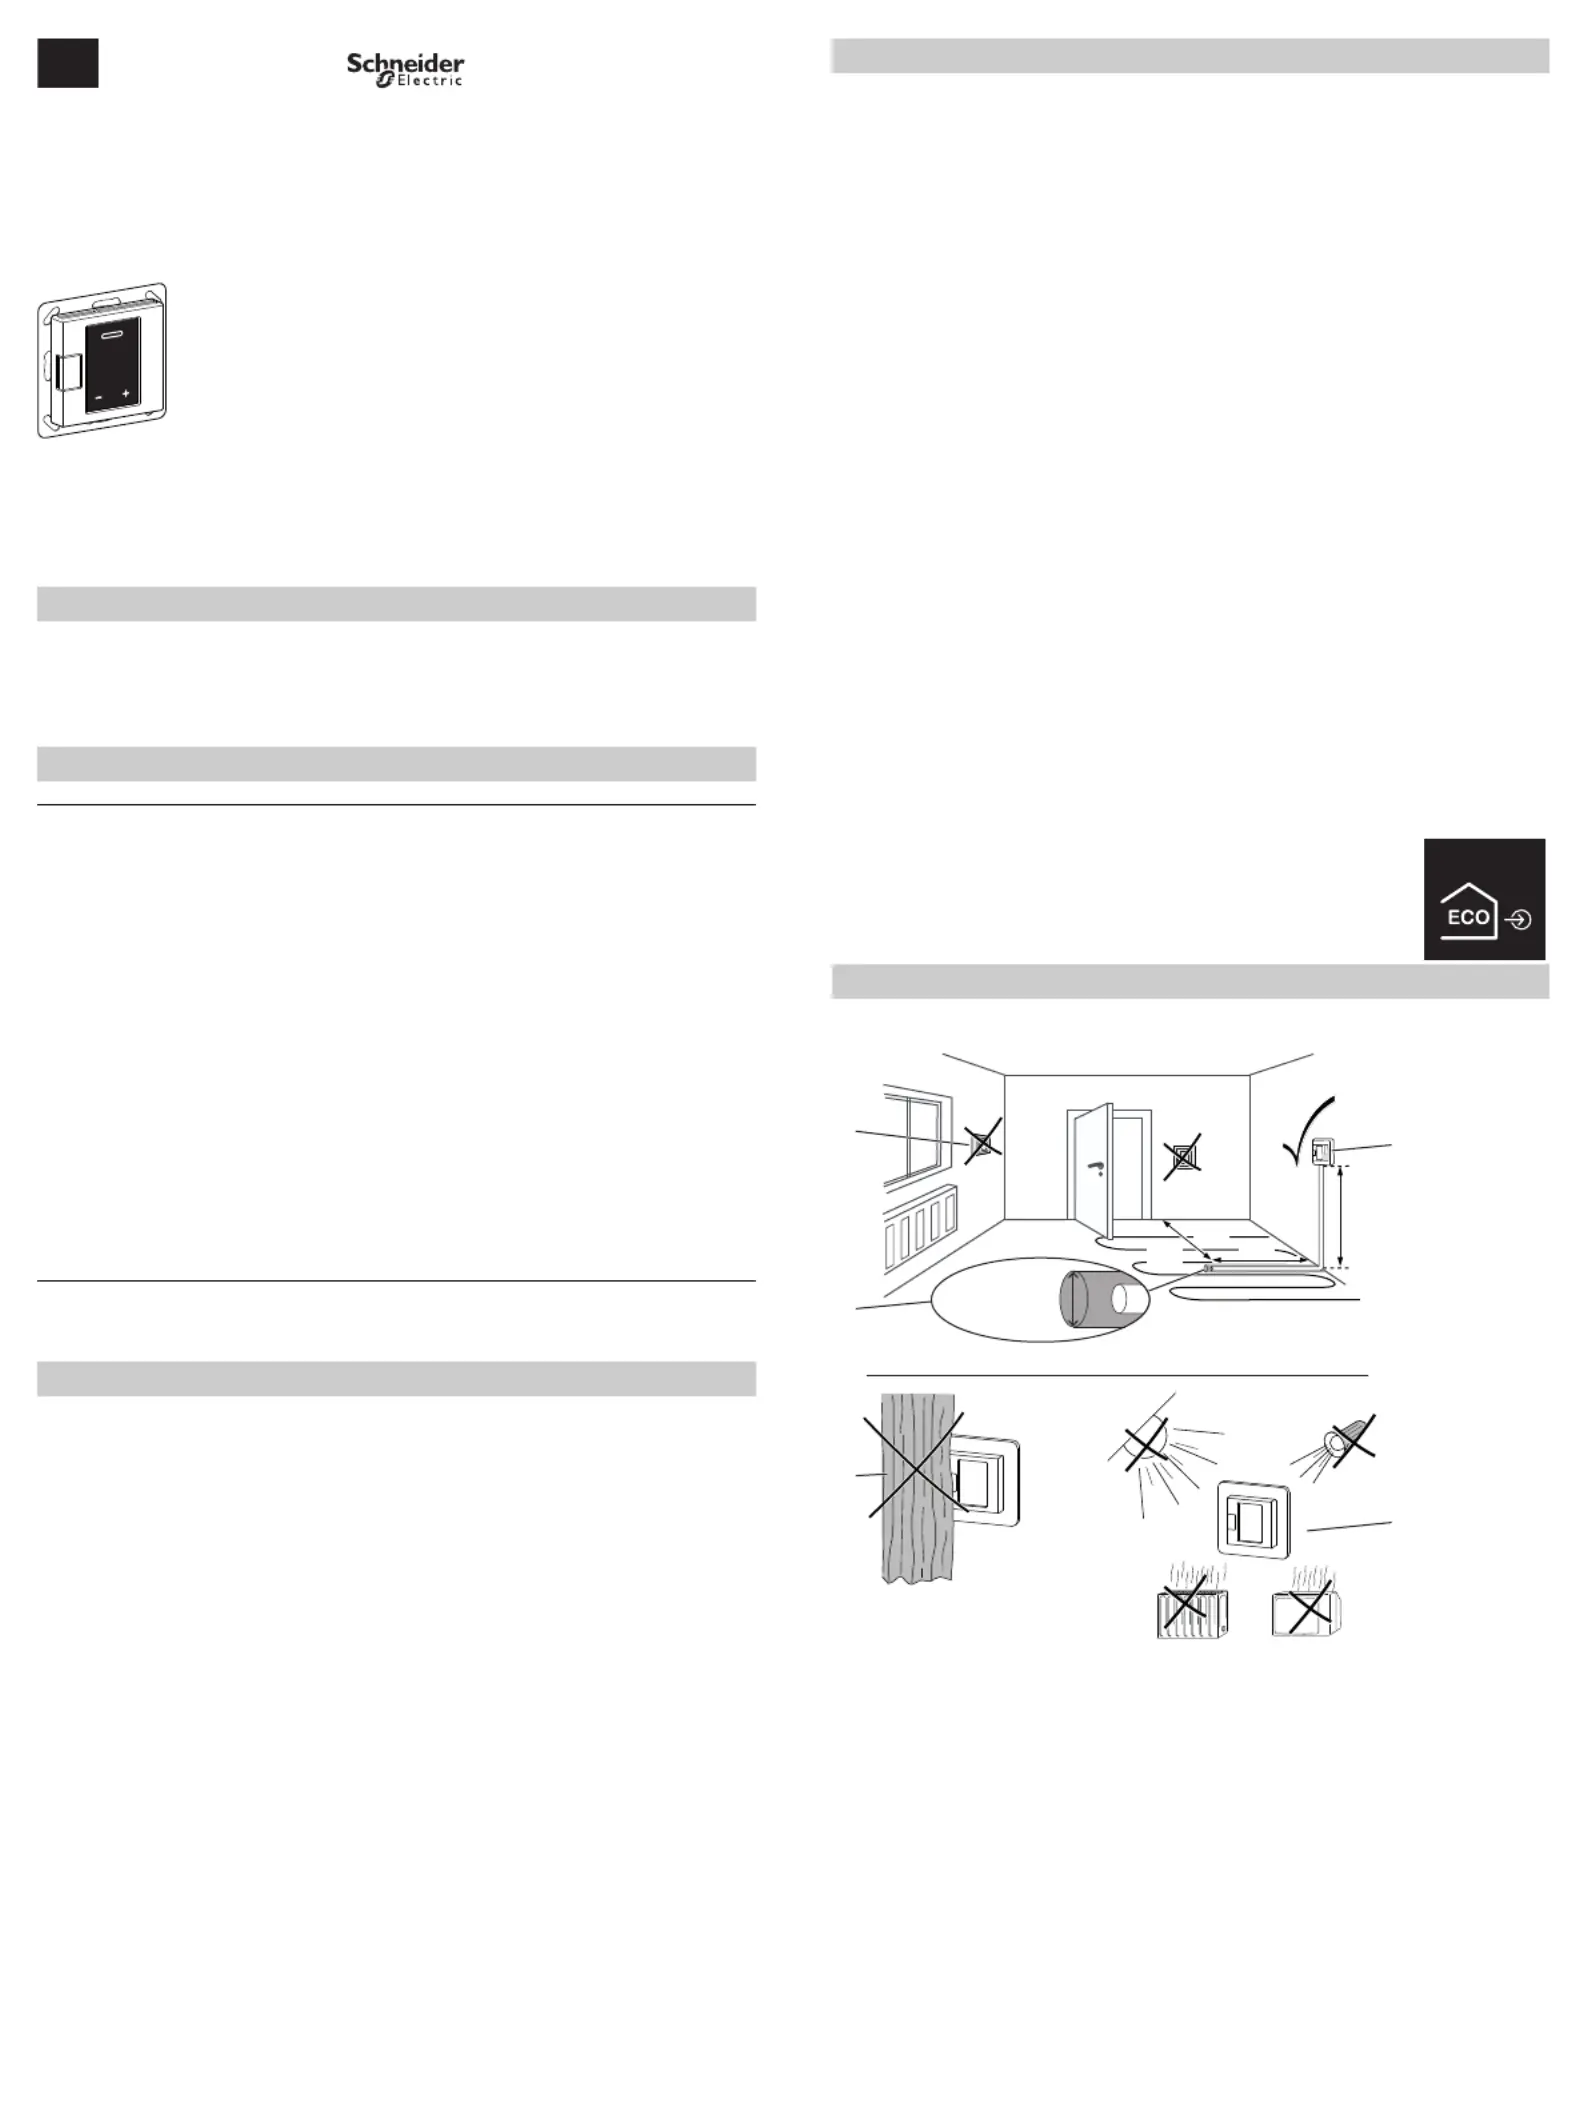
Programmable thermostat 2-pole with touch displayWTH-16 Art. no. WDE002478, WDE003478, WDE004478© Schneider-Electric 2014EAV56173-0011/14
- WDE002495 Floor Sensor
For operating the thermostat in floor and dual mode.
¼
DANGER
Risk of serious damage to property and personal injury, e.g. from fire or
electric shock, due to incorrect electrical installation.
Safe electrical installation can only be ensured if the person in question can prove
basic knowledge in the following areas:
• Connecting to installation networks
• Connecting several electrical devices
• Laying electric cables
These skills and experience are normally only possessed by skilled professionals
who are trained in the field of electrical installation technology. If these minimum re-
quirements are not met or are disregarded in any way, you will be solely liable for
any damage to property or personal injury.
¼
DANGER
Risk of death from electric shock.
The outputs may carry an electrical current even when the device is switched off.
Always disconnect the fuse in the incoming circuit from the supply before working
on connected loads.
Function and installation
• Getting to know the thermostat
• Installing the thermostat
Operation
• Displays and operating elements
• Starting up
• Operating the thermostat
• Adjusting the basic settings
Appendix
• Behaviour during mains voltage failure and recovery / power reserve
• What should I do if there is a problem?
• Technical data
Programmable thermostat 2-pole with
touch display
Operating instructions
WTH-16
Art. no. WDE002478, WDE003478, WDE004478
Accessories
For your safety
Table of Content
en
.5
°C
°C
°C
°C
°C
13:21
21
With the programmable thermostat 2-pole with touch display (referred to in the following
as the thermostat), you can regulate the room and/or floor temperature. The unit is oper-
ated using a touch display.
The thermostat can be connected to electrical underfloor heating systems, radiators or
valve drives which can be switched.
The thermostat has a weekly clock with an individually adjustable program. Alternatively,
you can select one of 3 pre-programmed weekly programs. Various heating modes with
individual temperature setpoints are available: comfort mode, eco mode and frost protec-
tion mode.
Operating modes
The thermostat can be operated in four different variants.
•Room air: The internal temperature sensor detects the room temperature. The thermo-
stat controls this with the aid of the connected heat load.
•Floor: The floor sensor detects the floor temperature. The thermostat controls this with
the aid of the underfloor heating.
•Dual: The internal temperature sensor monitors the room temperature and controls it
with the help of the connected heating systems. At the same time, the floor sensor mon-
itors the floor temperature and limits this to the predefined maximum temperature value
("max temp").
This variant is particularly recommended for temperature-sensitive parquet and lami-
nate floors.
•PWM: The pulse width modulator (PWM) switches the heating on and off at regular in-
tervals. In PWM mode, you can adjust the desired temperature using the PWM value
(see "Settings the PWM value").
The floor sensor does not work in this operating mode. The room temperature limits are
met.
External temperature reduction
In all operating modes, you can connect an external switch or time con-
trols for temperature reduction (TR). The internal temperature control is
overwritten here.
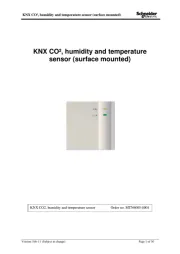
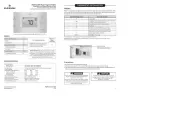
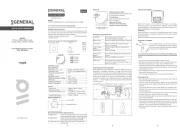
Installation site of thermostat and floor sensor
Room air mode or dual mode
To ensure reliable thermostat operation, note the following when planning the installation
site:
AMinimum installation height: 1.5 m above the floor.
BDo not install too close to windows, doors or ventilation openings.
CAvoid direct sunlight or direct light from lamps.
Do not install above radiators or other heat sources.
DDo not cover or install behind curtains.
Floor mode or dual mode
EPosition at least 1 m from walls or doors.
Install in the middle of the loops of the underfloor heating unit (see drawing).
FLay the floor sensor in a plastic tube with an inside diameter of 10 mm.
Getting to know the thermostat
Installing the thermostat
09:01
1 m
min. ø10 mm
1 m
1,5 m
A
E
C
B
F
D

EAV56173-00 11/14
Wire the thermostat
Mounting the thermostat and covers
1Install the thermostat in a flush-mounted box.
2Place the frame onto the insert.
3Press in the snap ring until it presses against the frame.
|
Selecting a central plate with switches allows you to disconnect both the device
and the connected load from the network at both terminals.
4Press on the central plate until it audibly clicks into place.
Removing the covers
1Using a suitable screwdriver, press on the marked points to loosen the central plate.
2Tilt the central plate forward and remove it.
3Lift out the snap ring using a suitable screwdriver and remove it.
4Remove the frame.
AExternal switch/external
time control (TR) or
"PilotWire"
BHeat load/valve drives
CFloor sensor
Displays and operating elements
APush-button switch
BDisplay
CSelection key
DCursor
ENavigation keys
• Press briefly:
change in steps
• Press and hold:
change continuously
L
N
N
-t
A
B
C
L
N L
SENSOR
.5
°C
°C
°C
°C
°C
13:21
21
°C
°C
°C
°C
°C
13:21
21
.5
°C
°C
°C
°C
°C
13:21
21
B
A
C
E
D
Individual display elements
The following symbols are shown on the display, depending on your selections and the
navigation level:
Heating mode selection / default A B C D
AAuto mode
Weekly program that is currently set
BComfort mode / +21 °C
CEco mode / +19 °C
DFrost protection mode / +7 °C
Symbol for manual mode (with hand): setting was
selected manually.
Symbol for external temperature reduction (arrow):
temperature is set via TR input.
Basic settings 1/4 / default A B C D
ADate and time / 01.01.2015, 12:00
BFrost protection mode (+5 °C to +21 °C) and eco
mode (+5 °C to +50 °C) setpoints
C"Pre-programmed weekly programs" menu
DDisplay brightness (15% to 100%) / 30%
Brightness during standard display
"Pre-programmed weekly programs" selection
AFreely adjustable weekly programmable
BWork
CFamily
DWeekend house
Basic settings 2/4 / default A B C D
A"Room temperature range" menu (PIN lock)
B"Floor temperature range" menu (PIN lock)
C"Calibrate sensor" menu (PIN lock)
D“Operating modes” menu (PIN lock)
Red dot on the sensor position indicates the oper-
ating mode that is currently selected (here: dual).
“Temperature” settings
AMinimum and maximum room temperature
(+5 °C, +35 °C) / +5 °C, +30 °C
BMinimum and maximum floor temperature
(+5 °C, +50 °C) / +5 °C, +40 °C
CCalibrate room air sensor (-3 °C to +3 °C) and
floor sensor (-9 °C to +9 °C)
“Operating modes” selection
ARoom air
Only internal temperature sensor active
BFloor
Only floor sensor active
CDual
Temperature and floor sensors active
DPWM
Pulse width modulator: the heating switches
on and off at regular intervals.
Basic settings 3/4 / default A B C D
AFloor sensor type (PIN lock)
Resistance of built-in sensor in ohms at 25 °C: 2 k,
10 k, 12 k, 15 k, 33 k, 47 k
BValve protection
green: activated, white: deactivated
CRelay output (PIN lock)
Normally open contact (NO=green
),
Normally closed contact (NC=green)
DSummer/winter time (CEST)
green: activated, white: deactivated
Basic settings 4/4 / default A B
AEnergy efficiency interval
Period for energy efficiency calculation in days /
1 d, 7 d, 30 d
BExit basic settings
1
1
1
1
1
1
2
2
2
2
2
3
3
3
3
3
max
max
max
max
max
min
mi
mi
mi
min
n
n
n
max
ma
ma
ma
max
x
x
x
min
mi
mi
mi
min
n
n
n
c
c
c
c
c
al
a
a
a
allll
min
m
m
m
miiiin
n
n
n
max
m
m
m
ma
a
a
ax
x
x
x
min
m
m
m
miiiin
n
n
n
max
m
m
m
ma
a
a
ax
x
x
x
c
c
c
c
c
al
a
a
a
allll
c
c
c
cc
al
a
a
a
allll
PWM
P
P
P
PW
W
W
WM
M
M
M
10k
10
10
10
10k
k
k
k
NO
N
N
N
NO
O
O
O
/NC

EAV56173-00 11/14
Switching on the thermostat for the first time
If the thermostat is connected and the push-button switch is pressed in D, the start
display appears.
The thermostat starts with the default settings:
• Comfort heating mode
• Room air operating mode
If a floor sensor is connected, it is detected automatically and the floor operating mode is
selected. The thermostat then switches to the standard display.
|
Also check the following settings:
•Operating mode: Always set the dual operating mode manually. If the sensor
configuration is changed later, the operating mode does not switch automatically
and you also have to set this manually.
•Floor sensor type: Always select the connected floor sensor in the basic set-
tings to ensure correct temperature regulation.
• All the default settings that are automatically selected when the device is
switched on for the first time can be adjusted later on in the "Basic settings"
menu.
Standard display
In the standard display, three different windows appear, changing in rotation every 10 sec-
onds. The current settings and measured values are shown.
The current time is displayed at the top of each window. A red line under the display indi-
cates that the heating is currently active.
ATemperature
Currently measured temperature
BEnergy efficiency information
Number of hours of heating during the selected
energy efficiency interval
CHeating mode
Mode with individual setpoint that currently ap-
plies to the heating (here: comfort mode)
A hand next to the symbol indicates that the heat-
ing mode was selected manually (manual mode)
and the heating is not being controlled by a weekly
program. This applies until you reactivate auto
mode.
|
To make the display last as long as possible, it moves slightly every 4 hours (screen
saving function).
Basic settings for operation ABC
APIN lock
Settings require PIN entry (PIN: 5)
Applies until you exit basic settings
BCheckbox selected
CCheckbox deselected
Faults ABC
AInternal overheating in thermostat
(> +85 °C)
BRoom temperature sensor not detected.
CFloor temperature sensor not detected.
All "faults" symbols are yellow.
Starting up
Setting the date and time Touch Display
1Reduce (-) or increase (+) the value marked by the
cursor using the navigation keys.
Press key briefly: change value in steps
Press and hold key: change value continuously
2Confirm the value and switch to the next one with
the selection key.
The settings are saved once you confirm the last val-
ue.
12:00
01.01.2015
09:01
.0
°C
°C
°C
°C
°C
21
09:01
09:01
A
B
C
15 h
Overview of operation
You can open the menus from each window of the standard display.
Setting the temperature for comfort mode
|
Heating the floor or the room to the desired temperature may take several hours.
You should therefore wait a while before increasing the temperature.
Settings the PWM value
The pulse width modulator (PWM) switches the heating on and
off at regular intervals. In PWM mode, you can adjust the de-
sired temperature using the PWM value. The value is displayed
instead of the temperature setpoint, in the same way (see "Set-
ting the temperature setpoint").
The PWM value specifies the percentage that the heating heats
in a recurring interval of 10 minutes.
Example:
0%: heating is permanently off
50%: heating is on for 5 minutes, then off for 5 minutes
100%: heating is permanently on
|
The thermostat automatically returns to the standard display without saving
changes if no entries are made for 15 seconds.
Operating the thermostat
ATemperature setpoint/
PWM
BHeating mode selection
CWeekly program
DBasic settings
Setting the temperature setpoint Touch Display
1Switch to the temperature setpoint display:
Press one of the navigation keys.
The setpoint for the room or floor temperature is
shown on the display with green underlining.
2Lower (-) or raise (+) the setpoint in steps of 0.5 K
using the navigation keys (room air and dual oper-
ating modes from 5 °C to 35 °C, floor operating
mode from 5 °C to 50 °C).
The desired setpoint for the room temperature in
comfort mode is shown on the display.
3Confirm the new setpoint with the selection key.
The standard display opens. If the measured tempera-
ture is lower than the new setpoint, the heating turns
on. The display shows red underlining during heating.
> 2 sec
B
A
C
D
> 2 sec
09:01
.0
°C
°C
°C
°C
°C
21
09:01
.5
°C
°C
°C
°C
°C
21
.5
°C
°C
°C
°C
°C
21
.0
°C
°C
°C
°C
°C
23
.0
°C
°C
°C
°C
°C
23
09:01
.5
°C
°C
°C
°C
°C
21
09:01
PWM
P
P
P
PW
W
W
WM
M
M
M
50%
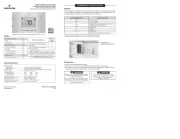
Produkspesifikasjoner
Merke: | Schneider |
Kategori: | Termostat |
Modell: | WDE002478 |
Trenger du hjelp?
Hvis du trenger hjelp med Schneider WDE002478 still et spørsmål nedenfor, og andre brukere vil svare deg
Termostat Schneider Manualer
12 August 2025
12 August 2025
27 Oktober 2024
27 Oktober 2024
18 Oktober 2024
Termostat Manualer
- Termostat ORNO
- Termostat Bosch
- Termostat Boneco
- Termostat Siemens
- Termostat EBERLE
- Termostat Schwaiger
- Termostat AEG
- Termostat TP Link
- Termostat Oreg
- Termostat Netatmo
- Termostat Busch-Jaeger
- Termostat Brennenstuhl
- Termostat Danfoss
- Termostat Somfy
- Termostat Panasonic
- Termostat EMOS
- Termostat Heatit
- Termostat Dimplex
- Termostat Velleman
- Termostat GE
- Termostat Nexa
- Termostat Nobo
- Termostat Tru Components
- Termostat Bearware
- Termostat Elgato
- Termostat Daikin
- Termostat Avidsen
- Termostat Mitsubishi
- Termostat STI
- Termostat Hunter
- Termostat Basetech
- Termostat TFA
- Termostat Tesla
- Termostat Renkforce
- Termostat REMKO
- Termostat ATAG
- Termostat Drayton
- Termostat Jung
- Termostat Ambiano
- Termostat Crestron
- Termostat Xavax
- Termostat Techno Line
- Termostat Remeha
- Termostat Heatmiser
- Termostat Hive
- Termostat Wolf
- Termostat GENERAL Life
- Termostat Silvercrest
- Termostat AVM
- Termostat HomePilot
- Termostat Elektrobock
- Termostat Corberó
- Termostat Perel
- Termostat Delta Dore
- Termostat Rademacher
- Termostat Homematic IP
- Termostat Vimar
- Termostat Emerson
- Termostat Intellinet
- Termostat Salus
- Termostat Ferguson
- Termostat Chacon
- Termostat Fenix
- Termostat Honeywell
- Termostat Junkers
- Termostat Eliwell
- Termostat Grasslin
- Termostat Jumo
- Termostat Enda
- Termostat Orbis
- Termostat Fantini Cosmi
- Termostat Vemer
- Termostat Qubino
- Termostat Theben
- Termostat EQ3
- Termostat Etherma
- Termostat Saunier Duval
- Termostat Gewiss
- Termostat Viessmann
- Termostat Bticino
- Termostat Conrad
- Termostat Econo-Heat
- Termostat Elro
- Termostat Gira
- Termostat Tado
- Termostat Brink
- Termostat Emmeti
- Termostat Itho
- Termostat Bryant
- Termostat Aube
- Termostat Baxi
- Termostat Seitron
- Termostat Amfra
- Termostat Vaillant
- Termostat Carel
- Termostat Buderus
- Termostat Optima
- Termostat Frico
- Termostat UPM
- Termostat Computherm
- Termostat Veria
- Termostat Innogy
- Termostat Nefit
- Termostat ICY
- Termostat Levica
- Termostat Itho-Daalderop
- Termostat Carrier
- Termostat Radson
- Termostat ChiliTec
- Termostat King
- Termostat ACV
- Termostat Landis Gyr
- Termostat Nest
- Termostat Oventrop
- Termostat IMIT
- Termostat Horstmann
- Termostat ELKO
- Termostat Alecto
- Termostat Google
- Termostat Emko
- Termostat Wachendorff
- Termostat MundoControl
- Termostat Otio
- Termostat Rose LM
- Termostat Tylö
- Termostat Sinustec
- Termostat TrickleStar
- Termostat Finder
- Termostat Sygonix
- Termostat Warmup
- Termostat Plugwise
- Termostat Lowes
- Termostat Go Green
- Termostat Drayton Erie
- Termostat Intertechno
- Termostat EQ-3
- Termostat Johnson Control
- Termostat RWE
- Termostat Webasto
- Termostat Tellur
- Termostat OJ ELECTRONICS
- Termostat Zehnder
- Termostat Plieger
- Termostat HomeMatic
- Termostat Eneco
- Termostat VDH
- Termostat Maico
- Termostat Yokis
- Termostat Eurotronic
- Termostat HQ
- Termostat Ouellet
- Termostat THERMAFLEX
- Termostat Truma
- Termostat Wallair
- Termostat AWB
- Termostat PECO
- Termostat Worcester-Bosch
- Termostat 2Heat
- Termostat EasyTemp
- Termostat Hugo Muller
- Termostat Watts
- Termostat Westfalia
- Termostat Oregon Scientific
- Termostat H-Tronic
- Termostat Z-Wave
- Termostat Easy Timer
- Termostat Fibaro
- Termostat SPC
- Termostat Muller
- Termostat Bulex
- Termostat Helios (Amfra)
- Termostat IR-V
- Termostat Eqiva
- Termostat Hager
- Termostat Energenie
- Termostat Thermy
- Termostat Ferroli
- Termostat Niko
- Termostat Stiebel Eltron
- Termostat De Dietrich
- Termostat POER
- Termostat Technoline
- Termostat Magnum
- Termostat Cotech
- Termostat Hornbach
- Termostat ATTACK
- Termostat AcuRite
- Termostat Braeburn
- Termostat Konyks
- Termostat Devi
- Termostat Sorel
- Termostat Wodtke
- Termostat Hoffman
Nyeste Termostat Manualer
11 August 2025
11 August 2025
10 August 2025
5 August 2025
5 August 2025
4 August 2025
4 August 2025
4 August 2025
4 August 2025
4 August 2025