Silverline 380421 Bruksanvisning
Silverline
Ikke kategorisert
380421
Les nedenfor 📖 manual på norsk for Silverline 380421 (3 sider) i kategorien Ikke kategorisert. Denne guiden var nyttig for 24 personer og ble vurdert med 4.6 stjerner i gjennomsnitt av 12.5 brukere
Side 1/3

380421
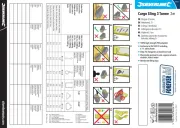
Tyre Repair Kit
Tubeless tyre repairing process
•Locatethepunctureandpushthereamerinandoutoftheholeuntilit
moveswithoutrestriction(FigA)
•Threadonestripoftyreadhesivethroughtheeyeletoftheinsertion
tool(FigB)
•Pushtheinsertiontoolintothepunctureholeleaving20mmtails
protrudingfromthehole(FigC)
•Rotatethetoolclockwisewhilstpullingtheinsertiontoolawayfromthe
tyresurface(FigD)
•Inatethetyretoitsrequiredpressureandallowtheadhesivestickto
stabilizefor5minutes
•Trimtheexcesstailsthatprotrudefromthetyresurface(FigE)
•Applywatertotherepairtocheckthatithassuccessfullysealed
WARNING:Oncethetyrehasbeenrepaireditisnotsuitableforpublic
roaduse.
Repairing tyre tubes
•Locatethepunctureinthetubeandusethesuppliedabrasivediscto
cleananydirtorgrimethatcouldpreventthepatchesfrombondingtothe
surface
•Removetheprotectiveclearlmfromthesurfaceofthepatchandapply
rubbercementevenlyacrossthesurface
•Removethecolouredbackingfromthepatchbeforeapplyingittothe
puncture
•Pushthepatchontothepunctureensuringthattherubbercementhas
createdasealaroundtheedgeofthepatch.Ifthereisnoclearsealapply
smallamountsofrubbercementuntilthepatchiscompletelysealed
•Allowthepatchtostabilizefor30minutesbeforellingthetyretothe
correctpressure
•Applywatertotherepairtocheckthatithassuccessfullysealed
Checking tyre pressure
•Removethedustcapfromthetyrevalve
•Holdthepressuregaugeonthetyrevalveandreadmeasurement
displayed
•Ifpressureappearslow,inateuntiloptimumpressureisreached
www.silverlinetools.com
Procédure de réparation d’un pneu tubeless
•Unefoislacrevaisonrepérée,faitesentrerleforetdansletrou.Effectuez
unmouvementdevaetviensdansletroujusqu’àcequeleforetyentre
etenressortesansproblèmes.(FigA)
•Enlezunemècheadhésivepourpneudansl’œilletdel’outild’insertion.
(FigB)
•Poussezlamècheadhésivepourpneudansl’œilletdel’outild’insertion
enlalaissantdépasserde20mmparrapportautrou.
• Faitestournerl’outildanslesensdesaiguillesd’unemontretoutentirant
surl’outild’insertionpourl’ôterdelasurfacedupneu.(FigD)
•Gonezlepneujusqu’àcequ’ilsoitàlabonnepressionetlaissezla
mècheadhésivesestabiliserdurant5minutes.
•Coupezl’excèsdemèchequidépassedelasurfacedupneu.(FigE)
•Appliquezdel’eausurlaréparationpourvousassurerqu’elleaétécor
rectementscellée.
AVERTISSEMENT:Lepneu,aprèsréparation,n’estpasappropriéà
unusagesurdesroutespubliques
Réparation des chambres à air
• Unefoislacrevaisonrepéréesurlachambre,nettoyezlasurfacede
toutesaletéoudébrisàl’aidedudisqueabrasifcarcelapourraitnuireà
l’adhésiondelarustine.
•Enlevezlelmtransparentquirecouvrelasurfacedelarustineetap
pliquezuniformémentlecimentvulcanisantsurtoutelasurface.Avantde
l’appliquersurlasurface,enlevezlapartiearrièrecolorée.
• Appuyezlarustinesurletroudecrevaisonet,assurez-vousqueleciment
vulcanisantabienscellétoutlereborddelarustine.Silescellén’estpas
uniforme,appliquezdepetitesquantitésdecimentvulcanisantjusqu’àce
quelarustinesoitscellée.
•Laissezlamècheadhésivesestabiliserdurant30minutesetgonezle
pneujusqu’àcequ’ilsoitàlabonnepression.
•Appliquezdel’eausurlaréparationpourvousassurerqu’elleaétécor
rectementscellée.
Contrôler la pression du pneu
•Ôtezlebouchondelavalvedepneu.
•Maintenezlajaugedepressiondanslavalvedupneuetcontrôlezla
pressionafchée.
•Silapressionestbasse,gonezjusqu’àobtentiondelapressionoptimale.
20mm
Fig A
Fig B
Fig C
Fig D
Fig E
Tyre Repair Kit
Coffret pour réparation de pneus
Reifen-Reparatursatz
Juego para reparación de pinchazos
Kit di riparazione pneumatici
Bandenreparatieset
380421_Z1MANPRO1.indd 1 05/06/2013 16:47
Produkspesifikasjoner
| Merke: | Silverline |
| Kategori: | Ikke kategorisert |
| Modell: | 380421 |
Trenger du hjelp?
Hvis du trenger hjelp med Silverline 380421 still et spørsmål nedenfor, og andre brukere vil svare deg
Ikke kategorisert Silverline Manualer
26 September 2025
25 September 2025
25 September 2025
25 September 2025
25 September 2025
25 September 2025
25 September 2025
25 September 2025
24 September 2025
24 September 2025
Ikke kategorisert Manualer
- Foreo
- Acti
- MEPROLIGHT
- Smith-Victor
- Air Guard
- Media-tech
- Cooler Master
- RC Allen
- Gen Energy
- TecTake
- Vantec
- Forza
- Majority
- Parallels
- Venicci
Nyeste Ikke kategorisert Manualer

23 Oktober 2025

23 Oktober 2025

23 Oktober 2025

23 Oktober 2025

23 Oktober 2025

23 Oktober 2025

23 Oktober 2025

23 Oktober 2025

23 Oktober 2025

23 Oktober 2025