Silverline 508819 Bruksanvisning
Silverline
Ikke kategorisert
508819
Les nedenfor 📖 manual på norsk for Silverline 508819 (3 sider) i kategorien Ikke kategorisert. Denne guiden var nyttig for 4 personer og ble vurdert med 4.3 stjerner i gjennomsnitt av 2.5 brukere
Side 1/3
508819
GB Specication
Dowel diameters: 6, 8 and 10mm
Maximum stock thickness: 30mm
Joints: E, L and T-joints
Dimensions (L x W x H): 200 x 70 x 100mm
Weight: 0.19kg
FR
Caractéristiques techniques
Diamètre des chevilles : 6, 8 et 10 mm
Épaisseur max de matériau : 30 mm
Types d’assemblage: en E, en L et en T
Dimensions (L x l x H) : 200 x 70 x 100 mm
Poids : 0,19 Kg
DE
Technische Daten
Dübeldurchmesser: 6, 8 und 10 mm
Materialstärke: max. 30 mm
Verbindungen: E, L und T
Abmessungen (L x H x B): 200 x 100 x 70 mm
Gewicht: 0,19 kg
ES
Especicaciones
Diámetro de las espigas: 6, 8 y 10 mm
Grosor máximo del material: 30 mm
Tipos de ensambles: E, L y en T
Dimensiones (L x An x A): 200 x 70 x 100 mm
Peso: 0,19 kg
IT
Speciche tecniche
Diametro tasselli: 6 mm, 8 mm e 10 mm
Spessore materiale. 30 mm
Tipo di assemblagio: E, L r T
Dimensioni (L x l x H) : 200 x 70 x 100 mm
Peso: 0,19 kg
NL
Specicaties
Deuvel diameter: 6, 8 en 10 mm
Max. materiaal dikte: 30 mm
Verbindingen: E, L en T verbinding
Afmetingen (L x B x H): 200 x 70 x 100 mm
Gewicht 0,19 kg
PL
Dane techniczne
Średnice kołków: 6, 8 i 10 mm
Maks. grubość płyty: 30 mm
Połączenia: E, L i T
Wymiary (dł. x sz. x wys.): 200 x 70 x 100 mm
Masa: 0,19 kg
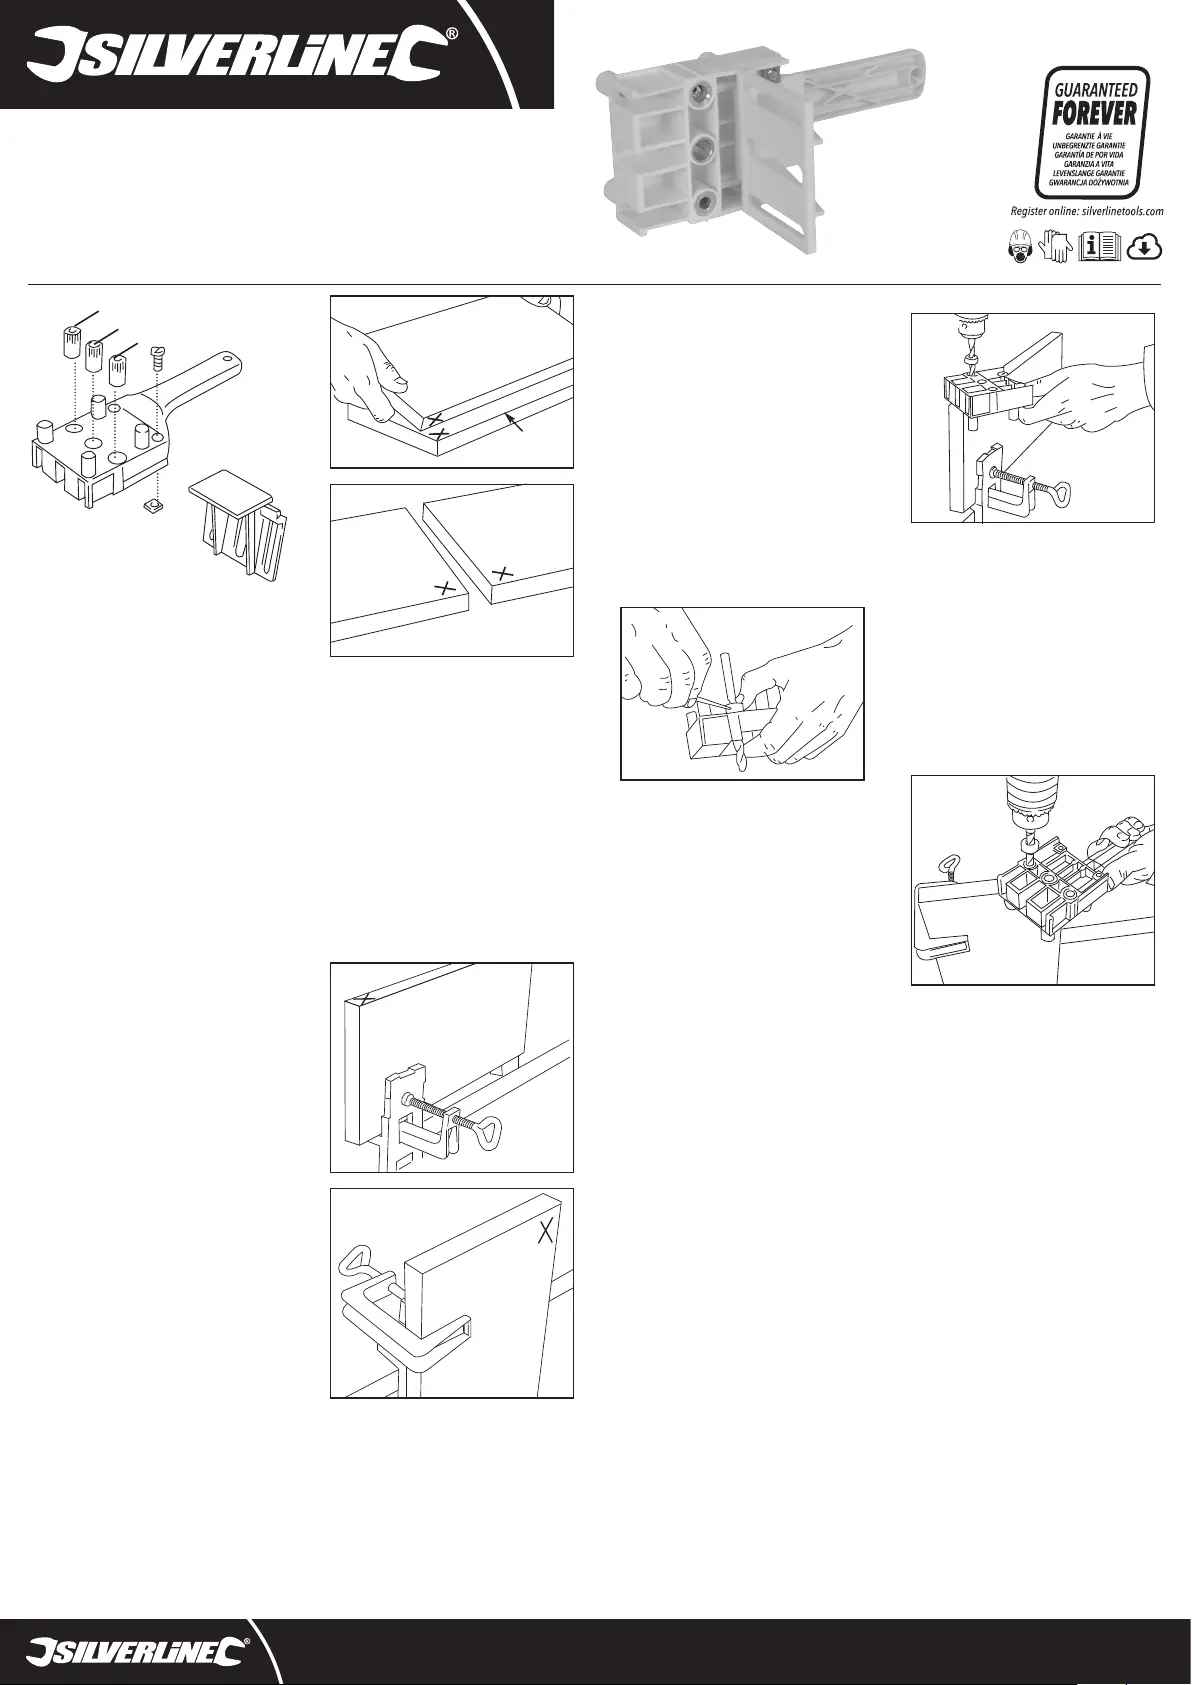
1
A
B
2
A
B
I
II
GB (I & II)
• Label the boards A and B, and mark the dowel positions
FR (I et II)
• Inscrivez sur chaque planche de bois une lettre, A et B puis,
faites également une inscription marquant l’emplacement
des chevilles.
DE (I u. II)
• Die Bretter mit den Buchstaben A und B markieren und die
Dübelpositionen anzeichnen.
ES (I y II)
• Marque los paneles A y B. Marque la posición de las espigas.
IT (I e II)
• Iscrivere su ognuna delle tavole una lettera, A e B. Segnare la
posizione dei tasselli
NL (I en II)
• Etikettering de borden A en B en markeer de deuvel posities
PL (I & II)
• Oznaczyć płyty A i B oraz zaznaczyć miejsce montażu kołków.
3
A
4
III
IV
GB (III & IV)
• For all dowel joints, clamp board A to the workbench
FR (III et IV)
• Quel que soit le type d’assemblage, xez la planche A à
l’établi à l’aide d’un dispositif de serrage.
DE (III u. IV)
• Für alle Dübelverbindungen Brett A an die Werkbank
spannen.
ES (III y IV)
• Sujete el panel A en un banco de trabajo (indicado para todos
los ensambles).
IT (III e IV)
• Fissare la tavola A sul banco da lavoro
NL (III en IV)
• Voor alle deuvelverbindingen, klem bord A in een werkbank
PL (III i IV)
• W przypadku wszystkich połączeń kołkowych ściskiem
przymocować płytę A do stołu roboczego.
5
V
GB Adjusting the drilling depth on board A:
• Dowel Lengths (board thickness of B + 5mm)
• For end-grain joints, halve the dowel length
• Use a drill bit with a depth stop
FR Réglage de la profondeur de perçage sur le panneau A :
• Longueur des chevilles (épaisseur de le panneau B + 5 mm)
• Pour un assemblage en bout-à-bout, réduisez la longueur de
la cheville par deux
• Servez-vous d’un foret pourvu d’une butée de profondeur
DE Bohrtiefe an Brett A einstellen:
• Dübellänge (Materialstärke von Brett B + 5 mm).
• Für Hirnholzverbindungen die Dübellänge halbieren.
• Einen Bohrer mit Tiefenanschlag verwenden.
ES Ajuste el tope de profundidad para el panel A:
• Longitud de la espiga (grosor del panel B + 5 mm).
• Para ensambles en cantos, reducir la longitud de la espiga ala
mitad.
• Utilice una broca con tope de profundidad.
IT Regolare la profondità di foratura sulla tavola A:
• La lunghezza del tassello (spessore della tavola B + 5 mm).
• Per assemblare ad angolo, ridurre la lunghezza del tassello a
metà.
• Utilizzare una punta da trapano con un blocco profondità
NL Boordiepte aan bord A aanpassen:
• Deuvellengte (borddikte van B + 5 mm).
• Voor randverbindingen, halveren deuvellengte.
• Gebruik een boorbit met een dieptestop
PL Regulacja głębokości wiercenia w płycie A:
• Długość kołków (grubość płyty B + 5 mm).
• W przypadku połączeń czołowych kołek powinien być o
połowę krótszy niż podano.
• Użyć narzędzia wiertniczego z ogranicznikiem głębokości.
FR Gabarit de tourillon
DE Dübel-Bohrschablone
ES Plantilla para espigas
Dowelling Jig 30mm
Version date: 10.04.2018
IT Guida per spinatura
NL Deuvelmal
PL Przyrząd do połączeń kołkowych
6
VI
GB (VI, VII & VIII)
• Drill the holes in board A
FR (VI, VII et VIII)
• Percez les trous sur le panneau A
DE (VI, VII u. VIII)
• Bohrungen in Brett A setzen.
ES (VI, VII y VIII)
• Perforar el panel A
IT (VI, VII e VIII)
• Perforare la tavola A
NL (VII, VII en VIII)
• Boor de gaten in bord A
PL (VI, VII i VIII)
• Wywiercić otwory w płycie A.
7
VII
GB
• Ensure the dowel jig is placed at on the edge/face to be
drilled
• Insert the drill bit into the drill bush
FR
• Assurez-vous que le gabarit de tourillon soit bien placé à plat
contre le bord du panneau devant être percé
• Introduisez le foret dans le guide-foret
DE
• Die Dübellehre muss ach auf der zu bearbeitenden Fläche/
Kante auiegen.
• Bohrer in die Bohrbuchse setzen.
ES
• Asegúrese de que la guía esté apoyada de forma plana en el
borde del panel.
• Introduzca la broca en el agujero de guía.
IT
• Assicurarsi del fatto che l amaschera sia appoggiata contro il
bordo della tavola
• Introdurre la punta del trapano nel foro della maschera
NL
• Zorg ervoor dat de deuvel mal is vlak op de rand / oppervlak
geplaatst zit dat geboord moet worden
• Steek het boorbit in de boorbus
PL
• Przyrząd powinien spoczywać płasko na krawędzi/
powierzchni, w której mają powstać otwory.
• Wsunąć narzędzie wiertnicze w tulejkę wiertarską.
silverlinetools.com
8mm
10mm
6mm
A
Produkspesifikasjoner
| Merke: | Silverline |
| Kategori: | Ikke kategorisert |
| Modell: | 508819 |
Trenger du hjelp?
Hvis du trenger hjelp med Silverline 508819 still et spørsmål nedenfor, og andre brukere vil svare deg
Ikke kategorisert Silverline Manualer
26 September 2025
25 September 2025
25 September 2025
25 September 2025
25 September 2025
25 September 2025
25 September 2025
25 September 2025
24 September 2025
24 September 2025
Ikke kategorisert Manualer
- AVerMedia
- Perel
- FSR
- JennAir
- Digi-Pas
- Optoma
- Eden
- Create
- 3M
- Girmi
- Techly
- Dash
- Magmatic
- Acti
- GeoVision
Nyeste Ikke kategorisert Manualer

23 Oktober 2025

23 Oktober 2025

23 Oktober 2025

23 Oktober 2025

23 Oktober 2025

23 Oktober 2025

23 Oktober 2025

23 Oktober 2025

23 Oktober 2025

23 Oktober 2025