Tenda RE3L Bruksanvisning
Les nedenfor 📖 manual på norsk for Tenda RE3L (2 sider) i kategorien Ruter. Denne guiden var nyttig for 8 personer og ble vurdert med 4.7 stjerner i gjennomsnitt av 4.5 brukere
Side 1/2
MESH/RST 1/2.5GE 2 3 4 POWER
自
输入: 12V 1A
Shenzhen Tenda Technology Co., Ltd.
6-8 Floor, Tower E3, No.1001, Zhongshanyuan Road, Nanshan D istrict,
Shenzhen, China. 518052 www.te ndacn.com Made in China
自
输入: 12V 1A
Shenzhen Ten da Technology Co., Ltd.
6-8 Floor, Tower E3, No.1001, Zhongshanyuan Road, N anshan District,
Shenzhen, Ch ina. 518052 www.tendacn.com Made in China
MESH/RS 2.5G 2 3 4 POWER
Shenzhen Tenda Technology Co., Ltd.
6-8 Floor, Tower E3, No.1001, Zhongshanyuan Road , Nanshan District,
Shenzhen, China. 518052 www.tendacn .com Made in China
MESH/RS 2.5G 2 3 4 POWER
Shenzhen Tenda Technology Co., Ltd.
6-8 Floor, Tower E3, No.1001, Zhongshanyuan Road , Nanshan District,
Shenzhen, China. 518052 www.tendacn .com Made in China
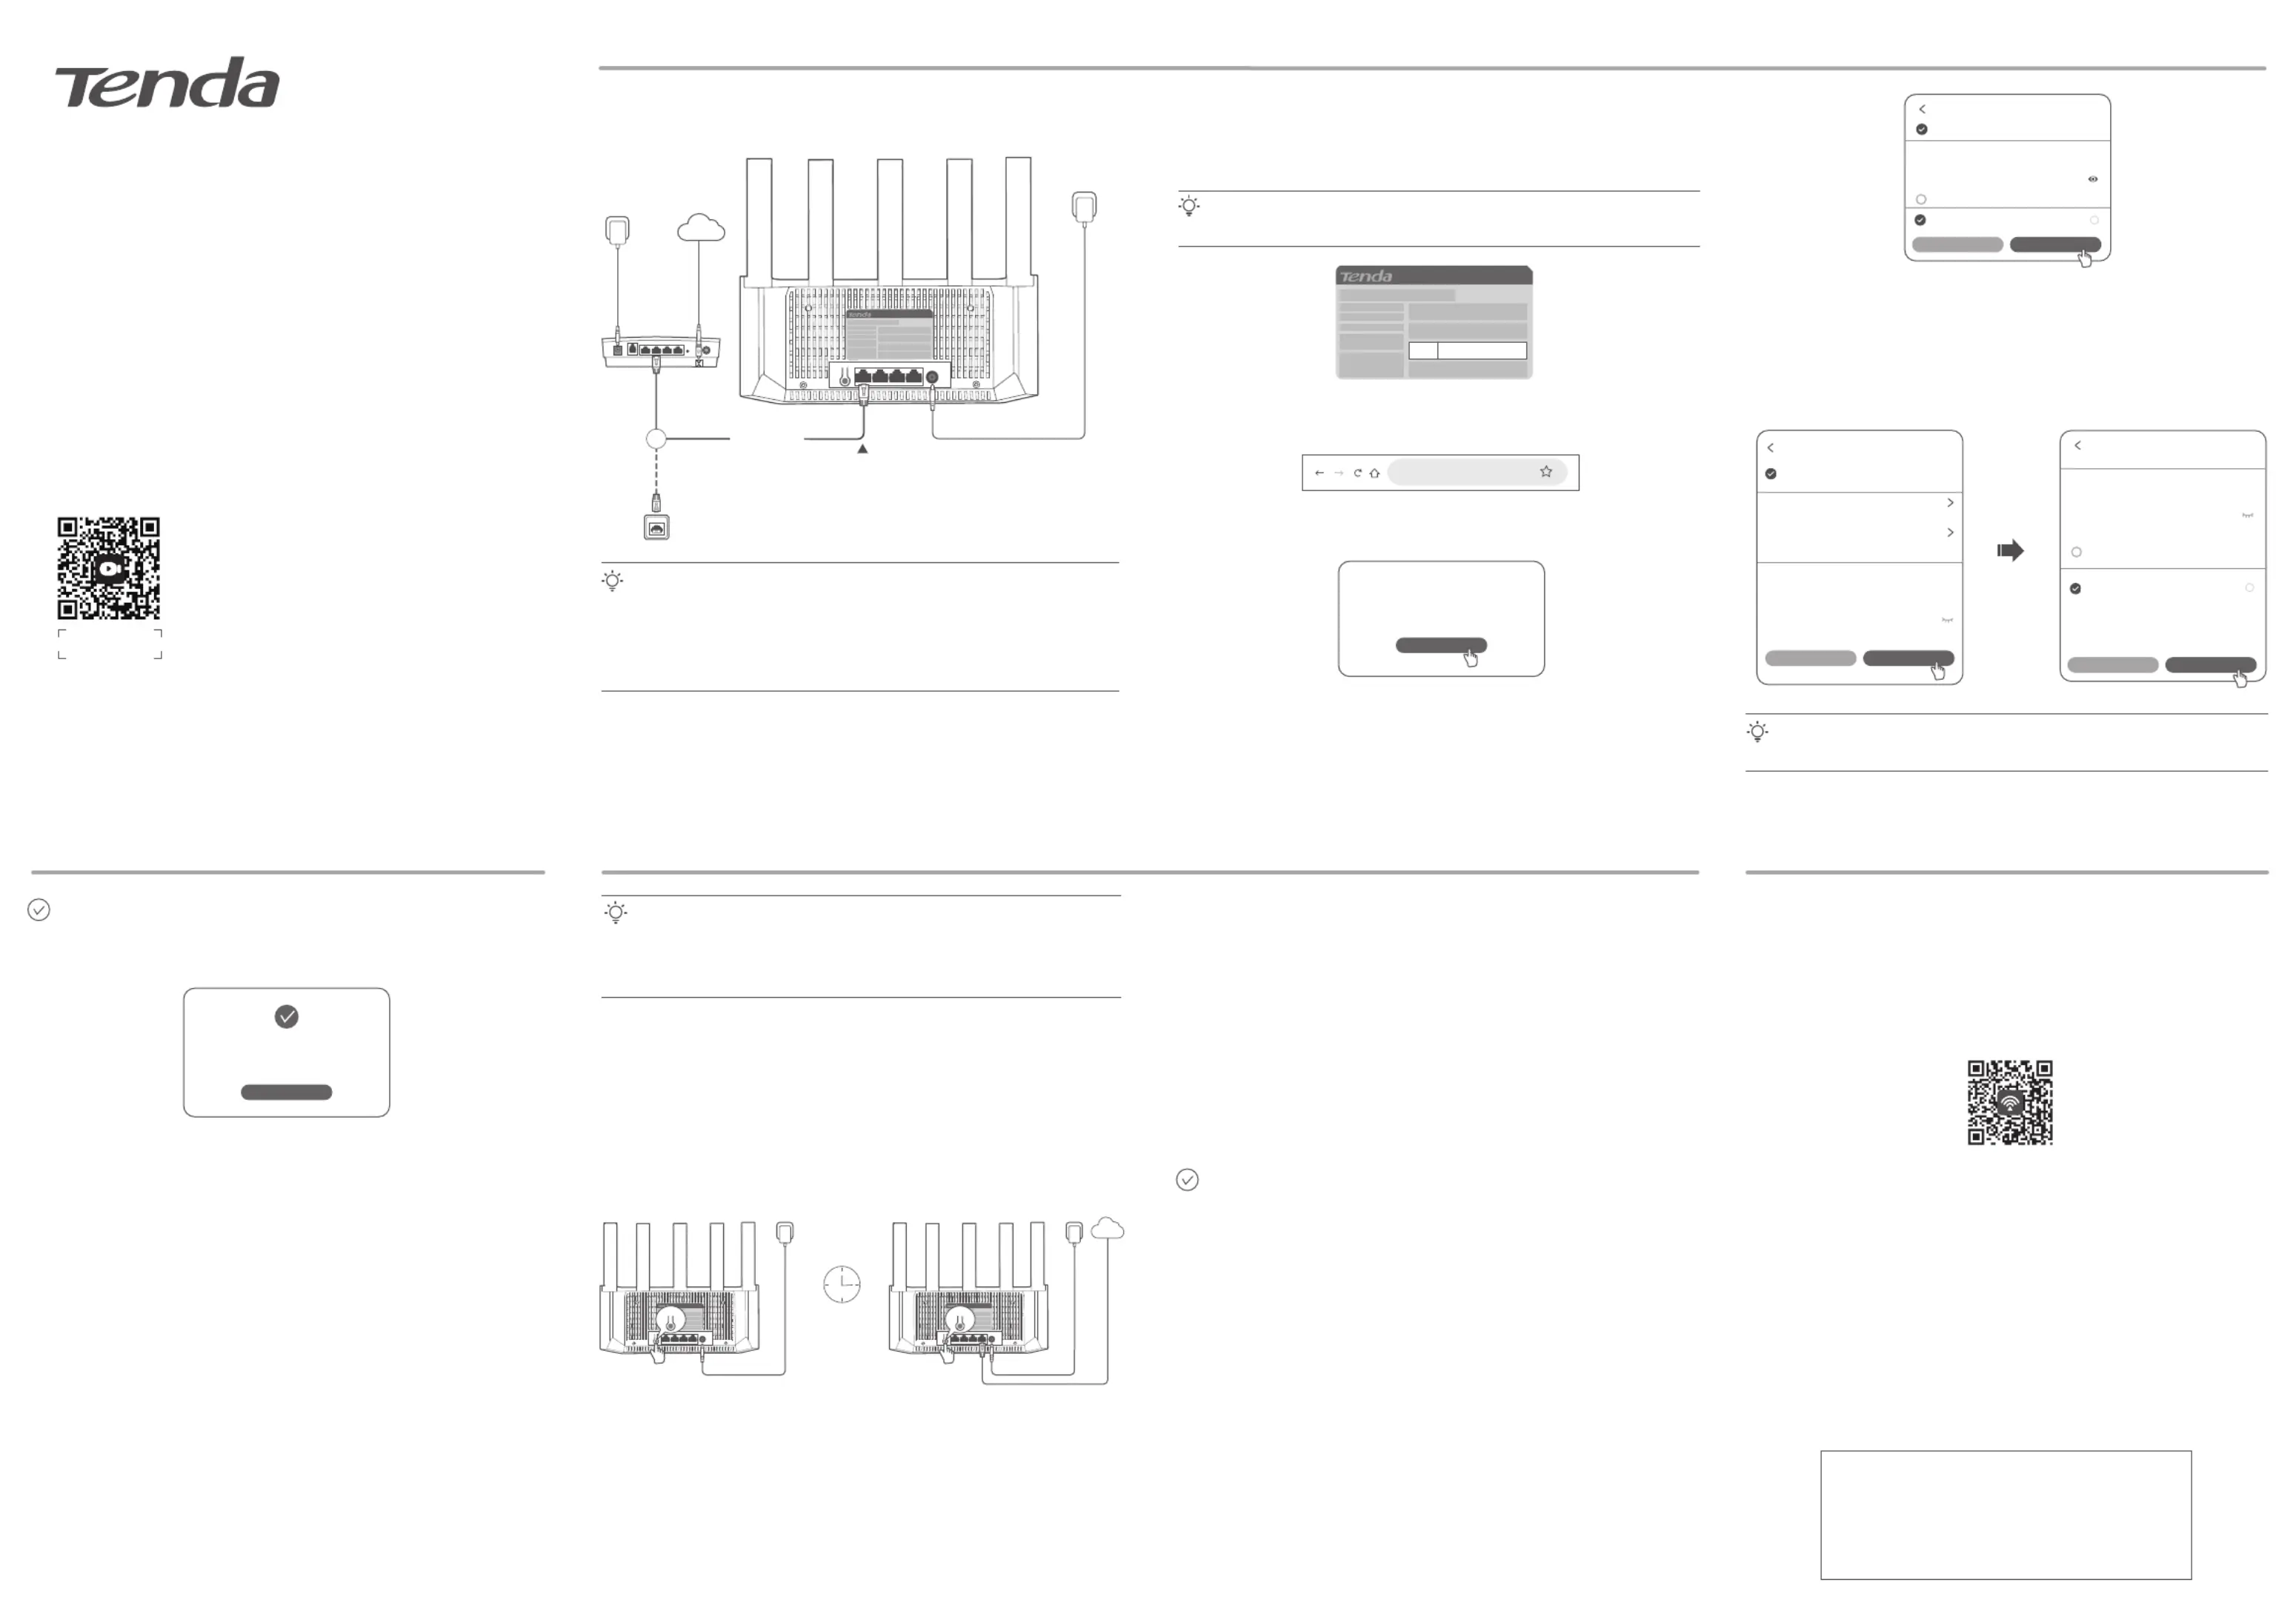
Scenario 1: Set Up the Device as a Router
II. Connect the Router to the Internet
I. Add the Router to an Existing Network
Scenario 2: Set Up as an Add-on Node Internet Connection with NFC
1. Place the router in an elevated and open position within 3 meters from your existing
router.
2. Use the power adapter to connect the router to a power source.
3. Press the networking button of the router for about 1-3 seconds. The indicator blinks
green quickly. Within 2 minutes, press the networking button of the existing router for 1-3
seconds to negotiate with this router. The indicator blinks green quickly.
When the indicator of the router lights solid green, the networking is successful and the
router becomes a secondary node in the network.
Tips
• This router can be networked with Tenda WiFi+ routers.
• Ensure that the existing router (primary node) has been connected to the internet and the router (secondary node) to
be added has never been used. If not, reset this router first.
• Two RE6L Pro are taken an example here. If the router fails to be added to an existing network, contact Tenda
customer service for help.
Wi-Fi 7 Router
RE6L Pro/TE6L Pro/RE3L/TE3L
Quick Installation Guide
• Wireless router x 1 • Power adapter x 1 • Ethernet cable x 1 • Quick installation guide
Package Contents
RE6L Pro is used for illustrations here unless otherwise specified. The actual product prevails.
I. Connect the Router
The product appearance may vary with models. Please refer to the product you purchased.
LAN
Or
Internet
Ethernet jack
Any Ethernet ports. 2.5GE port is recommended (if any)
Example: RE6L Pro
Modem
Ethernet cable
➋
Power source
➊
Power on the router.
Connect the WAN port of the router to the LAN port of your modem or the Ethernet
jack using an Ethernet cable.
➊
➋
• If you use the modem for internet access, power off the modem first before connecting the WAN port of the router to
the LAN port of your modem and power it on after the connection.
• Refer to the following relocation tips to locate the router to a proper position:
- Place the router in a high position with few obstacles.
- Keep your router away from electronics with strong interference, such as microwave ovens, induction cookers, and
refrigerators.
- Keep your router away from metal barriers, such as weak current boxes, and metal frames.
- If prompts on the page, ignore it.Unsecured Network
- For network security, the Wi-Fi password will be set in later setup.
Tips
Tips
1. Connect your wireless client such as a smartphone to the Wi-Fi network of the router. For
the default Wi-Fi name (SSID), check the label on the device body. It is no Wi-Fi password
by default.
3. Perform operations as prompted.
2. The page will automatically redirect to the web UI of the router. If not, disable your mobile
data traffic, start a browser and visit in the address bar.tendawifi.com
tendawifi.com
Welcome to use Tenda router
Faster, Safer, Smoother, Smarter
Start
Tap .Start
➊
• If the router detects that your connection type is . Your internet access is available DHCP
without further configuration (for example, PPPoE connection through an optical
modem is completed).
Set Wi-Fi name, Wi-Fi password and login password. Tap Next.
➋
• If the router detects that your connection type is PPPoE. Set the Wi-Fi name, Wi-Fi
password and login password. Tap .Next
− If the PPPoE user name and password are required for internet access, select the ISP
Type based on your region and ISP and enter required parameters (if any).
− If you forgot the PPPoE user name and password, you can obtain the PPPoE user name
and password from your ISP and manually enter them.
The Wi-Fi password is used to connect to the Wi-Fi network, while the login password is used to log in to the web UI of
the router.
Tips
Previous Next
ISP Type Normal
* PPPoE
Username
Internet Settings
Dynamic IP
Detection succeeded. Recommended internet
connection type: PPPoE
Internet
Connection
Type
Enter the username
* PPPoE
Password
Enter the password
Done. When the indicator is solid green, the network connection is successful.
This router supports IPv6, and the IPv6 is enabled by default. If your broadband service
supports IPv6, you can access the IPv6 network after setup.
To access the internet with:
• Wi-Fi-enabled devices: Connect to the router’s new Wi-Fi network (see the configuration
completion page for tips). You can connect to any Wi-Fi to access the internet, and 5G
Wi-Fi is recommended.
*As required by related laws and regulations, the device is performing Dynamic Frequency Selection (DFS).
Please connect to the Wi-Fi after about 90 seconds.
*Clients need to support 802.11be to experience the high speeds offered by Wi-Fi 7 routers.
• Wired devices: Connect to an Ethernet port of the router using an Ethernet cable.
II. Relocate the Router
1. Refer to the following relocation tips to locate the router to a proper position:
• Ensure that the distance between any two nodes is less than 10 meters.
• Keep your routers away from electronics with strong interference, such as microwave
ovens, induction cookers, and refrigerators.
• Place the routers in a high position with few obstacles.
2. Power on the router again.
3. Wait for 1-2 minutes and observe the router’s indicator. If the indicator is solid green, the
connection between the primary node and secondary node is good. Otherwise, move the
router (secondary node) closer to the existing router for better connection quality.
The router has NFC stickers, you can connect your NFC-enabled devices to the router's
Wi-Fi with one-touch. Only NFC-enabled orAndroid HarmonyOS phones or tablets can
connect to the internet with one-touch.
1. Write Wi-Fi information to NFC stickers.
(1) Install and register Tenda WiFi App by scanning the QR code. After managing the
router (connect to the router's Wi-Fi, the App will automatically discover the router),
enter the router configuration page and navigate to the NFC Sticker.
(2) Select the Wi-Fi name you want to write into sticker, and tap .Write NFC Sticker
(3) Place the NFC sticker near the NFC area of the phone (usually around the camera on
the back of the phone).
Wait for a moment, the Wi-Fi information is successfully written into the NFC sticker.
Place the NFC sticker in a visible location at home for internet access.
*NFC stickers can be re-written if the Wi-Fi name or Wi-Fi password changes.
2. Connect your phone to the internet.
* Ensure that the NFC function is enabled, and the screen is unlocked and active.
Place the NFC sticker near the NFC area of the phone, wait for a moment, and remove the
phone when the phone prompts for sound or vibration. When the phone prompts
Connect to network, tap CONNECT to connect to Wi-Fi without encryption.
Done.
To access the internet with:
− Wi-Fi-enabled devices: Connect to your Wi-Fi network. (The Wi-Fi name and Wi-Fi
password of the new router are the same as the existing router.)
* Clients need to support 802.11be to experience the high speeds offered by Wi-Fi 7 routers.
− Wired devices: Connect to an Ethernet port of any router using an Ethernet cable.
Internet
MESH/RST MESH/RST
This router Existing router
Within 2 minutes
Example: RE6L Pro
SSID
XXXXXX_XXXXXX
Internet connection type: DHCP
Not encrypted
Previous Next
*WiFi Name @Tenda_XXXXXX
*WiFi
WiFi Settings
i
Password
8 – 32 characters
Not encrypted
Set WiFi password to router login
password
Set WiFi password to router login
password
Previous Next
*WiFi Name @Tenda_XXXXXX
*WiFi
WiFi Settings
i
Password
Configuration completes
Complete
Scan to download Tenda WiFi App
NFC Service Just now
Connect to network
Connect to @Tenda_XXXXXX?
CANCEL CONNECT
Scan the QR code or visit www.tendacn.com for
installation videos, technical specifications, user
guides and more information.
You can see the product name and model on the
product label.
The label can be found on the back of the device.
Get Support
and Services
Produkspesifikasjoner
| Merke: | Tenda |
| Kategori: | Ruter |
| Modell: | RE3L |
Trenger du hjelp?
Hvis du trenger hjelp med Tenda RE3L still et spørsmål nedenfor, og andre brukere vil svare deg
Ruter Tenda Manualer

18 September 2025

25 August 2025

24 August 2025

24 August 2025

24 August 2025

24 August 2025
24 August 2025

22 Januar 2025
Ruter Manualer
- SPL
- Genexis
- Starlink
- Western Digital
- Keewifi
- Vimar
- Kramer
- Arris
- Blood Cells Audio
- Draytek
- Advantech
- Amped Wireless
- Zebra
- Rocstor
- Trust
Nyeste Ruter Manualer
20 Oktober 2025

12 Oktober 2025
7 Oktober 2025
7 Oktober 2025
7 Oktober 2025
6 Oktober 2025
6 Oktober 2025
6 Oktober 2025

6 Oktober 2025

6 Oktober 2025