Vemer Quicklux-3F Bruksanvisning
Les nedenfor 📖 manual på norsk for Vemer Quicklux-3F (2 sider) i kategorien Bryter. Denne guiden var nyttig for 14 personer og ble vurdert med 4.0 stjerner i gjennomsnitt av 7.5 brukere
Side 1/2
NORME DI RIFERIMENTO
La conformità con le Direttive Comunitarie:
2006/95/CE (Bassa tensione) 2004/108/CE (Compatibilità Elettromagnetica)
è dichiarata in riferimento alle seguenti norme armonizzate:
• CEI EN 60669-2-1
3
4
5
1
Manuale d’Uso
INTERRUTTORI CREPUSCOLARI
Leggere attentamente tutte le istruzioni
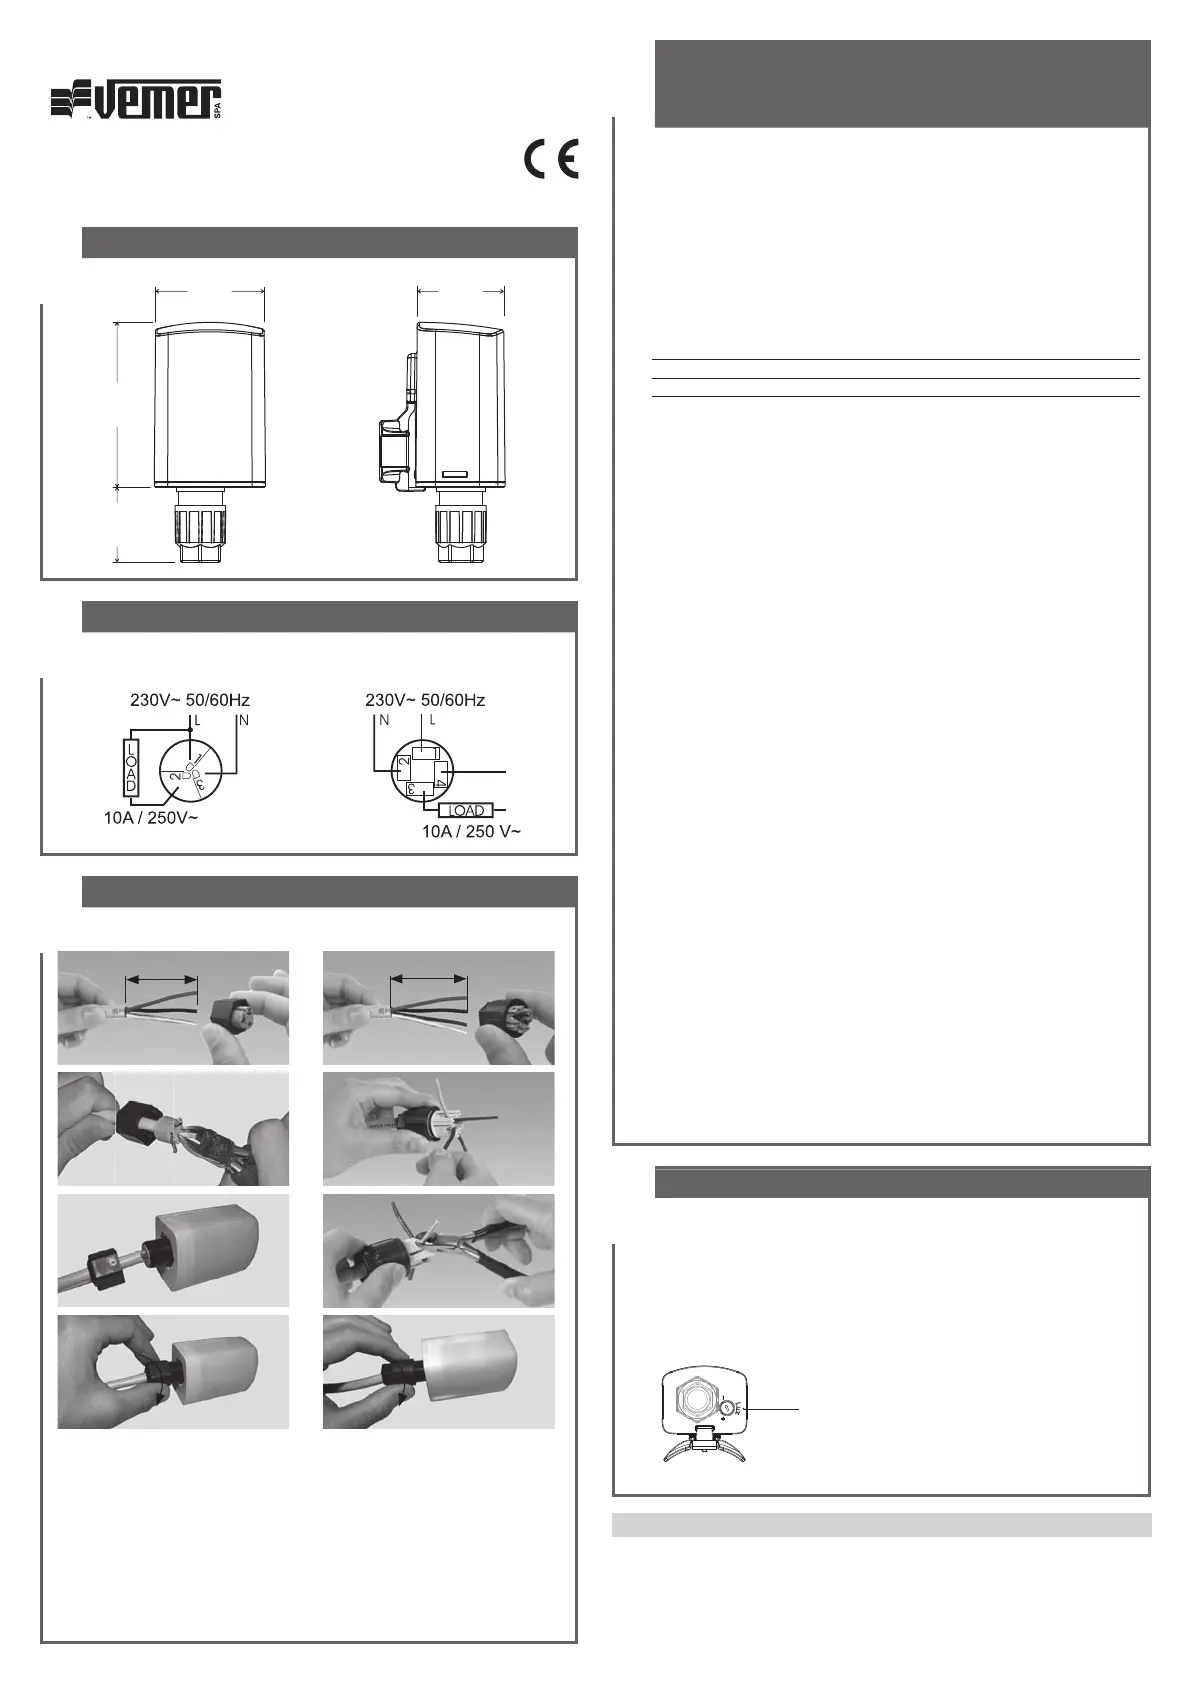
DIMENSIONI
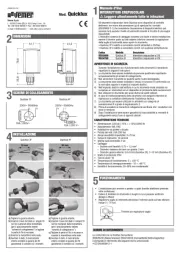
SCHEMI DI COLLEGAMENTO
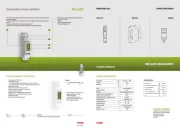
INSTALLAZIONE
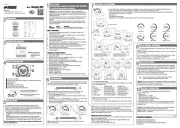
FUNZIONAMENTO
2
Vemer S.p.A.
I - 32032 Feltre (BL) • Via Camp Lonc, 16
Tel +39 0439 80638 • Fax +39 0439 80619
e-mail: info@vemer.it - web site: www.vemer.it
V3IS00725-010
Mod. Quicklux
Gli strumenti crepuscolari serie Quicklux sono dispositivi di controllo
elettronici con micro disconnessione (µ) di apertura fra i contatti
(EN 60669-2-1) che consentono l’accensione di dispositivi elettrici (ad
esempio luci) quando il livello di luminosità scende al di sotto di una soglia
impostabile.
L’innovativo sistema di cablaggio consente una facile e veloce installazione
mentre il trimmer posto sul lato esterno inferiore consente la regolazione
della soglia di luminosità senza aprire lo strumento.
• Quicklux 3F è adatto a comandare carichi alimentati a 230Vac.
• Quicklux 4F è adatto a comandare carichi con qualsiasi alimentazione.
Codice Modello Descrizione
VE503900 Quicklux 3F Interruttore crepuscolare a 3 fili
VE504700 Quicklux 4F Interruttore crepuscolare a 4 fili
AVVERTENZE DI SICUREZZA
Durante l’installazione ed il funzionamento dello strumento è necessario
rispettare le seguenti indicazioni:
1) Lo strumento deve essere installato da persona qualificata rispettando
scrupolosamente gli schemi di collegamento.
2) Non alimentare il prodotto se qualche parte risulta danneggiata.
3) Lo strumento deve essere installato e messo in funzione in conformità con
la normativa vigente in materia di impianti elettrici.
4) Nell’impianto elettrico dell’edificio in cui lo strumento viene installato va
compreso un interruttore ed un dispositivo di protezione dalle sovracorrenti
5) Non utilizzare lo strumento per scopi diversi da quelli indicati.
6) In caso di malfunzionamento dello strumento non eseguire interventi di
riparazione e contattare direttamente l’assistenza tecnica.
7) Lo strumento può essere utilizzato in ambienti con categoria di
sovratensione III e grado di inquinamento 2.
8) Prima di accedere ai morsetti di collegamento verificare che i conduttori non
siano in tensione.
9) Dopo l’installazione deve essere garantita la inaccessibilità ai morsetti di
collegamento senza l’uso di appositi utensili.
CARATTERISTICHE TECNICHE
• Alimentazione: 230 Vac (-15% ÷ +10%) 50/60 Hz
• Assorbimento: 6VA (1W)
• Installazione da parete o da palo
• Portata del relè: 10A /250 Vac
• Range sensibilità impostabile: 3÷70 lux
• Tempo di intervento: 10 secondi
• Isteresi sulla sensibilità: 4 lux
• Cablaggio
– Sezione cavi flessibili: 0,75 ÷ 1,5 mm
2
– Diametro massimo dei cavi con guaina: 3 mm
– Diametro guaina esterna: 5,6÷9 mm (Quicklux 3F), 7÷10 mm (Quicklux 4F)
• Grado di protezione: IP54
• Tipo di azioni: 1B
• Temperatura di funzionamento: 0 ÷ +50 °C
• Temperatura di immagazzinamento: -10 ÷ +60 °C
• Umidità di funzionamento: 20÷90% non condensante
Trimmer per regolazione soglia
78,6
51,7
35,8
41,2
Quicklux 3F
• L’installazione può avvenire a parete o a palo (tramite adattatore presente
nella confezione)
• Evitare di installare lo strumento in luoghi in cui si possono verificare
abbagli o riflessi
• Regolare la soglia di intervento attraverso il trimmer posto sul lato inferiore
(range 3 ÷ 70 lux)
Quicklux 4F
a) Togliere la guaina esterna.
b) Inserire il cavo nel dado e i singoli fili
nei fori numerati della morsettiera
(per il posizionamento vedere
“schemi di collegamento”) e tagliare
la parte di filo in eccesso.
c) Inserire la morsettiera nella sede.
d) Avvitare il dado. Il meccanismo
interno inciderà le guaine dei fili
garantendo il contatto coi i morsetti.
a) Togliere la guaina esterna.
b) Inserire il cavo nel dado e i singoli fili
nei fori numerati della morsettiera
(per il posizionamento vedere
“schemi di collegamento”).
c) Tagliare la parte di filo in eccesso e
inserire la morsettiera nella sede.
d) Avvitare il dado. Il meccanismo
interno inciderà le guaine dei fili
garantendo il contatto coi i morsetti.
Quicklux 3F Quicklux 4F
10 mm 30 mm
a) a)
b) b)
c) c)
d) d)
Produkspesifikasjoner
| Merke: | Vemer |
| Kategori: | Bryter |
| Modell: | Quicklux-3F |
Trenger du hjelp?
Hvis du trenger hjelp med Vemer Quicklux-3F still et spørsmål nedenfor, og andre brukere vil svare deg
Bryter Vemer Manualer
18 August 2025
18 August 2025
18 August 2025
18 August 2025

4 Februar 2025

4 Januar 2025
Bryter Manualer
- ATen
- Gewiss
- Nedis
- Vivotek
- Metra
- Ecler
- Elation
- Monacor
- ZyXEL
- Icy Box
- PCE
- Hikvision
- Digitus
- Theben
- Suevia
Nyeste Bryter Manualer
20 Oktober 2025

19 Oktober 2025
19 Oktober 2025
9 Oktober 2025
8 Oktober 2025
8 Oktober 2025
7 Oktober 2025

6 Oktober 2025

6 Oktober 2025

6 Oktober 2025