Yealink RCH240 Bruksanvisning
Yealink
Videokonferansesystem
RCH240
Les nedenfor 📖 manual på norsk for Yealink RCH240 (3 sider) i kategorien Videokonferansesystem. Denne guiden var nyttig for 8 personer og ble vurdert med 4.3 stjerner i gjennomsnitt av 4.5 brukere
Side 1/3

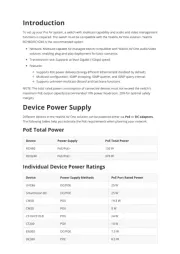
Device Power Supply PoE Total Power
RCH80 PoE/PoE+ 130 W
RCH240 PoE/PoE+ 370 W
Device Power Supply Methods PoE Port Rated Power
UVC86 DC/POE 25 W
SmartVision 80 DC/POE 25 W
CM50 POE 19.3 W
CM20 POE 9 W
CS10/CS10-D POE 24 W
CT200 POE 10 W
EN300 DC/POE 7.5 W
DE300 POE 8.5 W
Introduction
To set up your Pro AV system, a switch with multicast capability and audio and video management
functions is required. The switch must be compatible with the Yealink AV One solution. Yealink
RCH80/RCH240 is the recommended option.
Network: Multicast-capable AV-managed switch compatible with Yealink AV One audio/video
solution, enabling plug-and-play deployment for basic scenarios.
Transmission rate: Supports at least Gigabit (1Gbps) speed.
Features:
Supports PoE power delivery (Energy-Efficient Ethernet/EEE disabled by default).
Multicast configuration: IGMP snooping, IGMP querier, and IGMP query interval.
Supports unknown multicast discard and fast leave functions.
NOTE: The total rated power consumption of connected devices must not exceed the switch's
maximum PoE output capacity (recommended 10% power headroom, 20% for optimal safety
margin).
Device Power Supply
Different devices in the Yealink AV One solution can be powered either via PoE or DC adapters.
The following tables help you estimate the PoE requirements when planning your network.
PoE Total Power
Individual Device Power Ratings
Produkspesifikasjoner
| Merke: | Yealink |
| Kategori: | Videokonferansesystem |
| Modell: | RCH240 |
Trenger du hjelp?
Hvis du trenger hjelp med Yealink RCH240 still et spørsmål nedenfor, og andre brukere vil svare deg
Videokonferansesystem Yealink Manualer
28 September 2025

27 September 2025
27 September 2025

19 Januar 2025

4 Januar 2025

21 Desember 2024

21 Desember 2024

16 Oktober 2024
Videokonferansesystem Manualer
- KanDao
- Middle Atlantic
- Alfatron
- HuddleCamHD
- BZBGear
- VDO360
- Plantronics
- Ipevo
- AVer
- Konftel
- Roland
- Tripp Lite
- VFI
- PureLink
- Philips
Nyeste Videokonferansesystem Manualer
6 Oktober 2025
3 Oktober 2025
3 Oktober 2025

2 Oktober 2025

2 Oktober 2025
1 Oktober 2025

1 Oktober 2025
1 Oktober 2025
1 Oktober 2025
1 Oktober 2025