Be Quiet! Dark Rock Elite Bruksanvisning
Be Quiet!
luftkondisjonering
Dark Rock Elite
Les nedenfor 📖 manual på norsk for Be Quiet! Dark Rock Elite (2 sider) i kategorien luftkondisjonering. Denne guiden var nyttig for 8 personer og ble vurdert med 4.3 stjerner i gjennomsnitt av 4.5 brukere
Side 1/2
» Product information for this CPU cooler
» Produktinformationen zu diesem CPU-Kühler
» Informations produit pour ce système de refroidissement
» Información del producto para este refrigerador de CPU
» Informacje produktowe dla tego coolera CPU
» Engelstalige productinformatie voor deze processorkoeler
» Produktinformation för den här processorkylaren, på engelska
» Подробнаяинформацияоданномкулередляпроцессора
» 此CPU散熱器的產品資訊
» 此CPU散热器的产品信息
» 製品情報(クーラー)
NL
SE
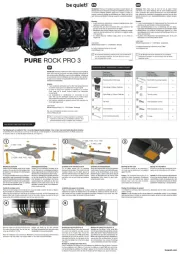
Installation of the mounting
brackets
Screw the Intel spacer nut A onto the
previously positioned Intel backplate.
Then position the Intel mounting brackets
over the Intel spacer nut A and affix
these with the mounting bracket fastening
screws. You can use the cross-tip
screwdriver for this.
Center the Silent Wings 135mm fan
from above. Then slide it into the recess
between the heatsinks and press it
firmly. Connect both fans via the Y-cable.
You can adjust the height of the Silent
Wings 135mm front fan by pushing it
up and down.
Installation der Montagebrücken
Schraube den Intel Gewindebolzen A
auf die zuvor platzierte Intel Backplate.
Positioniere dann die Intel Montagebrü-
cken auf den Intel Gewindebolzen A, um
sie mit den Befestigungsschrauben für die
Montagebrücke zu fixieren. Hierzu kannst
du den Kreuzschraubendreher nutzen.
Befestigung der Backplate
Platziere die Intel Backplate Schrauben in
die auf der Rückseite der Intel Backplate
befindlichen Aussparungen. Beachte hierzu
die Bohrlöcher für den jeweiligen Sockel.
Verwende zur Befestigung der Backplate-
Schrauben auf der Intel Backplate die
O-Ringe. Sobald die Intel Backplate für den
jeweiligen Intel-Sockel zusammengebaut
ist, positioniere es unter dem Mainboard.
Achte dabei darauf, dass die Intel Backplate-
Schrauben genau in den Mainboardlöchern
positioniert sind.
Setze den Silent Wings 135mm Lüfter von
oben mittig an. Lass ihn anschließend in die
Aussparung zwischen den Kühlkörpern hin-
eingleiten und drücke ihn fest. Verbinde beide
Lüfter über die Y-Weiche. Du kannst den Silent
Wings 135mm Frontlüfter in seiner Höhe ver-
stellen, indem du ihn hoch und runter schiebst.
Mounting the CPU cooler
First peel off the protective film from
the underside of the cooler. Apply
thermal paste on the CPU surface. The
tube contains enough for about 1 or 2
applications.
Caution: The thermal paste supplied
should not be swallowed. If any is swal-
lowed, drink lots of water and urgently
seek the advice of a doctor. Store it
beyond the reach of children. Avoid con-
tact with skin and eyes.
Montage des CPU-Kühlers
Entferne zunächst die Schutzfolie
von der Unterseite des Kühlers. Trage
die Wärmeleitpaste auf die CPU-
Oberfläche auf. Der Inhalt reicht für ca.
1-2 Anwendungen.
Vorsicht: Die mitgelieferte Wärmeleitpaste
ist nicht zum Verzehr geeignet. Bei Verzehr
ausreichend Wasser trinken und umgehend
einen Arzt aufsuchen. Außerhalb der Reich-
weite von Kindern aufbewahren. Vermeide
Haut- und Augenkontakt.
Place the cooler onto the CPU unit.
Then screw the mounting bridge alter-
nately tight. You can use the cross-tip
screwdriver for this.
Dark Rock Elite has a Quiet (Q) and a
Performance (P) mode. The mode affects
the maximum fan speeds and the opera-
ting noise. To change modes, first remove
the top magnetic top frame. Move the
switch to switch between the modes.
Lege den Kühler mittig auf die Intel
Montagebrücken, sodass sich der
Kühler mit selbigen verschrauben lässt.
Hierzu kannst du den Kreuzschrauben-
dreher verwenden.
Dark Rock Elite hat einen Quiet (Q) und
einen Performance (P) Modus. Der Modus
hat Einfluss auf die maximalen Drehzahlen
des Lüfters und die Betriebsgeräusche.
Entferne zum Wechseln der Modi
zunächst den magnetischen Rahmen.
Bewege den Schalter, um zwischen den
Modi zu wechseln.
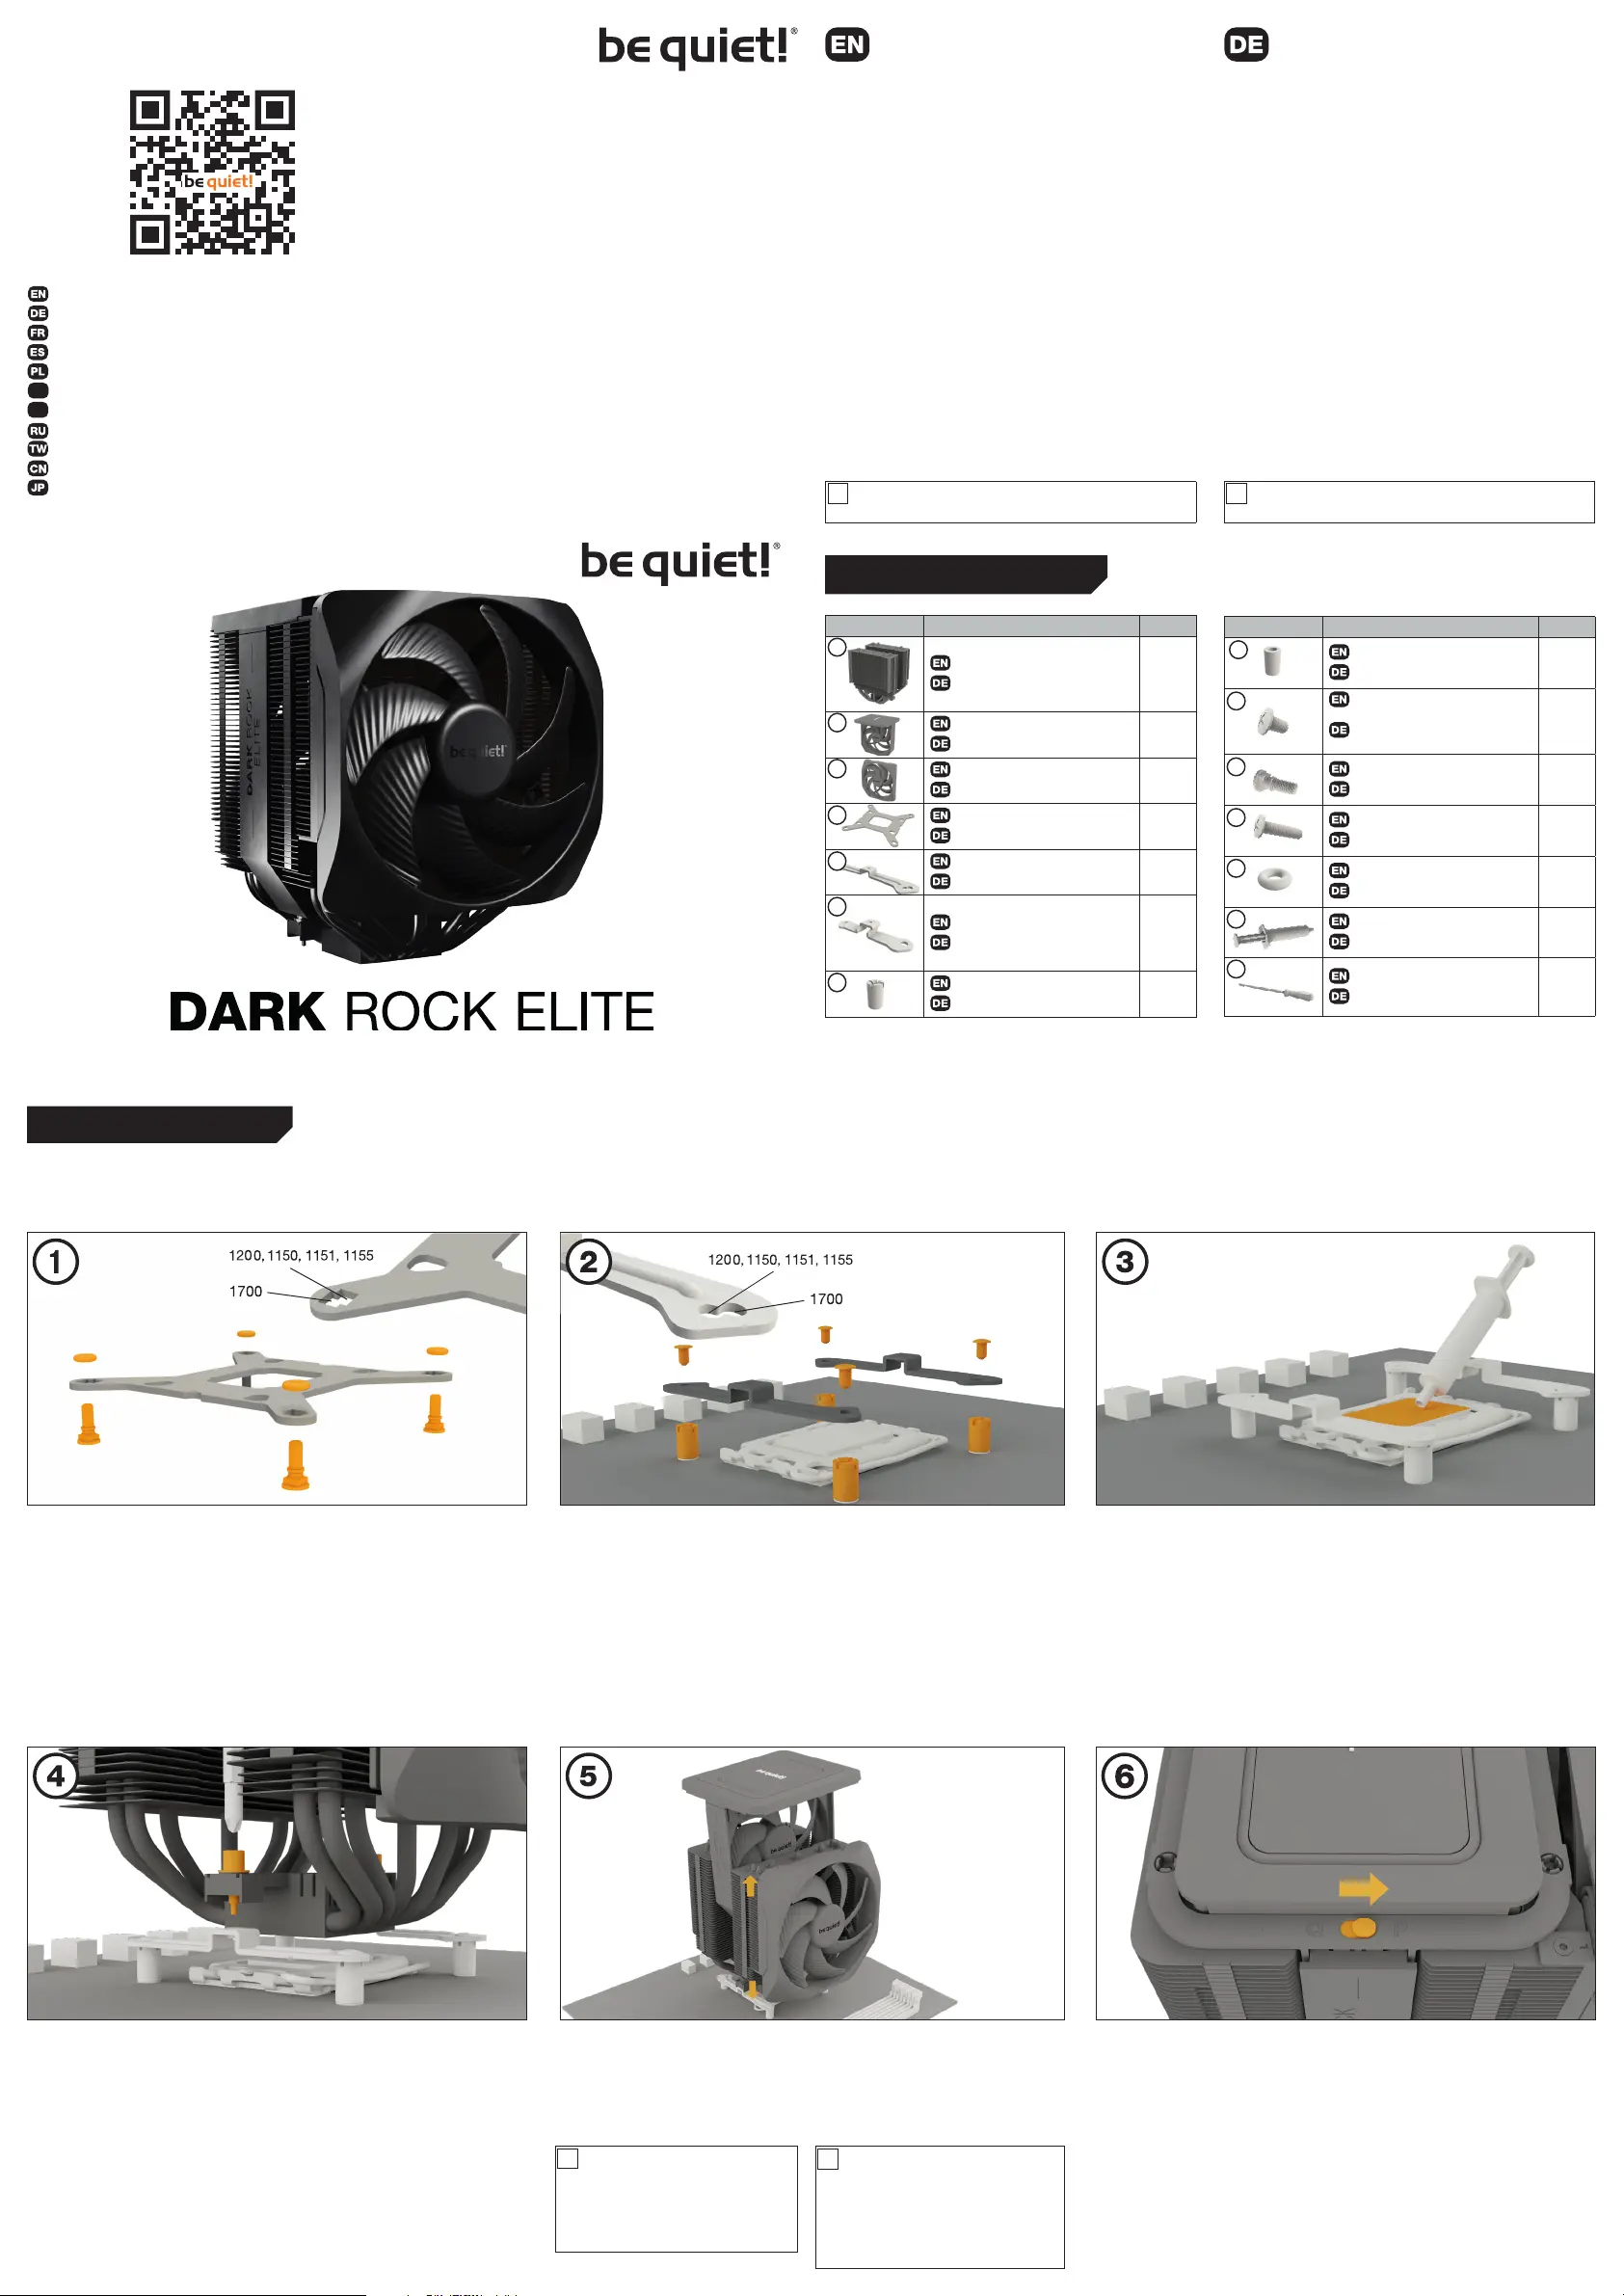
The following parts are needed for this:
1x Dark Rock Elite CPU cooler (1), 1x Silent Wings 135mm fan (2), 1x Silent Wings 135mm front fan (3), 1x Intel backplate (4),
2x Intel mounting brackets (5), 4x Intel spacer nut A (7), 4x mounting bracket fastening screws (9), 4x Intel backplate screws (10),
4x O-rings (12), 1x thermal paste (13), 1x cross-tip screwdriver (14)
Es werden folgende Bauteile benötigt:
1x Dark Rock Elite CPU-Kühler (1), 1x Silent Wings 135mm Lüfter (2), 1x Silent Wings 135mm Frontlüfter (3), 1x Intel Backplate (4),
2x Intel Montagebrücken (5), 4x Intel Gewindebolzen A (7), 4x Befestigungsschrauben für die Montagebrücke (9), 4x Intel Back-
plate-Schrauben (10), 4x O-Ringe (12), 1x Wärmeleitpaste (13), 1x Kreuzschraubendreher (14)
Mounting the backplate
Position the Intel backplate screws in the
notches situated on the rear side of the
Intel backplate. Pay attention doing so to
align with the holes drilled for each socket.
For fixing the backplate screws onto
the Intel backplate use the O-rings.
Once assembly of the Intel backplate
for the respective Intel socket has
been completed, position it under the
motherboard. In so doing make sure that
the Intel backplate screws are precisely
located within the motherboard holes.
Pull off the top cover to remove the
Silent Wings 135mm fan. Separate
both fans from each other by pulling
off the Y-cable. Push the Silent Wings
135mm front fan from the bottom up
out of the rail system to remove it.
!
Ziehe das Top Cover ab, um den Silent
Wings 135mm Lüfter zu entfernen. Trenne
anschließend beide Lüfter, indem du sie
von der Y-Weiche trennst. Drücke den
Silent Wings 135mm Frontlüfter von der
Unterseite nach oben aus dem Railsystem
raus, um ihn zu entfernen.
!
Intel: LGA 1700 / 1200 / 1150 / 1151 / 1155
Einleitung: Vielen Dank, dass du dich für ein be quiet!
Produkt entschieden hast. Diese Anleitung wird dir beim
Installationsprozess helfen. Kontaktiere bitte unseren
Kundenservice unter service@bequiet.com, sollten bei
der Installation Schwierigkeiten auftreten. be quiet! kann
keinerlei Haftung für durch Kompatibilitätsprobleme bedingte
Schäden übernehmen.
Garantie:
• 3 Jahre Herstellergarantie für Endkonsumenten (nur Erst-
erwerb vom autorisierten be quiet! Händler), ab Datum des
Kaufbelegs
• Eine Garantieabwicklung ist nur in Verbindung mit einer
beigefügten Kopie des Kaufbeleges eines autorisierten
be quiet! Händlers möglich
• Manipulationen und bauliche Veränderungen jeglicher
Art, sowie Beschädigungen durch äußere mechanische
Einwirkungen führen zum totalen Garantieverlust
• Es gelten unsere Allgemeinen Garantiebestimmungen,
die du unter www.bequiet.com im Internet abrufen kannst
Listan GmbH
Wilhelm-Bergner-Straße 11c
.
21509 Glinde
.
Germany
Für weitere Unterstützung erreichst du uns via E-Mail:
service@bequiet.com
Introduction: Thank you for deciding to purchase a be quiet!
product. The following instructions will guide you through the
installation process. If you do encounter installation problems,
please don't hesitate to contact our customer services by
mailing service@bequiet.com. Please note that be quiet!
cannot accept liability for damage caused by compatibility
problems.
Warranty:
• 3-year manufacturer guarantee for consumers (original
purchase from authorized be quiet! dealers only)
• Guarantee work can only be processed with a copy
included of the purchase receipt from an authorized be
quiet! dealer
• Manipulation and structural changes of any kind, including
any damage caused by external mechanical force, will lead
to a complete voiding of the guarantee
• Our General Warranty Conditions apply, which can be
viewed on bequiet.com
Listan GmbH
Wilhelm-Bergner-Straße 11c
.
21509 Glinde
.
Germany
For further information contact us via e-mail:
service@bequiet.com
V1/23
Für die Montage des Kühlers empfehlen wir die Installation
außerhalb des Gehäuses.
!
We recommend preparatory mounting of the cooler outside
the PC case for subsequent installation.
!
V1/23
www.bequiet.com/bk037
Part name Quantity
AMD spacer nuts
AMD Abstandsbolzen
4
Mounting bracket fastening
screws
Befestigungsschrauben für
die Montagebrücke
4
Intel backplate screws
Intel Backplate-Schrauben
4
AMD backplate screws
AMD Backplate-Schrauben
4
O-rings
O-Ringe
4
Thermal paste
Wärmeleitpaste
1
Cross-tip screwdriver
Kreuzschraubendreher
1
Part name Quantity
Dark Rock Elite CPU cooler
Dark Rock Elite CPU-Kühler
1
Silent Wings 135mm fan
Silent Wings 135mm Lüfter
1
Silent Wings 135mm front fan
Silent Wings 135mm Frontlüfter
1
Intel backplate
Intel Backplate
1
Intel mounting brackets
Intel Montagebrücken
2
Short AMD mounting brackets
Kurze AMD Montagebrücken
2
Intel spacer nut A
Intel Gewindebolzen A
4
SCOPE OF DELIVERY / LIEFERUMFANG
8
10
11
12
13
2
3
4
5
6
7
9
1
14
Produkspesifikasjoner
| Merke: | Be Quiet! |
| Kategori: | luftkondisjonering |
| Modell: | Dark Rock Elite |
| Vekt: | 1340 g |
| Bredde: | 136 mm |
| Dybde: | 145 mm |
| Høyde: | 168 mm |
| Støynivå (lav hastighet): | 11 dB |
| Pakkevekt: | 1780 g |
| Antall per pakke: | 1 stykker |
| Egnet plassering: | Prosessor |
| Viftespenning: | 12 V |
| Antall varmerør: | 7 |
| Viftehastighet (maks.): | 2000 RPM |
| Radiatorhøyde: | 168 mm |
| Viftelagerteknologi: | Fluid Dynamic Bearing (FDB) |
| Produktfarge: | Sort |
| Pakkedybde: | 202 mm |
| Pakkehøyde: | 220 mm |
| Pakkebredde: | 180 mm |
| Bærekraftsertifikater: | CE, RoHS, TUV, Triman, UKCA, UL ECOLOGO, WEEE |
| Modell/Type: | Luftkjøler |
| Viftetilkobling: | 4-pin |
| Viftediameter: | 135 mm |
| Støynivå (høy hastighet): | 25.8 dB |
| Antall vifter: | 2 vifter |
| Viftestrøm: | 0.4 A |
| Støttede prosessorkontakter: | LGA 1150 (Socket H3), LGA 1151 (Socket H4), LGA 1155 (Socket H2), LGA 1200 (Socket H5), LGA 1700, Socket AM4, Socket AM5 |
| Viftens forventede levetid (MTTF): | 300000 timer |
| Viftedimensjoner (BxDxH): | 135 x 135 x 25 mm |
| Radiatordybde: | 120 mm |
| Radiatorbredde: | 136 mm |
| Viftetykkelse: | 25 mm |
| Produkter per (indre) fraktkasse: | 12 stykker |
| Bærekraftsamsvar: | Ja |
| (Indre) fraktkasse, bredde: | 380 mm |
| (Indre) fraktkasse, lengde: | 625 mm |
| (Indre) fraktkasse, høyde: | 467 mm |
| (Indre) fraktkasse, bruttovekt: | 22800 g |
| Thermal Design Power (TDP): | 280 W |
| Vifte diameter 2: | 135 mm |
| Vifte nr. 2, rotasjonshastighet (min.): | 1500 RPM |
| Vifte nr. 2, rotasjonshastighet (maks.): | 2000 RPM |
| Pulsbreddemodulerings- støtte (PWM): | Ja |
| Viftehastighet (min.): | 1500 RPM |
| Fundament-plate materiale: | Kopper |
| Varmerør, diameter: | 6 mm |
| Finnemateriale: | Aluminium |
| Vifte nr. 2, dimensjoner (B x D x H): | 135 x 135 x 25 mm |
Trenger du hjelp?
Hvis du trenger hjelp med Be Quiet! Dark Rock Elite still et spørsmål nedenfor, og andre brukere vil svare deg
luftkondisjonering Be Quiet! Manualer
9 September 2025
9 September 2025

8 September 2025

8 September 2025
8 September 2025

8 September 2025
8 September 2025
7 September 2025
luftkondisjonering Manualer
- Manta
- Hisense
- Dantherm
- Frigidaire
- MSW
- El Corte Inglés
- Primo
- Fakir
- Carson
- Haier
- Dimplex
- Dometic
- Jocca
- Livoo
- Sencor
Nyeste luftkondisjonering Manualer

20 Oktober 2025
19 Oktober 2025

18 Oktober 2025
17 Oktober 2025

13 Oktober 2025
13 Oktober 2025

13 Oktober 2025

13 Oktober 2025

13 Oktober 2025
13 Oktober 2025