NUVO Polaris 60/607 Bruksanvisning
Les nedenfor 📖 manual på norsk for NUVO Polaris 60/607 (2 sider) i kategorien Lampe. Denne guiden var nyttig for 12 personer og ble vurdert med 4.5 stjerner i gjennomsnitt av 2 brukere
Side 1/2

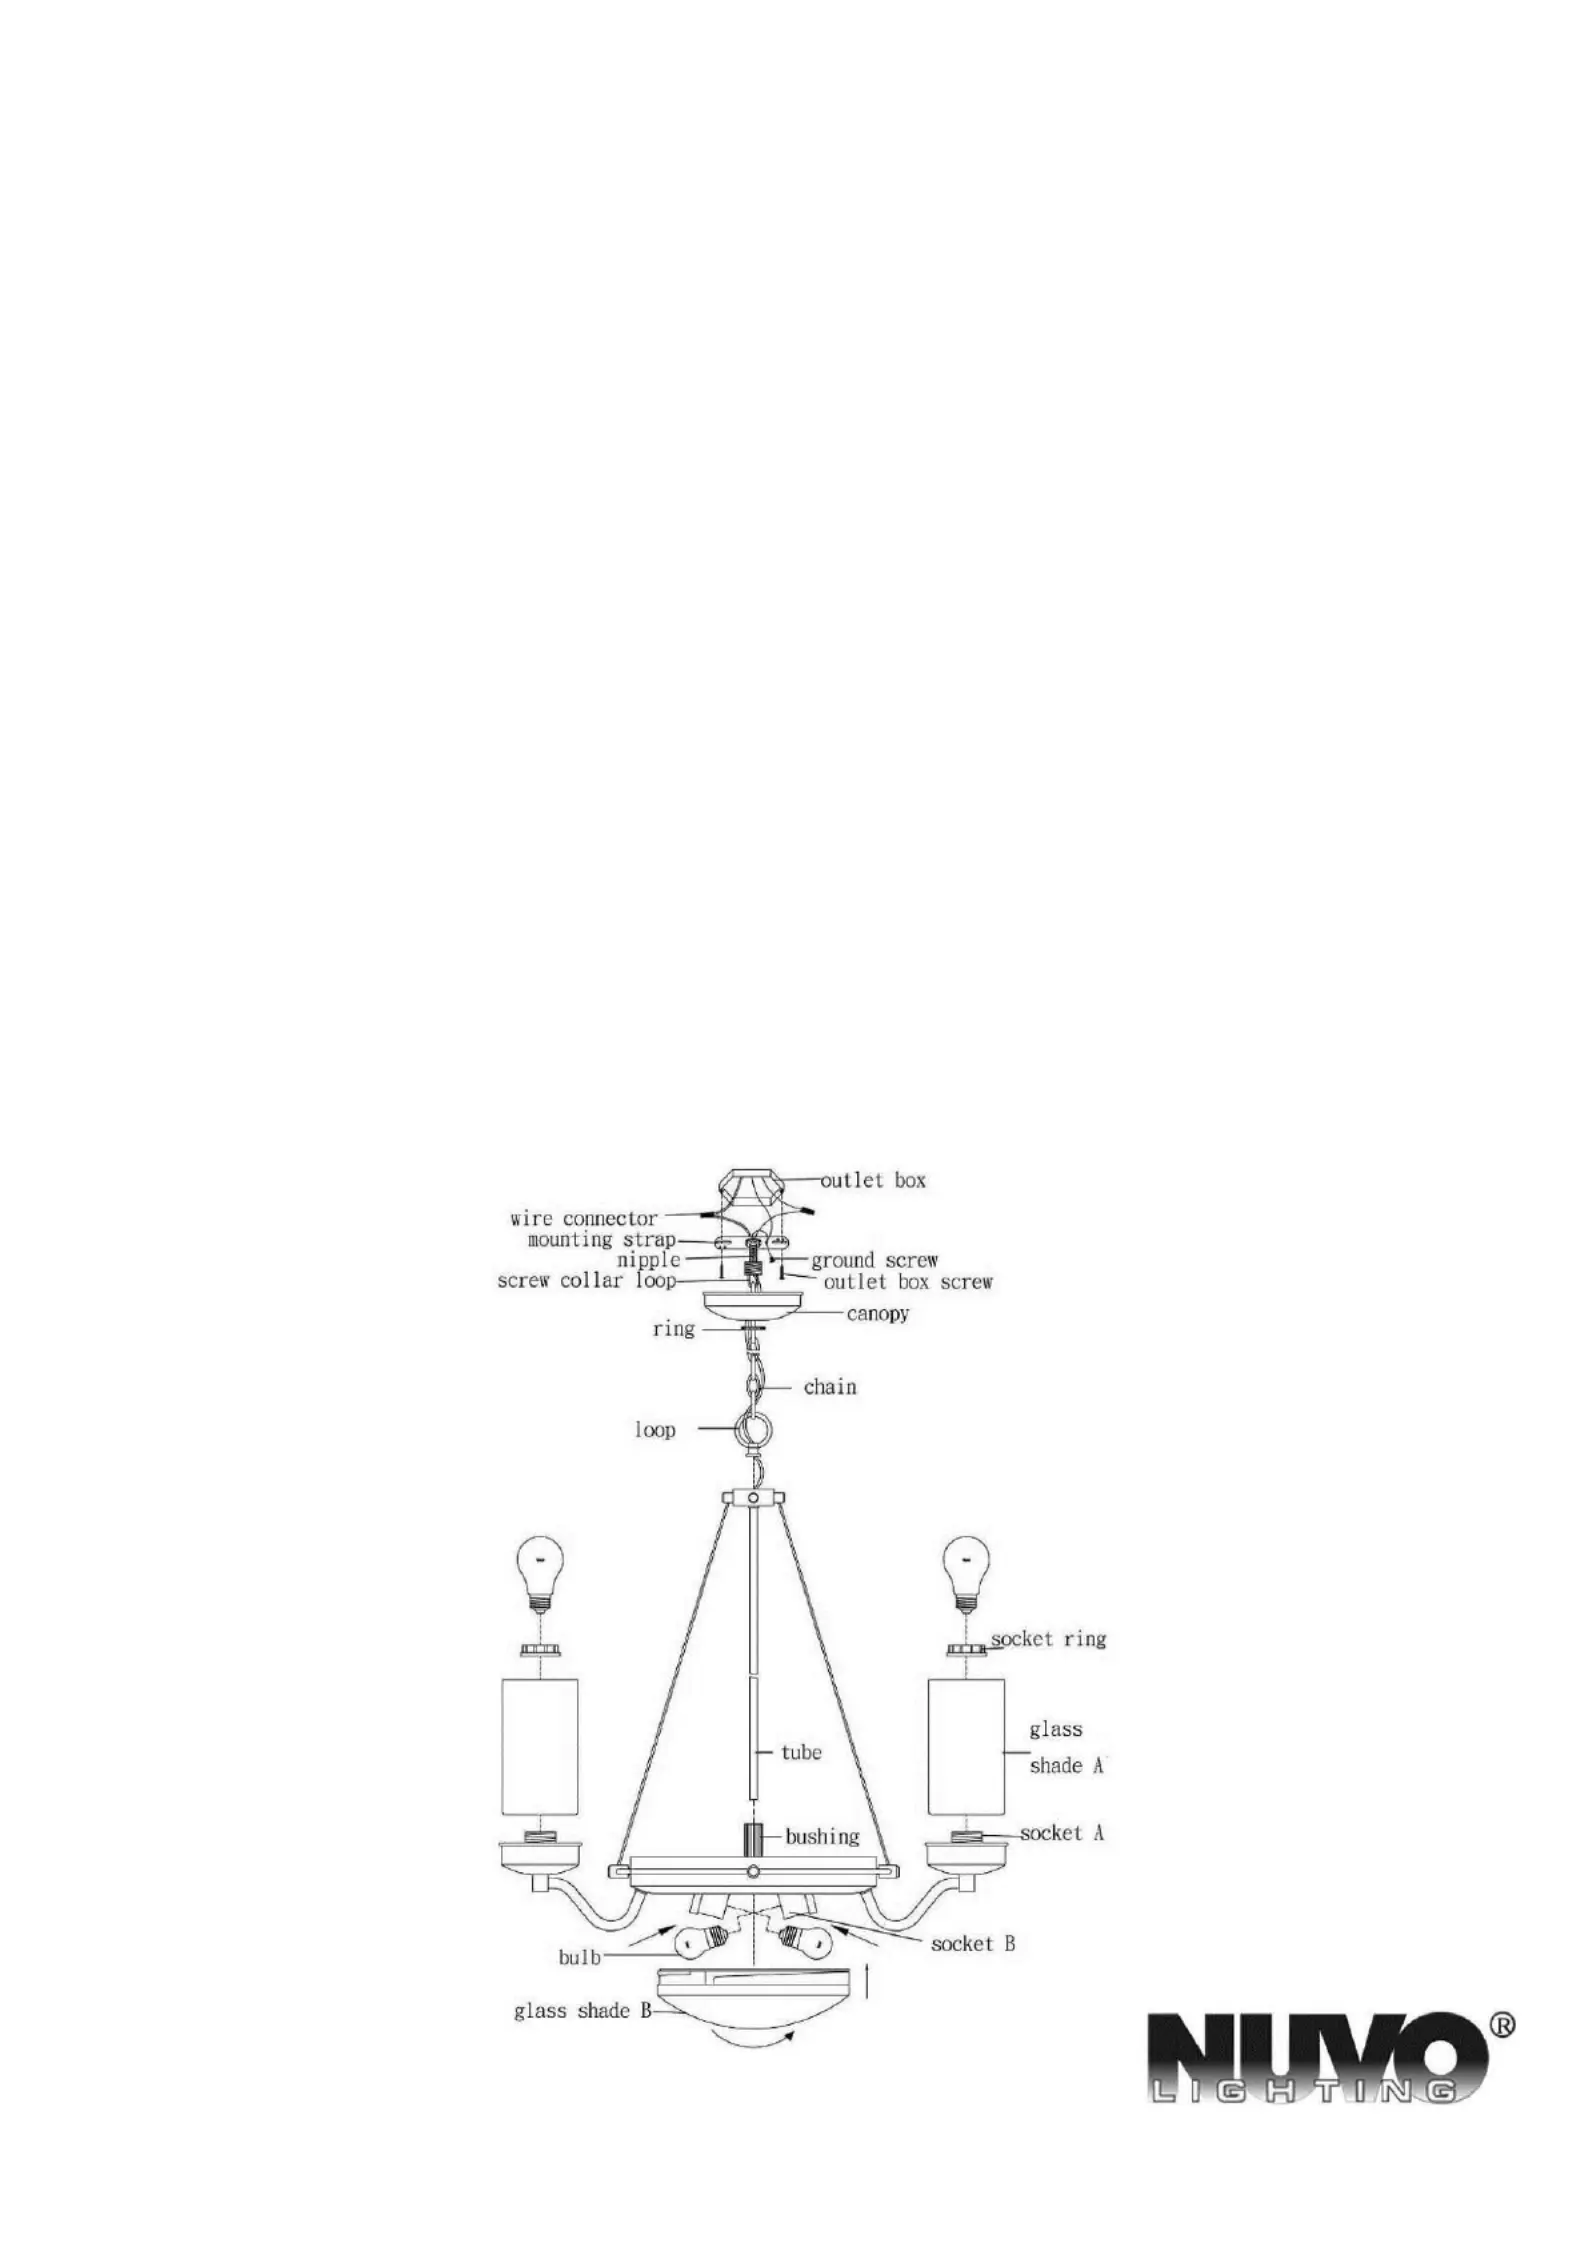
ASSEMBLY INSTRUCTION
SKU#60/607
NOTE: Please consult a qualied electrician if you are not certain of the installation.
CAUTION: Before starting the installation, disconnect the power by turning off the circuit breaker or by
removing the fuse at the fuse box.
1. Attach the Mounting Strap to Outlet Box using the Outlet Box Screws provided.
2. Screw Loop into Nipple of the xture ( can’t see in the drawing).
3. Screw o the Ring from the Screw Collar Loop on the Mounting Strap. Using a pair of pliers, twist open th e
link at one end of the Chain. Hook it to the Loop and close the link.
4. Weave xture wires and ground wire up through Chain, through Ring, through Canopy, through the Nipple
on the Mounting Strap and put back into Outlet Box.
5. Connect wires white to white and black to black. Cover connections using Wire Connectors provided. Tie
ground wires from Outlet Box and from xture to the Ground Screw on the Mounting Strap.
6. Using a pair of pliers, twist open the link at the other end of the Chain. Hook the whole xture to the Screw
Collar Loop and close the link.
7. Place the Canopy over the Outlet Box. Tighten the Ring onto the Screw Collar Loop until the Canopy is held
rmly against the ceiling.
8. Screw the Tube into the Bushing. Unscrew the Socket Ring from Socket A. Insert the Glass Shade A over the
Socket A and retighten the Socket Ring until the Glass Shade A is held rmly to the xture.
9. Install the bulbs. (Not included)
10. Attach the Glass Shade B to the xture as drawn.
11. Turn on the power.
A Satco Product

INSTRUCCIÓN DE ASAMBLEA
SKU#60/607
NOTE: Por favor, consulte con un electrcista cacado en caso de que no est seguro de la instalación. é
CAUCI N:Ó Antes de comenzar la instalación, cortar la electricidad mediante apagar el cortacircuitos o quitar
el fusible desde la caja de fusible.
1. Acoplar la Correa de Montaje a la Caja de Salida usando los Tornillos de la Caja de Salida que se proporcionan.
2. Atornillar el Lazo en la Entrerrosca de la instalación (no se puede ver en el dibujo ).
3. Desatornillar el Aro del Lazo del Cuello del Tornillo que hay en la Correa de Montaje. Usando un par de alicates, abrir el
enlace que hay en el extremo de la Cadena. Engancharlo al lazo y cerrar el enlace.
4. Entrepasar los cables de la instalación y el cable de tierra a través de la Cadena, a través del Aro a través del Dosel a través , ,
de la Correa de Montaje y ponerlos de vuelta en la Caja de Salida.
5. Conectar el cable blanco con blanco y negro con negro, cubrir las conexiones usando lo conectores de cables que se
proporcionan. Atar los cables de tierra desde la Cja de Salida y desde la instalación Tornillo de Tierra que hay en la Barra al
Cruzada.
6. Usando un par de alicates, abrir el enlace que hay en el otro extremo de la Cadena. Enganchar toda la instalación al Lazo del
Collar del Tornillo y cerrar el enlace.
7. Acoplar la Dosel a la Caja de Salida usando los Aro que se proporcionan.
8. Atornillar el Tubo en el Buje como está dibujado. Desatornillar el Aro del Zócalo y Cubierta del Zócalo. Insertar la Pantalla de
Cristal A sobre el Zócalo y volver a apretar el Cubierta y Aro del Zócalo hasta que la Pantalla de Cristal A se sujete
fírmemente en la instalación.
9. Instalar las bombillas. (No incluídas).
10. Colocar la Pantalla de Cristal en la instalación como está dibujado. B
11. n. Encienda la alimentació
INSTRUCTIONS DE MONTAGE
SKU#60/607
REMARQUE: vous avez des incertitudes quant l installation, demandez de l aide Si à' ' à é un lectricien qualifi
é.
ATTENTION: Avant de commencer l installation, d connectez l alimentation lectrique avec le disjoncteur ou 'é'é
en retirant le fusible du disjoncteur.
1. Fixez la Bande de Montage sur le Coret de prise de courant à l'aide des Vis pour coret de prise de courant fournies.
2. Atornillar el Lazo en la Entrerrosca de la instalación (no se puede ver en el dibujo ).
3. Dévissez l'anneau de la Boucle de collier à vis sur la Bande montage. A l' e d'un paire de pinces, ouvrez le maillon qui se aid
trouve à l'extrémité de la Chaîne. Accrochez-y la boucle et refermez le maillon.
4. Faites passer les ls de la lampe et le l de terre à travers la Chaîne, l'Anneau, le Couvercle et la Bande de montage, et
remettez-les dans le Coret de prise électrique.
5. Connectez les ls blanc sur blanc et noir sur noir, couvrez les connexions à l'aide des connecteurs de ls fournis. Attachez les
ls de terre du Coret de prise de courant la lampe sur la Vis de terre sur la Barre transversale.
6. A l'aide d'un paire de pinces, ouvrez le maillon qui se trouve à l'autre extrémité de la Chaîne. Accrochez l'ensemble du
luminaire à la Boucle du collier de vis et refermez le maillon.
7. Fixez la Couverce sur le Coret de prise de courant à l'aide des anneau fournies.
8. Vissez le tube dans l'Embout A ainsi qu'illustré. Dévissez l'Anneau à douille et Capot de la Douille. Insérez l'Abat-jour en verre
A sur la Douille et resserrez Capot, l'Anneau à douille jusqu ce que l'Abat-jour en verre A soit fermement place sur le 'à
luminaire.
9. Installez les ampoules. (Non fournies).
10. Placez l'Abat-jour en verre sur la lampe ainsi qu'illustré. B
11. Allumez l lctricité. 'é
Produkspesifikasjoner
Merke: | NUVO |
Kategori: | Lampe |
Modell: | Polaris 60/607 |
Trenger du hjelp?
Hvis du trenger hjelp med NUVO Polaris 60/607 still et spørsmål nedenfor, og andre brukere vil svare deg
Lampe NUVO Manualer

5 April 2025

5 April 2025

5 April 2025

5 April 2025

5 April 2025

2 April 2025

2 April 2025

2 April 2025

15 Oktober 2024

15 Oktober 2024
Lampe Manualer
- Lampe Ledlenser
- Lampe AFX
- Lampe Hama
- Lampe Neewer
- Lampe Hazet
- Lampe Philips
- Lampe Topeak
- Lampe Schwaiger
- Lampe Godox
- Lampe IKEA
- Lampe Samsung
- Lampe Sony
- Lampe Xiaomi
- Lampe Trust
- Lampe Integral LED
- Lampe Lutec
- Lampe Golden Lighting
- Lampe ET2
- Lampe Quoizel
- Lampe Crystorama
- Lampe Brennenstuhl
- Lampe Aputure
- Lampe NEO Tools
- Lampe Westinghouse
- Lampe Schneider
- Lampe Dainolite
- Lampe EMOS
- Lampe Nanlite
- Lampe Cameo
- Lampe BeamZ
- Lampe Livoo
- Lampe Steinel
- Lampe Flex
- Lampe Maxim
- Lampe Nordlux
- Lampe Brandson
- Lampe Maginon
- Lampe Sonneman
- Lampe Elgato
- Lampe Ansmann
- Lampe Makita
- Lampe Intermatic
- Lampe V-Tac
- Lampe JBL
- Lampe Nedis
- Lampe Elation
- Lampe Fredrick Ramond
- Lampe Chauvet
- Lampe Karma
- Lampe Ridem
- Lampe Dedra
- Lampe Black Diamond
- Lampe Powerplus
- Lampe Ozito
- Lampe BenQ
- Lampe Hansa
- Lampe Livarno Lux
- Lampe Eurolite
- Lampe Casalux
- Lampe Beghelli
- Lampe American DJ
- Lampe Profoto
- Lampe Claypaky
- Lampe Petzl
- Lampe Gravity
- Lampe Ikan
- Lampe AVM
- Lampe Impact
- Lampe Olight
- Lampe Vimar
- Lampe Genaray
- Lampe Altman
- Lampe Setti+
- Lampe Kanlux
- Lampe Xline
- Lampe ARRI
- Lampe Osram
- Lampe Zhiyun
- Lampe Savio
- Lampe Bresser
- Lampe Honeywell
- Lampe Theben
- Lampe ColorKey
- Lampe Perfect Christmans
- Lampe XCell
- Lampe Physa
- Lampe Jinbei
- Lampe Apa
- Lampe Bolt
- Lampe Heitronic
- Lampe HQ Power
- Lampe Currey & Company
- Lampe Deko-Light
- Lampe Cateye
- Lampe Angler
- Lampe Raya
- Lampe Livex Lighting
- Lampe Hinkley Lighting
- Lampe Norwell
- Lampe Ranex
- Lampe COLBOR
- Lampe Lucide
- Lampe Nicols
- Lampe August
- Lampe Dorr
- Lampe Pixel
- Lampe Silva
- Lampe Brilliant
- Lampe Allegri
- Lampe Exagerate
- Lampe Waldmann
- Lampe Kind LED
- Lampe Zafferano
- Lampe Zadro
- Lampe X4-Tech
- Lampe Craftmade
- Lampe Unilux
- Lampe Louis Poulsen
- Lampe Trio Lighting
- Lampe Rotolight
- Lampe SLV
- Lampe Yeelight
- Lampe Falcon Eyes
- Lampe Schonbek
- Lampe Lowel
- Lampe Hoffman
Nyeste Lampe Manualer

8 April 2025

8 April 2025

6 April 2025

6 April 2025

5 April 2025

5 April 2025

5 April 2025

5 April 2025

5 April 2025

4 April 2025