Pyle PSW445T Bruksanvisning
Les nedenfor 📖 manual på norsk for Pyle PSW445T (4 sider) i kategorien veggfeste. Denne guiden var nyttig for 8 personer og ble vurdert med 4.7 stjerner i gjennomsnitt av 4.5 brukere
Side 1/4

Warning: Some TV require two people to lift, as we are not responsible for any
personal injury or product damage due to mishandling.
W
W
W
Warning:
arning:
arning:
arning:
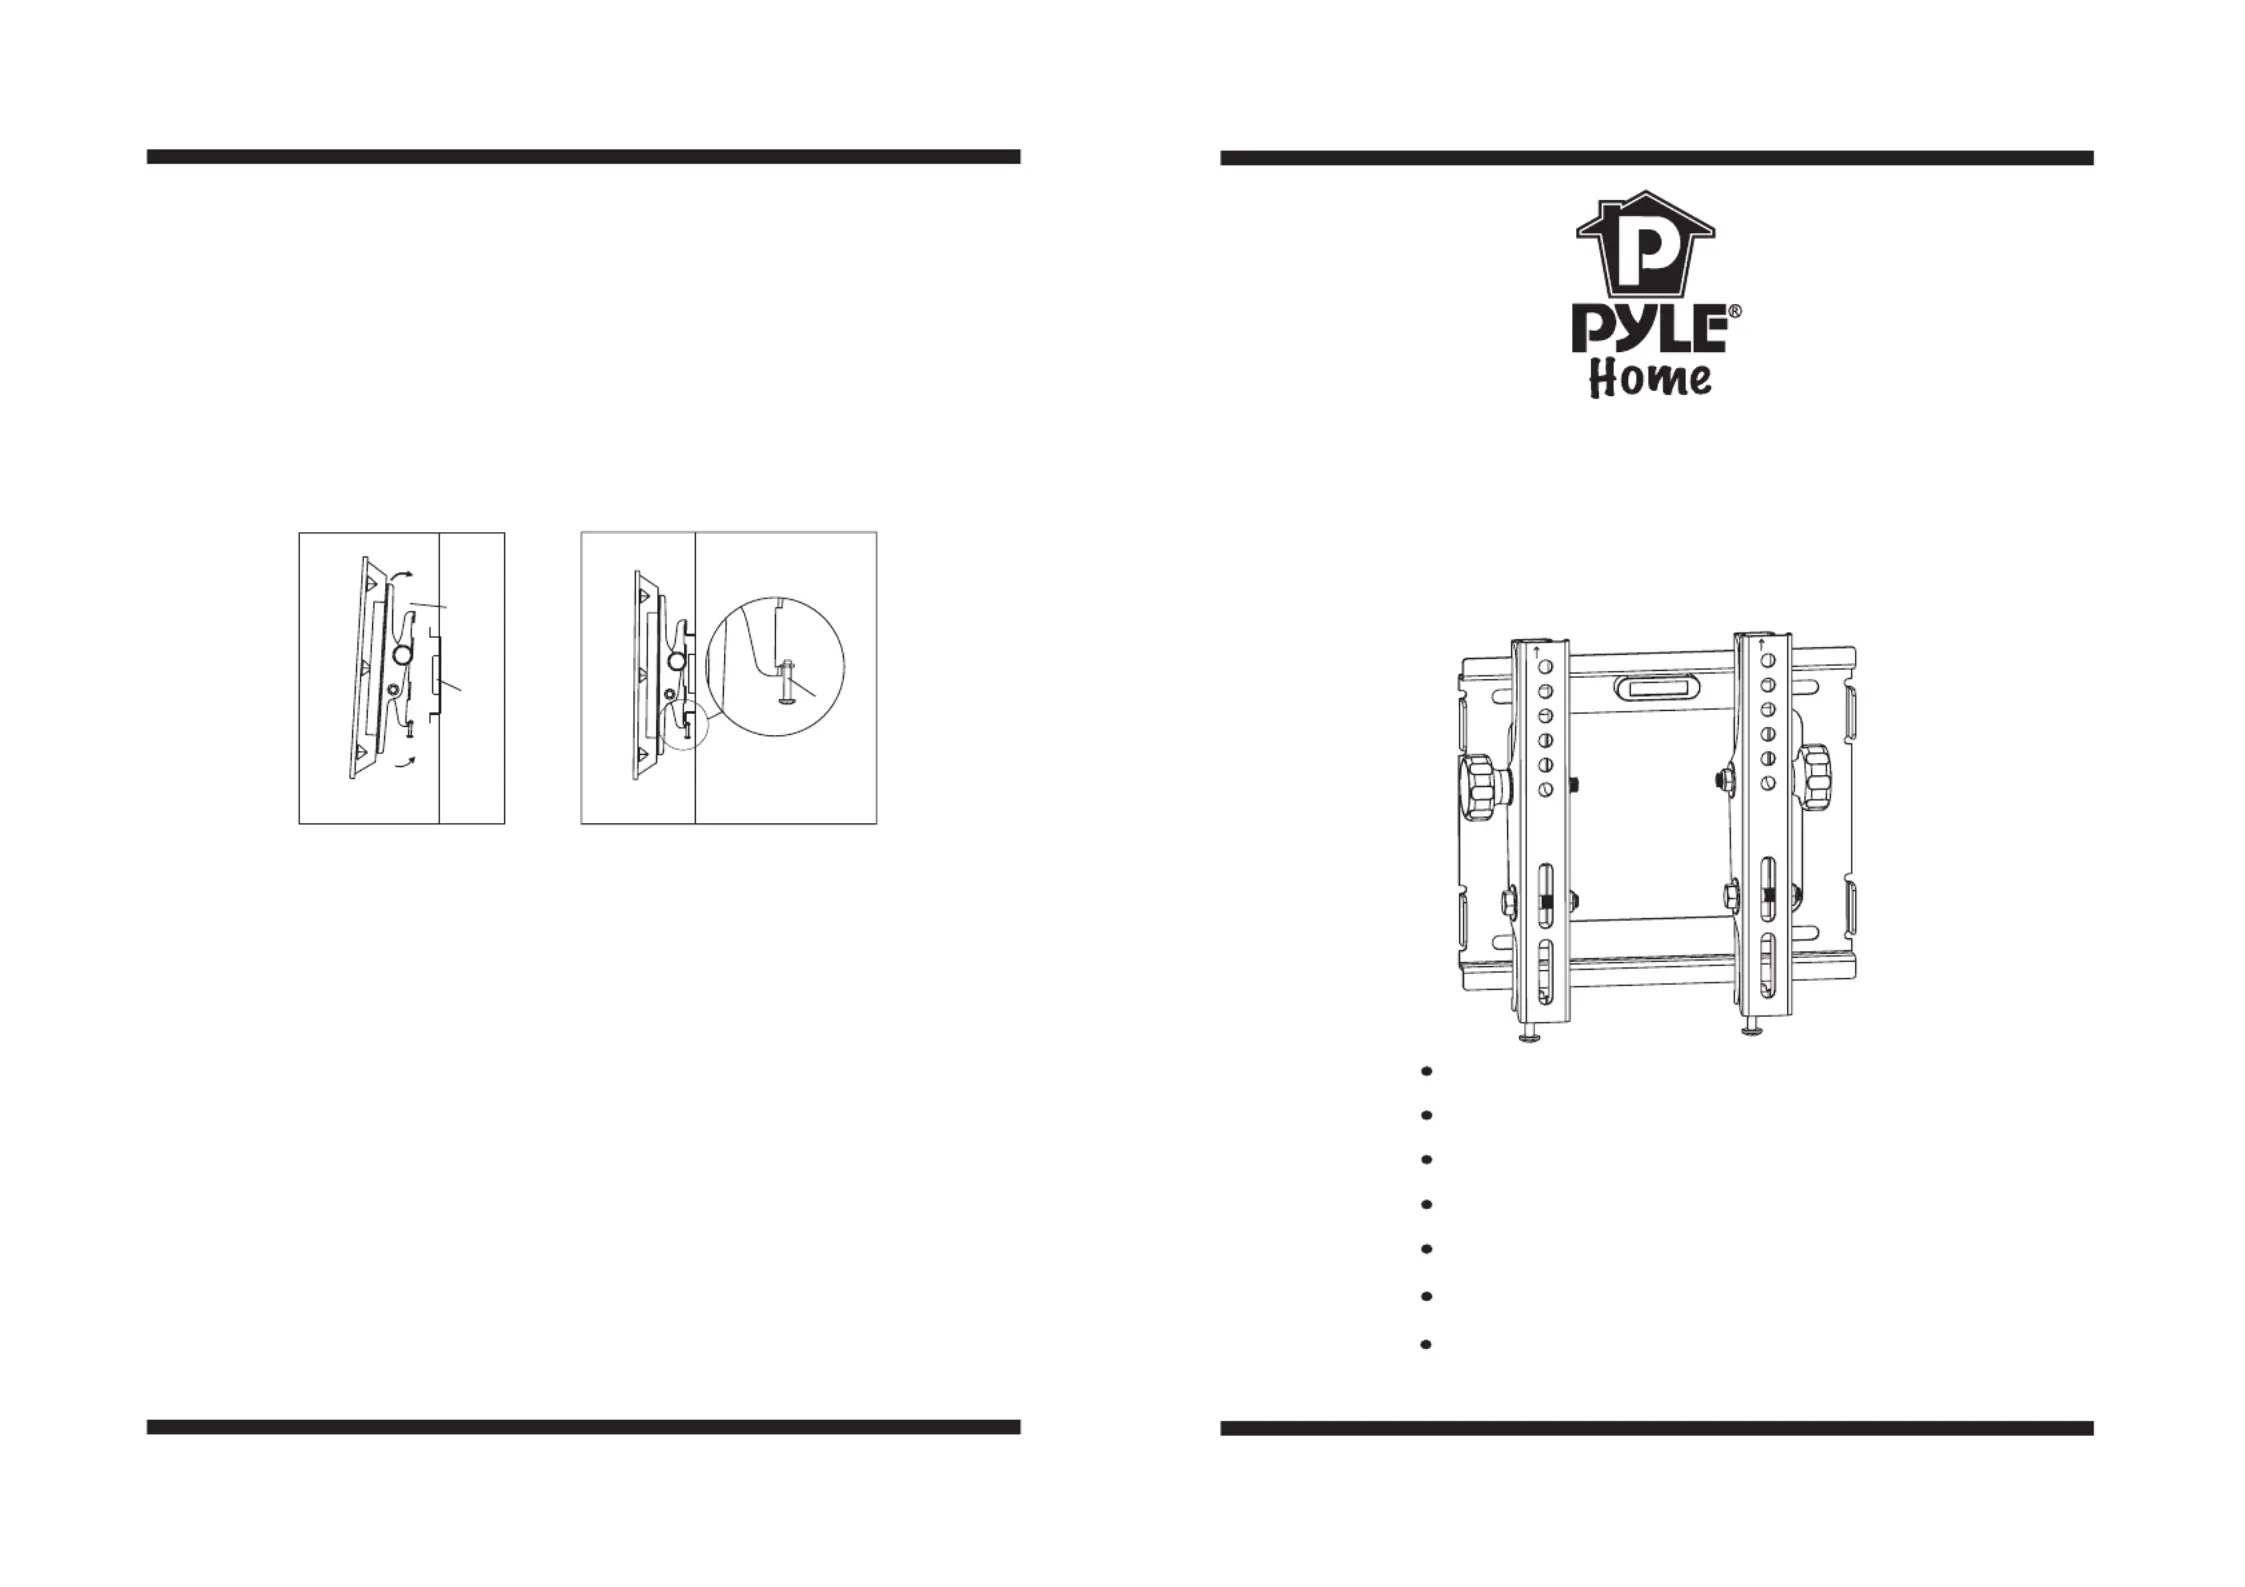
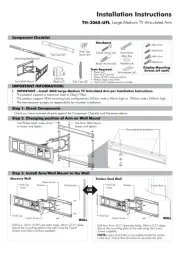
Step 3: Hanging display
Firstly lift the bracket mounted display over the wall mount. And then hook the
brackets over the top of the wall mount. Rotate the display let the bottom of the
brackets hook over the bottom of wall mount, as shown in Fig.3a. Then put safe
bolts into the bottom of the brackets and lock it, as shown in Fig.3b.
Step
Step
Step
Step 3:
3:
3:
3: Hanging
Hanging
Hanging
Hanging display
display
display
display
Thank you for choosing our products
Thank
Thank
Thank
Thank you
you
you
you for
for
for
for choosing
choosing
choosing
choosing our
our
our
our products
products
products
products
-8-
IMPORTANT: If don’t understand about right install ways, please
consult to normal installing specialist.
IMPORT
IMPORT
IMPORT
IMPORTANT
ANT
ANT
ANT:
:
:
:
Item No.:PSW445T
Item
Item
Item
Item No.:PSW445T
No.:PSW445T
No.:PSW445T
No.:PSW445T
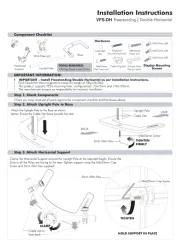
Multifunctional double deck wall mount
Tilt Flat Panel TV Bracket
Easy installing: Just hang up the display
Safety: locking by spinning bolt on the bottom
Max load capacity:35kg/77lbs
TV size range: 10 ~32
Adjustable angle: 5 15
" "
- ~
Inside has balance adjust system
Bulit in leveler system
INSTALLATION GUIDE
4
Fig 3a
2,3
1
Fig 3b
UP
UP
UP
UP
UP UP
UP
UP
UP
UP
www pyleaudio com. .
MADE IN CHINA
Pyle Audio
1600 63rd st , Brooklyn, NY, 11204
(718)236-8000

-2-
-7-
Hardware List: Actual parts appearance and the quantity may different
with illustrated.
Hardwar
Hardwar
Hardwar
Hardware
e
e
eList:
List:
List:
List:
4
4
H
I
J
K
4
4
Square washer
Long bolt
Wall anchor
Long bolt washer
Spacer
ID Description
1
2
A
3
B
C
1
1
4
1
4
4
Wall mount
Left bracket
Right bracket
M4 mm×12 bolt
M4 mm×16 bolt
M5× mm16 bolt
M6×16mm bolt
M5×36mm bolt
M6×36mm bolt
Qty
D
4
4
4
4
E
F
G
4 2
Safe bolt
A-F
J
G
IH
K
ID
Description
Qty
Fig 2b
Fig 2c
1
2
3
4
Using balance-adjusting system on the plate, make sure whether wall plate is installed
balance. If not, then slide the wall plate let pointer level in the center position.
H
J
1
Balance-adjusting
After determining the height of stand, follow the installation instructions in below
to install wall mount to different kinds of wall -wooden, concrete.
Using a a wl or nail to m ak e where t he nails are located , as shown as fig.2b. Distan ce
between two nails for fixing wall mount must not less than 16”. Pre-drill these holes
with a 5mm drill bit to at least 40mm in deep hole. Please make sure these holes are
level and located at center. Use wall mount as a template to mark the location of other
three holes and drill the same holes. Fix the wall mount to the wall with 4 long bolts(H)
and washers(J).
Wooden wall:
W
W
W
Wooden
ooden
ooden
ooden wall:
wall:
wall:
wall:
Concrete wall:
Using the wall mount as template to mark 4 holes location on the wall. Please make
sure these holes are level and at least 6” between any two lines. Pre-drill these holes
with a 10mm drill bit to at least 50mm deep hole. Insert wall anchors(I) into each of
these holes. Attach the wall mount to the wall using 4 long bolts(H) and washers(J).
Concrete
Concrete
Concrete
Concrete wall:
wall:
wall:
wall:
UP
UP
UP
UP
UP UP
UP
UP
UP
UP

-6-
-3-
b
15 degree
viewing angle
eyelevel
a
Fig 2a
Step 2: mount to wall
First, determine the height of stand
The best height of stand is parallel to eyelevel of a person who sitting on a couch.
Normally, the horizontal distance of eyelevel is about 4’ from ground level.
The following two conditions are for determining the perfect height of stand:
1) the distance between wall and couch(Fig 2a).
2) the distance of eyelevel from ground level plus the distance measured from
eyelevel of a person sitting on couch with viewing angle of 15 (Fig 2a).
For example:
1) the distance of ‘a’ is 5’-7’, the distance of ‘b’ is about 1’
2) the distance of ‘a’ is 8’-13’, the distance of ‘b’ is about 3’
3) the distance of ‘a’ is 14’-17’, the distance of ‘b’ is about 4’
The perfect height of stand centre will be anywhere within b, where you feel
comfortable for viewing.
°
Attach
Step
Step
Step
Step mount
mount
mount
mount
2:
2:
2:
2: Attach
Attach
Attach
Attach to
to
to
to wall
wall
wall
wall
W
W
W
WWARNING
ARNING
ARNING
ARNINGARNING
We are not responsible for any personal injury or product damage due to mishandling,
incorrect mounting, incorrect assembly or incorrect use of this product.
The supplied wall mounting hardware is not for use on steel stud walls or cold
cinder block walls. If you are uncertain about the nature of your wall, please consult a
qualified contractor. If the hardware you required is not included please contact your
local hardware store.
Note:
Note:
Note:
Note:Note:
Caution : This Product LCD /Plasma Wall Mount Bracket is intended for use only
with the maximum weights indicated .See apparatus instructions .Use with products
heavier than the maximum weights indicated may result in instability causing possible
injury .
Caution
Caution
Caution
Caution :
:
:
:
UP
UP
UP
UP
UP
Fig.1
UP
UP
UP
UP
UP
Step 1: Attach bracket to TV
Check your TV manual to confirm the diameter of bolt to be used or choose an
appropriate bolt according to size, height and position of the holes on your TV. See
pages 4-5 of these instructions for examples.
For correct installing, make sure that hook of every bracket must facing down. Use
selected bolts, spacers and washers for installing bracket at the b ack o f display.
Adjust two brackets to equal heights and level. Once aligned, tightly secure the
bolts. As shown in Fig.1.
Don't force the bolt into the hole, which will cause a damage of
equipments and injure of person. Don't use electric drill to fasten any bolts.
Note the UP side on the top: " " .
IMPORTANT:
Step
Step
Step
Step 1:
1:
1:
1: Attach
Attach
Attach
Attach bracket
bracket
bracket
bracket TV
TV
TV
TV
to
to
to
to
IMPORT
IMPORT
IMPORT
IMPORTANT
ANT
ANT
ANT
Note
Note
Note
Note:
:
:
:
Fig.1
UP
UP
UP
UP
UP
Fig.1
UP
UP
UP
UP
UP
Step 1: Attach bracket to TV
Check your TV manual to confirm the diameter of bolt to be used or choose an
appropriate bolt according to size, height and position of the holes on your TV. See
pages 4-5 of these instructions for examples.
For correct installing, make sure that hook of every bracket must facing down. Use
selected bolts, spacers and washers for installing bracket at the b ack o f display.
Adjust two brackets to equal heights and level. Once aligned, tightly secure the
bolts. As shown in Fig.1.
Don't force the bolt into the hole, which will cause a damage of
equipments and injure of person. Don't use electric drill to fasten any bolts.
Note the UP side on the top: " " .
IMPORTANT:
Step
Step
Step
Step 1:
1:
1:
1: Attach
Attach
Attach
Attach bracket
bracket
bracket
bracket TV
TV
TV
TV
to
to
to
to
IMPORT
IMPORT
IMPORT
IMPORTANT
ANT
ANT
ANT
Note
Note
Note
Note:
:
:
:
Fig.1
UP
UP
UP
UP
UP
Produkspesifikasjoner
Merke: | Pyle |
Kategori: | veggfeste |
Modell: | PSW445T |
Vekt: | 2100 g |
Bredde: | 238.76 mm |
Dybde: | 68.58 mm |
Høyde: | 231.14 mm |
Bruksanvisning: | Ja |
Antall skjermer som støttes: | 1 |
Maksimal skjermstørrelse: | 37 " |
Minimum skjermstørrelse: | 17 " |
Egnet for dataskjerm: | Ja |
Produktfarge: | Sort |
Vippevinkelområde: | -5 - 15 ° |
Pakkedybde: | 231.14 mm |
Pakkehøyde: | 269.24 mm |
Monteringssett: | Ja |
Pakkebredde: | 464.82 mm |
Skruer inkludert: | Ja |
Panelmonterbart grensesnitt: | 200 x 200 mm |
Montasjetype: | Vegg |
Maksimalvekt (kapasitet): | 35 kg |
Monteringsgrensesnitt, kompatibilitet (min): | - mm |
Monteringsgrensesnitt, kompatibilitet (maks): | 200 x 200 mm |
Distanse til vegg (min.): | 68.58 mm |
Innebygget spirit-nivå: | Ja |
Trenger du hjelp?
Hvis du trenger hjelp med Pyle PSW445T still et spørsmål nedenfor, og andre brukere vil svare deg
veggfeste Pyle Manualer
18 August 2025
veggfeste Manualer
- Black Box
- AV:link
- Tripp Lite
- Pelco
- One For All
- Atdec
- Gembird
- KIMEX
- Biltema
- Electro-Voice
- Grunkel
- Hama
- InLine
- Duronic
- DataVideo
Nyeste veggfeste Manualer
8 Oktober 2025
8 Oktober 2025
8 Oktober 2025
8 Oktober 2025
6 Oktober 2025
6 Oktober 2025
6 Oktober 2025
6 Oktober 2025
4 Oktober 2025
2 Oktober 2025