Atdec TH-3060-UFL Bruksanvisning
Les nedenfor 📖 manual på norsk for Atdec TH-3060-UFL (3 sider) i kategorien veggfeste. Denne guiden var nyttig for 19 personer og ble vurdert med 4.9 stjerner i gjennomsnitt av 10 brukere
Side 1/3
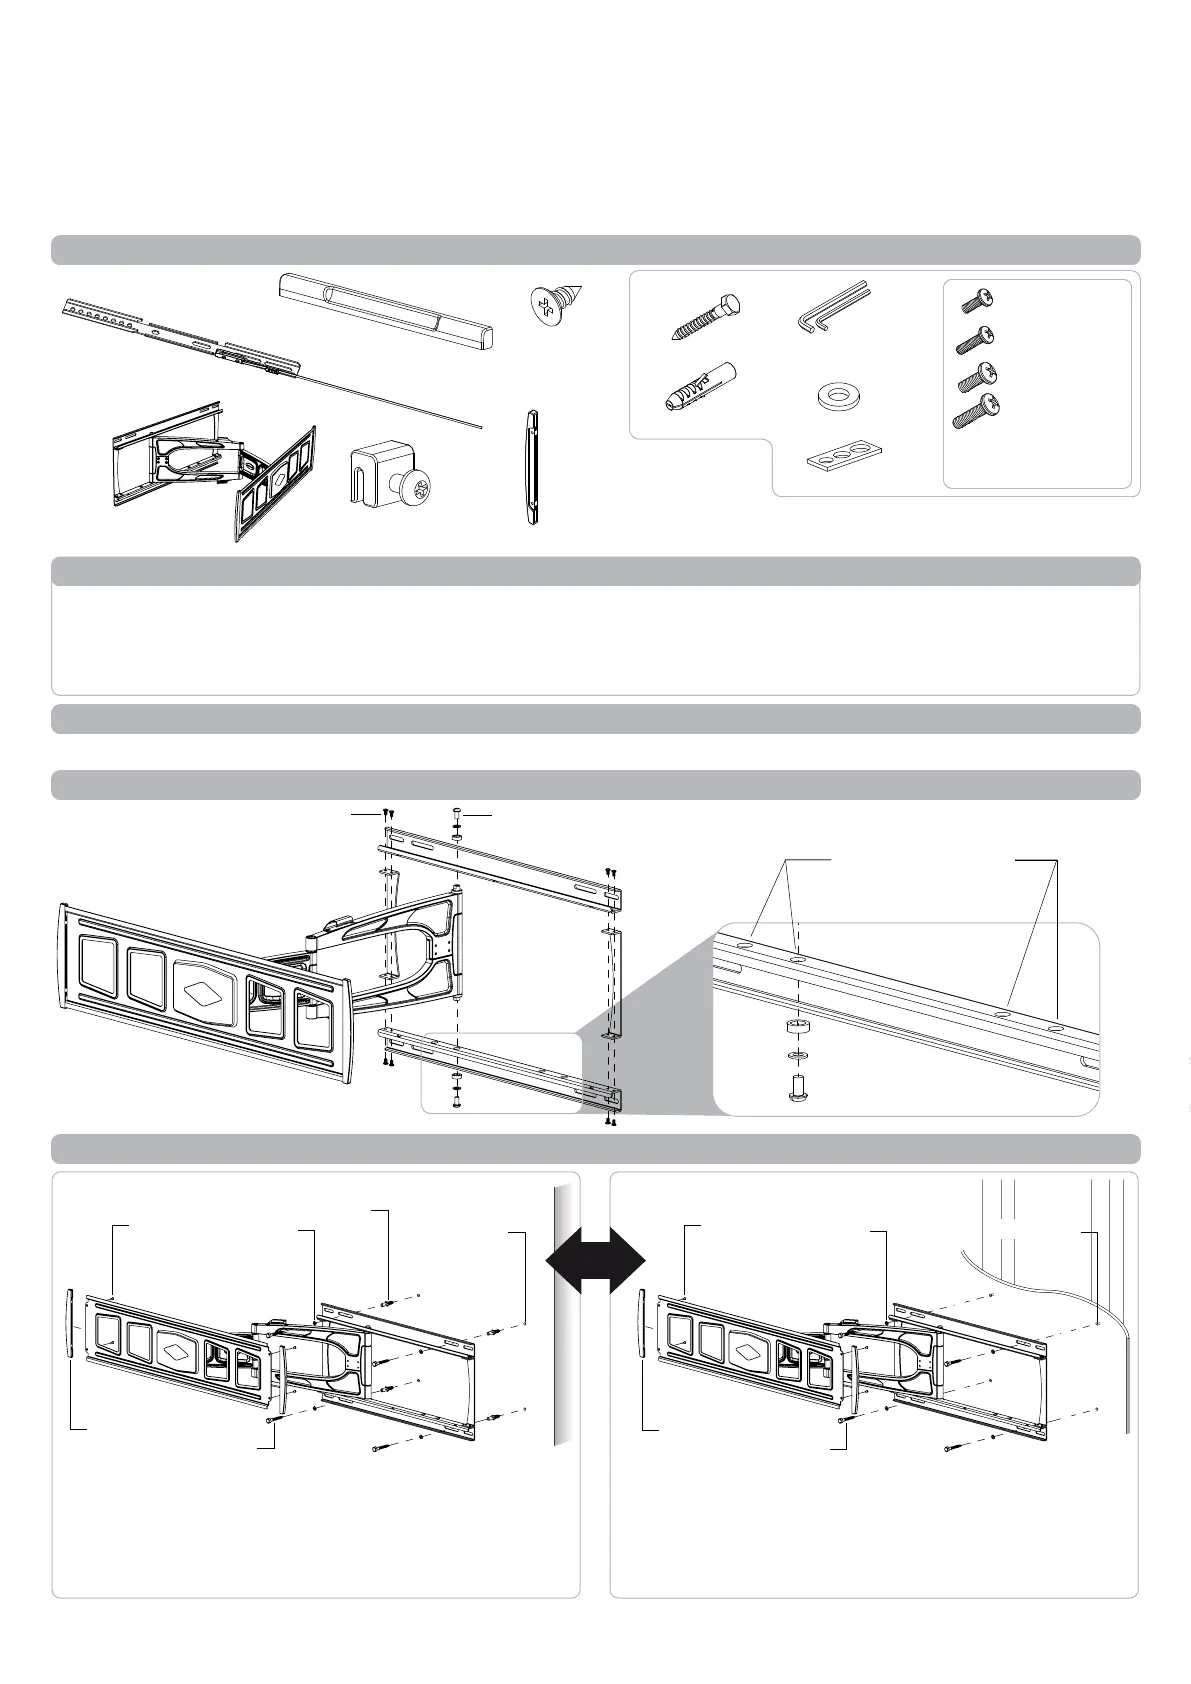
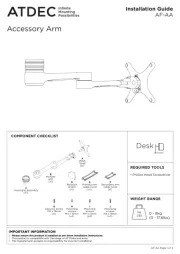
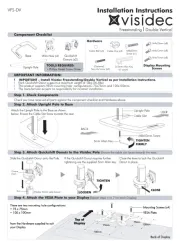
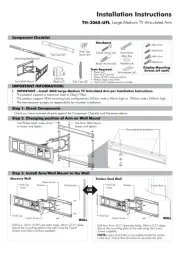
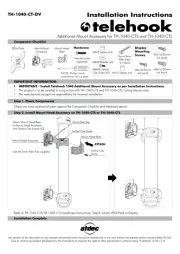
Component Checklist
Coach Screw (x4)
Nylon Anchor (x4)
Washer (x4)
5mm/4mm
Allen Key
M6x16mm
M6x25mm
M8x16mm
M8x25mm
TH-3060-UFL
Large-Medium TV Articulated Arm
IMPORTANT INFORMATION:
Step 1. Check Components
Check you have received all parts against the Component Checklist and Hardware above.
! IMPORTANT - Install 3060 Large-Medium TV Articulated Arm per Installation Instructions.
! This product supports a maximum load of 35kg (77lbs).
! This product supports VESA mounting hole configurations 200mm wide x100mm high to 700mm wide x 500mm high.
! The manufacturer accepts no responsibility for incorrect installation.
Display Mounting
Screws (x4 each)
Hardware
Tools Required:
Power drill
•
5mm (0.2”) drill bit
•
10mm (0.39”) masonry drill bit
•
Phillips head screw driver•
13mm (0.5”) socket wrench or shifter
•
Step 2. Changing position of Arm on Wall Mount
Step 3. Install Arm/Wall Mount to the Wall
Arm/Wall Mount
Mounting Bracket (x2)
Multiwasher (x4)
End Cap (x2)
Top Cap (x2)
Block (x2)
Locking
Screw (x4)
End Cap
Use Phillips head screw driver
to loosen and tighten.
Use 5mm Allen Key to
loosen and tighten.
Timber Stud Wall
Masonry Wall
- Drill four 10mm (0.39”) diameter holes, 58mm (2.3”) deep.
- Secure the mounting plate to the wall using the Coach
Screws and Nylon Anchors supplied.
- Drill four 5mm (0.2”) diameter holes, 58mm (2.3”) deep.
- Secure the mounting plate to the wall using the Coach
Screws supplied.
NOTE: Use a stud finder to accurately locate the centre
of the stud. Ensure that all screws fix securely into stud.
Four optional positions
OR
Coach Screw
Washer
End Cap
Screw
Nylon Anchor
Drilled Hole
End Cap
Coach Screw
Washer
End Cap
Screw
Drilled Hole
End Cap
WALL
WALL
Installation Instructions
Produkspesifikasjoner
| Merke: | Atdec |
| Kategori: | veggfeste |
| Modell: | TH-3060-UFL |
| Maksimal skjermstørrelse: | - " |
| Minimum skjermstørrelse: | - " |
| Produktfarge: | Sort |
| Vippevinkelområde: | -5 - 15 ° |
| Kroppsmateriale: | Aluminium, Steel |
| Panelmonterbart grensesnitt: | - mm |
| Montasjetype: | Vegg |
| Maksimalvekt (kapasitet): | 35 kg |
Trenger du hjelp?
Hvis du trenger hjelp med Atdec TH-3060-UFL still et spørsmål nedenfor, og andre brukere vil svare deg
veggfeste Atdec Manualer
10 Oktober 2025
10 Oktober 2025
10 Oktober 2025
9 Oktober 2025
9 Oktober 2025
9 Oktober 2025
9 Oktober 2025
9 Oktober 2025
9 Oktober 2025
9 Oktober 2025
veggfeste Manualer
- Electro-Voice
- ErgoAV
- Duronic
- Pelco
- Samsung
- Icy Box
- Grunkel
- Tripp Lite
- One For All
- Hama
- Rocketfish
- Nabo
- Bauhn
- Biltema
- Pyle
Nyeste veggfeste Manualer
12 Oktober 2025
6 Oktober 2025
4 Oktober 2025
2 Oktober 2025
2 Oktober 2025
29 September 2025
29 September 2025
24 September 2025
23 September 2025
22 September 2025