QTX DMX-192 Bruksanvisning
Les nedenfor 📖 manual på norsk for QTX DMX-192 (6 sider) i kategorien belysning. Denne guiden var nyttig for 11 personer og ble vurdert med 3.5 stjerner i gjennomsnitt av 6 brukere
Side 1/6
www.avsl.com 154.103UK User Manual
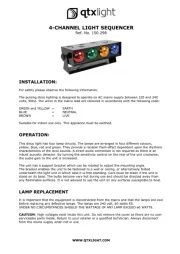
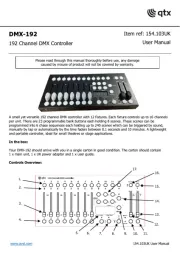
DMX-192
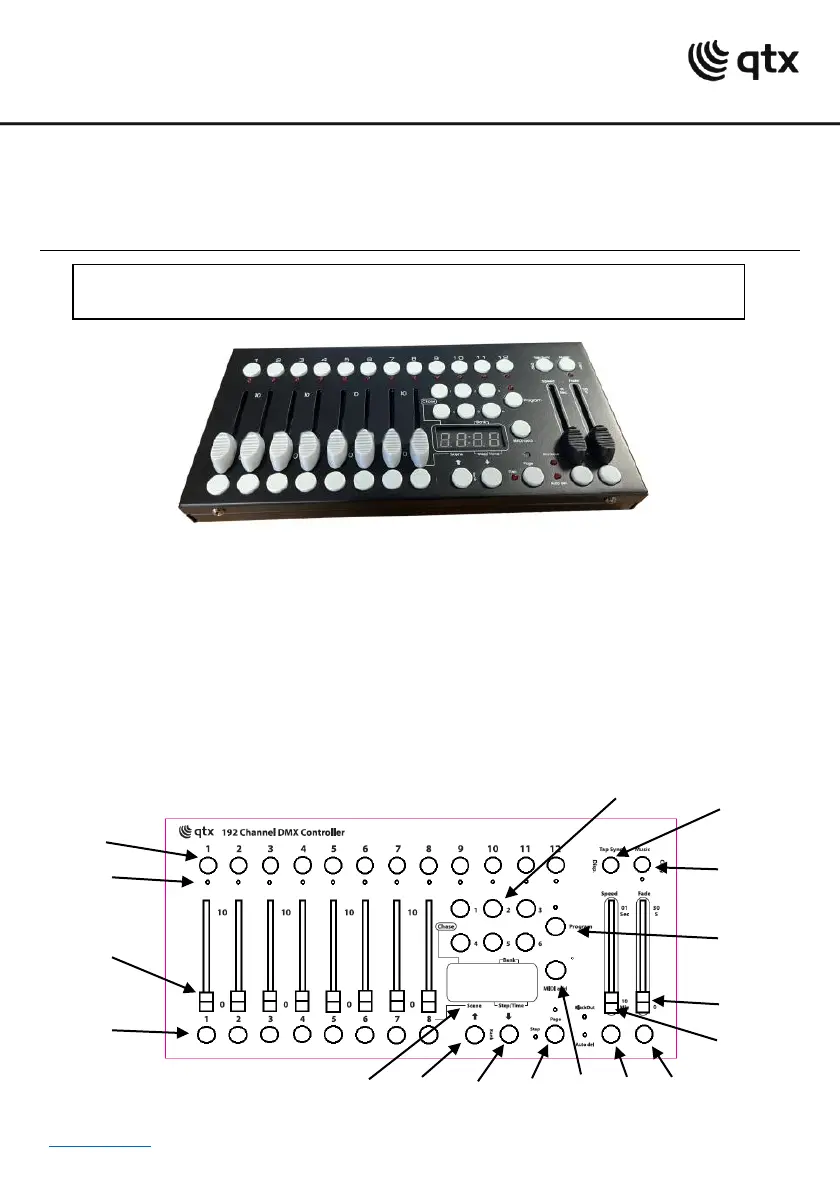
192 Channel DMX Controller
Item ref: 154.103UK
User Manual
A small yet versatile 192 channel DMX controller with 12 fixtures. Each fixture controls up to 16 channels
per unit. There are 23 programmable bank buttons each holding 8 scenes. These scenes can be
programmed into 6 chase sequences each holding up to 240 scenes which can be triggered by sound,
manually by tap or automatically by the time faders between 0.1 seconds and 10 minutes. A lightweight
and portable controller, ideal for small theatres or stage applications.
In the box:
Your DMX-192 should arrive with you in a single carton in good condition. The carton should contain
1 x main unit, 1 x UK power adaptor and 1 x user guide.
Controls Overview:
Please read through this manual thoroughly before use, any damage
caused by misuse of product will not be covered by warranty.
1.
2.
3.
4.
6.
7.
5.
8.
9.
10.
11.
12.
13.
14.
15.
16.
17.
Produkspesifikasjoner
| Merke: | QTX |
| Kategori: | belysning |
| Modell: | DMX-192 |
Trenger du hjelp?
Hvis du trenger hjelp med QTX DMX-192 still et spørsmål nedenfor, og andre brukere vil svare deg
belysning QTX Manualer
13 Oktober 2025
13 Oktober 2025
13 Oktober 2025
12 Oktober 2025
12 Oktober 2025

12 Oktober 2025
12 Oktober 2025
12 Oktober 2025
12 Oktober 2025
12 Oktober 2025
belysning Manualer
- Infinity
- American DJ
- Adam Hall
- GLP
- BoomTone DJ
- IFM
- ARRI
- Omnitronic
- Steinel
- Hama
- Cameo
- Ansmann
- Neewer
- Elation
- Magmatic
Nyeste belysning Manualer
23 Oktober 2025

23 Oktober 2025

23 Oktober 2025

23 Oktober 2025
20 Oktober 2025
19 Oktober 2025
17 Oktober 2025
17 Oktober 2025
17 Oktober 2025
15 Oktober 2025