Swann ADS-466 Bruksanvisning
Swann
Sikkerhetskamera
ADS-466
Les nedenfor 📖 manual på norsk for Swann ADS-466 (2 sider) i kategorien Sikkerhetskamera. Denne guiden var nyttig for 16 personer og ble vurdert med 4.3 stjerner i gjennomsnitt av 8.5 brukere
Side 1/2
2 3
456
789
1
C
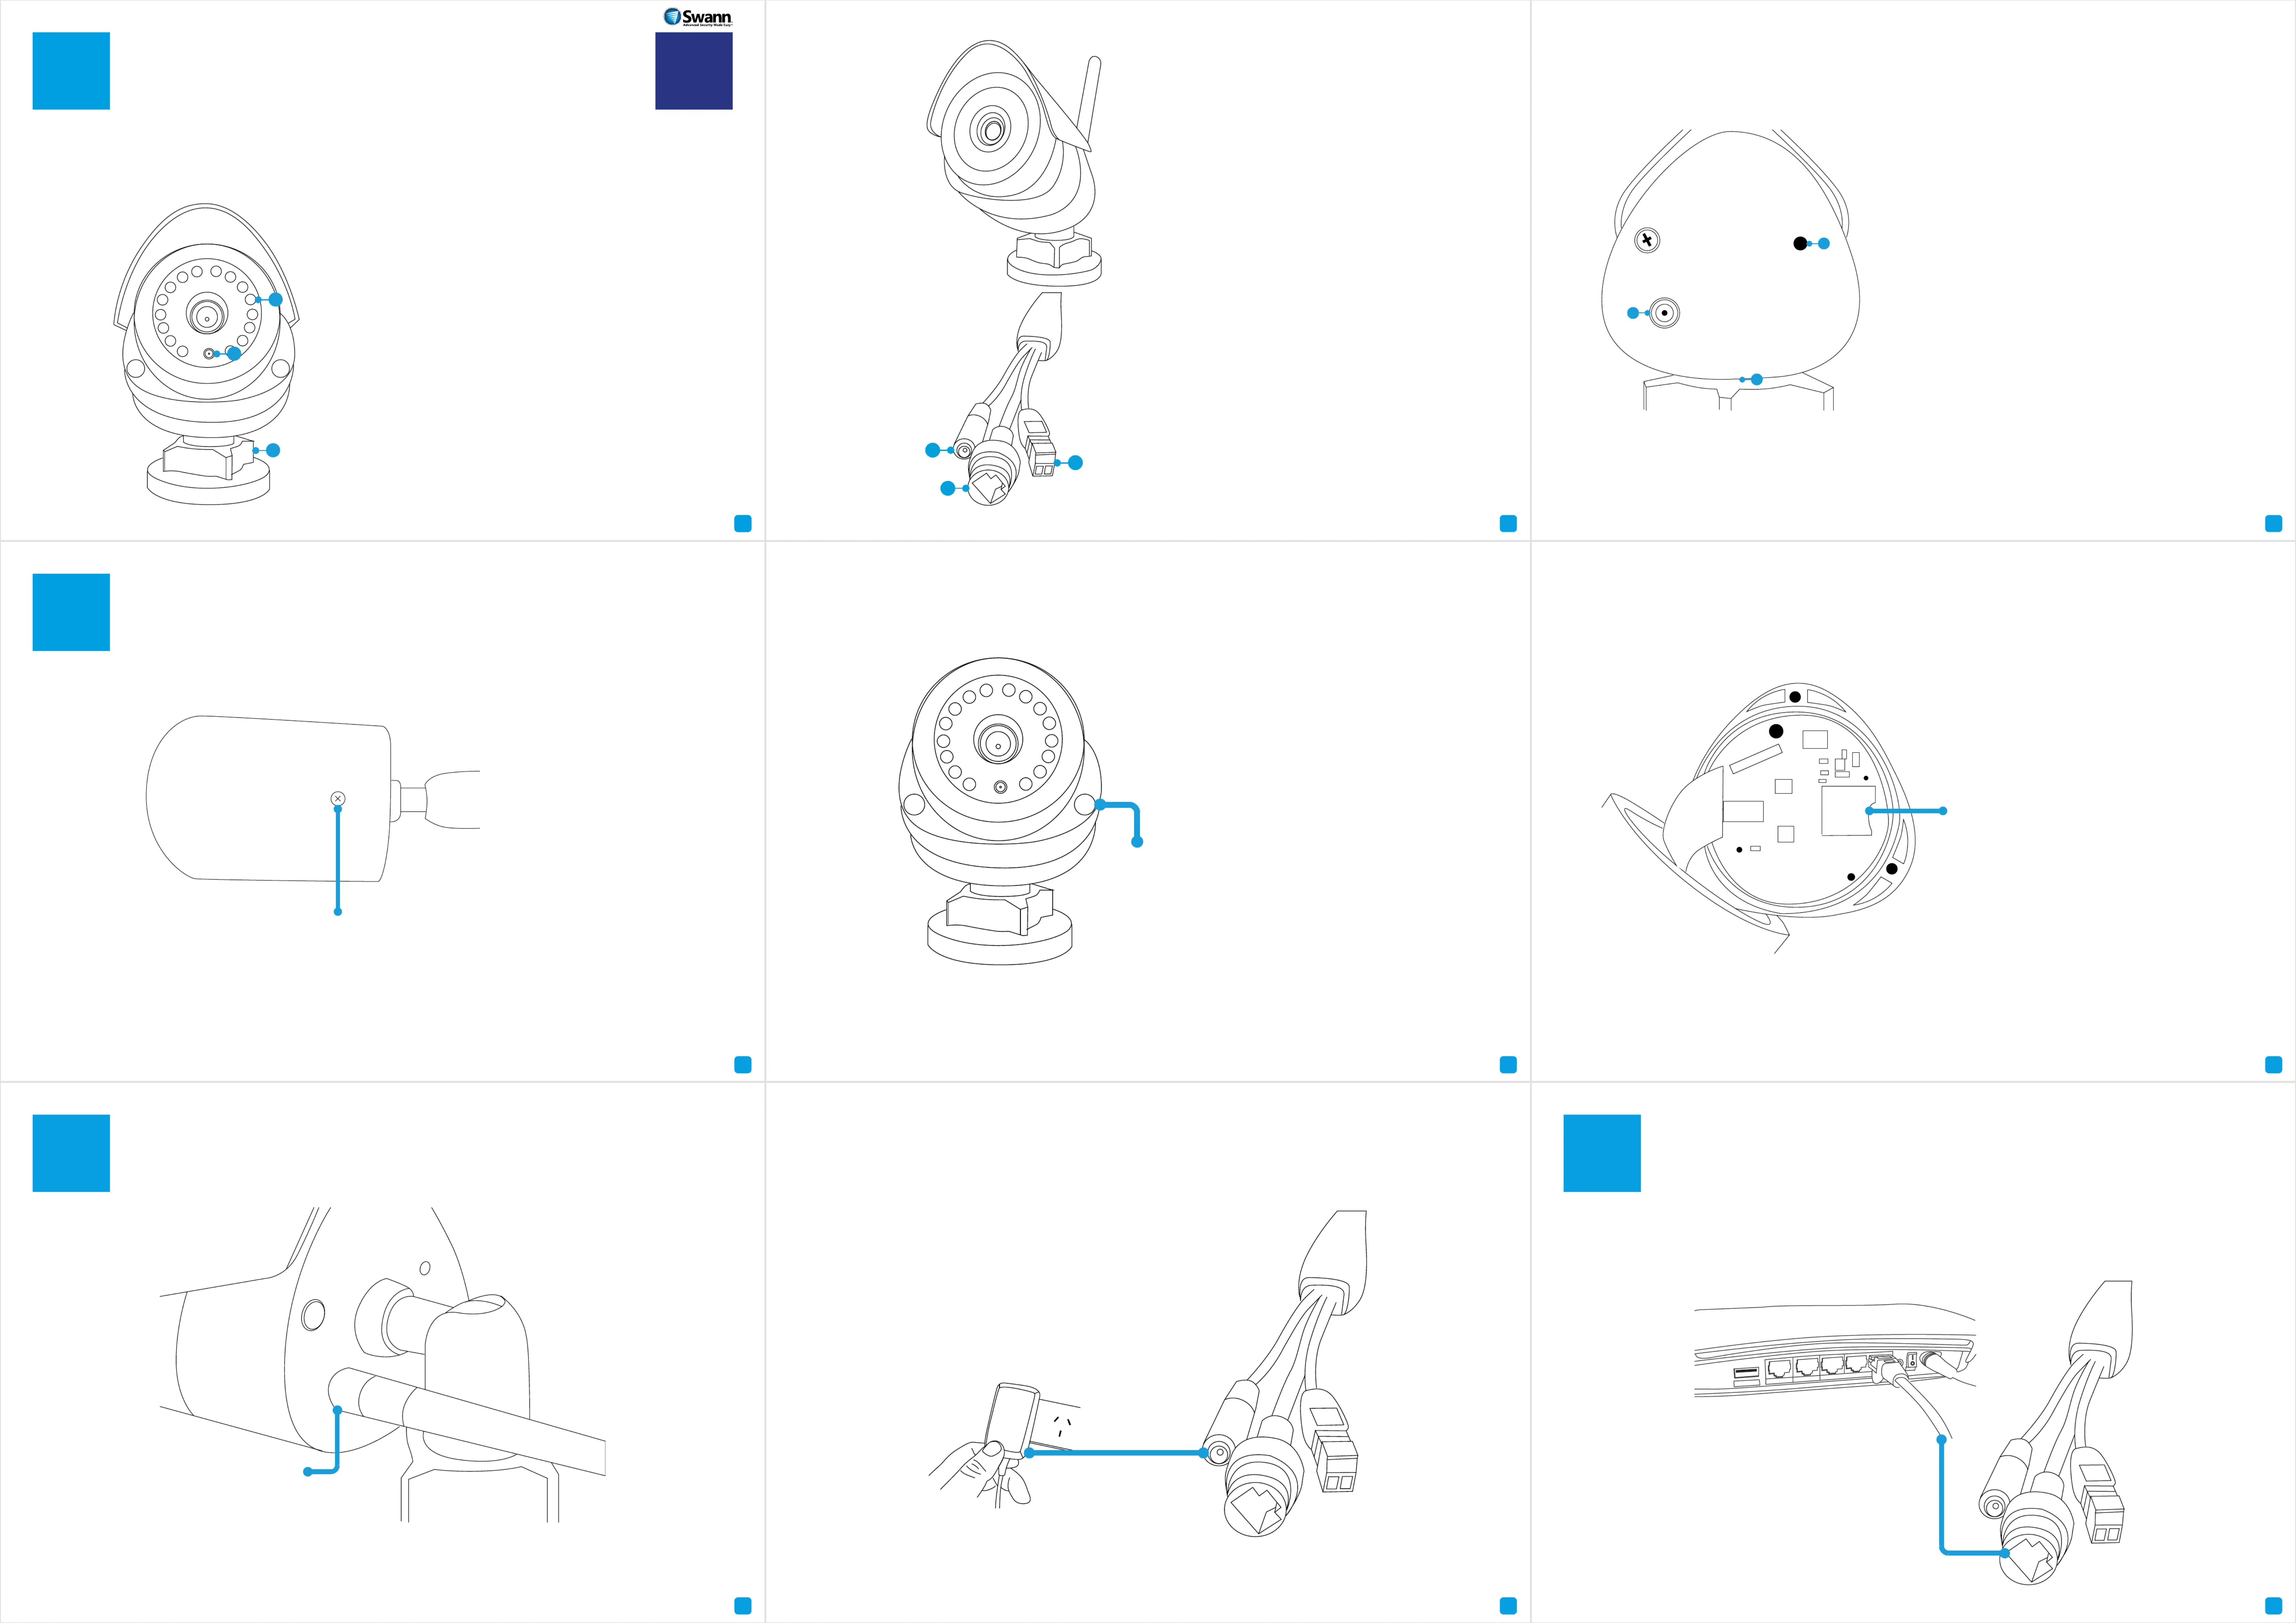
Connecting the Camera
D
Network LAN Connection (optional)
QSH_466CAM200214E | © Swann 2014
A
Getting to know your Camera
EN
Congratulations on the purchase of your SwannCloud camera. This quick start guide will assist you on
getting your camera up and running as soon as possible. We recommend that you connect everything and
give it a try before you do a permanent installation, to make sure nothing was damaged during shipping.
A) IR (Infrared) LEDs -
The camera will use
these in low-light conditions to generate
a black and white image, even in total
darkness.
B) Light Sensor - Detects the amount of
light available and turns on the IR LEDs
when necessary.
C) Locking Ring - Loosening the locking
ring will allow you to rotate the barrel of
the camera, so no matter what direction it
faces, you can spin the camera so that your
images are correctly oriented.
A) Power Socket - Connect the power
adapter here.
B) RJ45 (Ethernet) - For a wired connection,
connect this to a spare port on your router.
C) Alarm I/O Block -
For connecting external
alarms and sensors.
A) Wi-Fi Antenna - The included Wi-Fi
antenna connects here.
B) Reset -
When pressed and held for
more than 10 seconds when the power is
disconnected and reconnected, all settings
will revert to the factory defaults.
C) Microphone - Located at the bottom, it
allows the camera to hear nearby sounds
and stream them with the video.
B
Accessing the Micro-SD Card slot
To remove the protective cover,
use a Phillips-head screwdriver to
unscrew the screw located at the top
of the camera.
Even though this camera primarily connects to your home network wirelessly, it can also connect to
your router using the supplied LAN cable. The main advantage of a LAN connection is that you don’t get
disconnections or dropouts as you would with a wireless connection.
A
B
B
C
A
B
A
B
C
Remove each rubber cap and unscrew
to gain access to the Micro-SD Card slot.
There are three in total.
Gently pull the camera apart to reveal
the Micro-SD Card slot.
Inserting a
Micro-SD card allows you to capture
a series of snapshots and video files
directly to the card, as well as setting
an alarm schedule so it records
when it has detected motion. This
is optional and is recommended for
advanced users only.
First thing to do is to screw the provided
Wi-Fi antenna into the antenna socket
located on the camera. Use a clockwise
motion to connect. It is recommended
to leave the antenna in a vertical
position for best reception.
Now connect the
supplied power adapter
to the power input on
the camera.
US B In te rne t Et her ne t
432
Produkspesifikasjoner
| Merke: | Swann |
| Kategori: | Sikkerhetskamera |
| Modell: | ADS-466 |
| Bruksanvisning: | Ja |
| Wi-Fi: | Ja |
| Tilkoblingsteknologi: | Ledning & Trådløs |
| Maksimal oppløsning: | 1280 x 720 piksler |
| Dag/natt-modus: | Ja |
| Bildefrekvens: | 30 fps |
| Produktfarge: | Hvit |
| Monteringssett: | Ja |
| Kabler inkludert: | AC, UTP |
| Antall ethernets-/bredbåndstilkoblinger (RJ-45): | 1 |
| nattsyn: | Ja |
| Formfaktor: | Kule |
| Modell/Type: | IP-sikkerhetskamera |
| DC-inngangskontakt: | Ja |
| Minimumsbelysning: | - lx |
| Ethernet/bredbåndsforbindelse: | Ja |
| Støttede plasseringer/plasseringer som kan benyttes: | Inne & Ute |
| AC-adapter bunt: | Ja |
| Montasjetype: | Tak/Vegg |
| Støttede Mac operativsystemer: | Mac OS X 10.7 Lion, Mac OS X 10.8 Mountain Lion, Mac OS X 10.9 Mavericks |
| Effektiv distanse for nattsyn: | 15 m |
| Ekstern visning: | Ja |
Trenger du hjelp?
Hvis du trenger hjelp med Swann ADS-466 still et spørsmål nedenfor, og andre brukere vil svare deg
Sikkerhetskamera Swann Manualer
18 August 2025
18 August 2025
18 August 2025
18 August 2025
18 August 2025
18 August 2025
18 August 2025

18 August 2025

18 August 2025

18 August 2025
Sikkerhetskamera Manualer
- Blow
- Imou
- Marshall Electronics
- AVer
- GeoVision
- Edimax
- Lumens
- Boss
- Nedis
- Overmax
- Lorex
- Mobotix
- Technaxx
- Abus
- IMILAB
Nyeste Sikkerhetskamera Manualer
20 Oktober 2025
20 Oktober 2025

20 Oktober 2025
19 Oktober 2025

18 Oktober 2025

18 Oktober 2025

17 Oktober 2025

17 Oktober 2025

17 Oktober 2025

17 Oktober 2025