Tripp Lite 4POSTRAILKITHD Bruksanvisning
Tripp Lite
veggfeste
4POSTRAILKITHD
Les nedenfor 📖 manual på norsk for Tripp Lite 4POSTRAILKITHD (4 sider) i kategorien veggfeste. Denne guiden var nyttig for 15 personer og ble vurdert med 4.8 stjerner i gjennomsnitt av 8 brukere
Side 1/4

B
A
A
A
A
B
1
2
2
B
B
C
C
C
C
2U
3U AND ABOVE
1
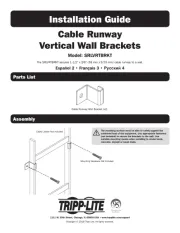
Owner's Manual
4POSTRAILKITHD
Heavy-Duty Adjustable Rackmount Shelf Kit
Important Safety Instructions
Español / Français : 3
Installation
SAVE THESE INSTRUCTIONS
This manual contains instructions and warnings that must be followed during the installation and operation of the product described in this manual.
Failure to comply may invalidate the warranty and cause property damage or personal injury.
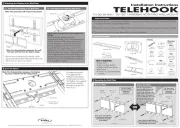
• Use the included shelves and mounting hardware to mount your rackmount equipment in a 4-post rack or rack enclosure. If you need to install your
equipment in a 2-post rack, order Tripp Lite’s 2-Post Rackmount Kit (model: 2POSTRMKITWM).
• The instructions in this manual are for common rack and rack enclosure types and may not be appropriate for all mounting applications. You must
determine the fitness of hardware and procedures before mounting. If hardware or procedures are not suitable for your application, contact the
manufacturer of your rack or rack enclosure for a solution.
• Rackmount equipment may be extremely heavy—be careful when moving or lifting equipment. Use one or more assistants if necessary.
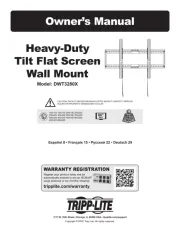
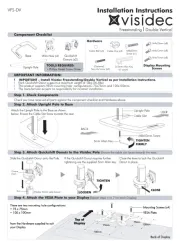
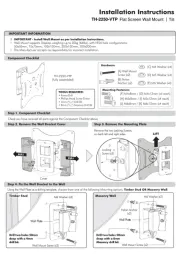
Square-Hole Rack Installation
1
The included plastic pegs
A
will temporarily support the empty
rackmount shelves
B
while you install the permanent mounting
hardware. Insert a peg near the center of the front and rear bracket of
each shelf as shown. (Each front bracket has 6 holes and each rear
bracket has 3 holes.) The pegs will snap into place.
After installing the pegs, expand each shelf to match the depth of your
rack rails. The pegs will fit through the square holes in the rack rails to
support the shelves. Refer to the rack unit labels to confirm that the
shelves are level in all directions. Note: The support ledge of each
shelf must face inward.
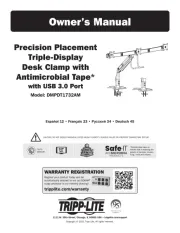
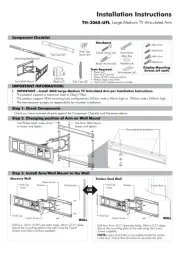
2
Secure the shelves
B
to the mounting rails permanently using the
included screws and cup washers
C
as shown.
• For 2U equipment mounting, place 4 screws total at the front and
4 screws total at the back.
• For 3U and above equipment mounting, place 6 screws total at the
front and 4 screws total at the back.
Tighten all screws before proceeding.
Warning: Do not attempt to install your equipment until you
have inserted and tightened the required screws. The plastic
pegs will not support the weight of your equipment.
1111 W. 35th St., Chicago, IL 60609 USA • www.tripplite.com/support
Produkspesifikasjoner
| Merke: | Tripp Lite |
| Kategori: | veggfeste |
| Modell: | 4POSTRAILKITHD |
| Opprinnelsesland: | China |
| Pakkevekt: | 4760 g |
| Sertifisering: | RoHS |
| Materiale: | Stål |
| Produktfarge: | Grå |
| Pakkedybde: | 609.6 mm |
| Pakkehøyde: | 165.1 mm |
| Pakkebredde: | 114.3 mm |
| Harmonisert system (HS)-kode: | 7326.90.8688 |
| Maksimalvekt (kapasitet): | 225 kg |
| Masterkassens (ytterkassens) GTIN (EAN/UPC): | 10037332182996 |
| Masterkassens (ytterkassens) bruttovekt: | 29660 g |
| Masterkassens (ytterkassens) lengde: | 635 mm |
| Produkter per masterkasse (ytterkasse): | 6 stykker |
| Masterkassens (ytterkassens) bredde: | 378.5 mm |
| Masterkassens (ytterkassens) høyde: | 375.9 mm |
Trenger du hjelp?
Hvis du trenger hjelp med Tripp Lite 4POSTRAILKITHD still et spørsmål nedenfor, og andre brukere vil svare deg
veggfeste Tripp Lite Manualer
18 August 2025
18 August 2025
18 August 2025

18 August 2025
18 August 2025

17 August 2025
17 August 2025
17 August 2025
17 August 2025

17 August 2025
veggfeste Manualer
- Grunkel
- Biltema
- AV:link
- Kanto
- One For All
- Nabo
- Hama
- Atdec
- Craftsman
- InLine
- Duronic
- Pyle
- KIMEX
- Rocketfish
- ErgoAV
Nyeste veggfeste Manualer
12 Oktober 2025
10 Oktober 2025
10 Oktober 2025
10 Oktober 2025
9 Oktober 2025
9 Oktober 2025
9 Oktober 2025
9 Oktober 2025
9 Oktober 2025
9 Oktober 2025