Wilbur Curtis SW-1 Bruksanvisning
Les nedenfor 📖 manual på norsk for Wilbur Curtis SW-1 (4 sider) i kategorien Ikke kategorisert. Denne guiden var nyttig for 17 personer og ble vurdert med 4.7 stjerner i gjennomsnitt av 9 brukere
Side 1/4

CLEANING
Regular cleaning of the syrup warmer is essential when maintaining the best taste of syrup and function
that your unit is capable of dispensing.
1. Wipe any spills, dust or debris from the exterior surfaces with a damp cloth. The outside surfaces
of the unit should be cleaned with stainless steel polish to prevent scratches.
2. Clean the unit with a mild detergent solution and scrub well to remove
residue. Rinse thoroughly with warm water. Dry with clean cloth.
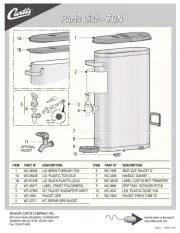
3. Remove the faucet assembly.
A. Unscrew the handle assembly from the faucet and remove.
B. Clean the faucet shank with a gage glass brush (circular bristle) by pushing
the brush through the shank.
C. Using the same brush, clean the faucet body outlet.
D. Clean the faucet cap and silicone seat cup.
4. After cleaning, you may sanitize the faucet parts.
5. After cleaning, sanitizing and drying, assemble any parts taken from the syrup
warmer.
FOR THE LATEST SPEC INFORMATION GO TO WWW.WILBURCURTIS.COM
HOLDING TEMPERATURE
It is necessary to preheat the syrup before pouring into the SW-1 syrup warmer. This
unit will keep syrup warm, at serving temperature until consumed.
SETUP INSTRUCTIONS
1. Place the syrup warmer unit on a solid, level counter top. Locate the unit close to a
120 VAC electrical outlet.
2. Plug the power cord into the electrical outlet.
3. Remove the lid and pour in previously-warmed syrup.
4. Switch on the unit at the ON/OFF switch.
6. Dispense syrup by holding the individual serving vessel under the faucet and tilting the handle. Warm
syrup will pour into the container.
SPECIFICATIONS
Capacity, 1 Gallon Power Requirements, 30 watts
Faucet Clearance, 4½” Voltage, 120VAC / 60 Hz
Diameter, 7” Shipping Weight, 5 lbs.
Height, 14”
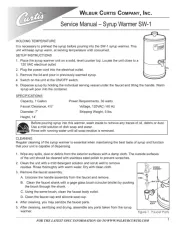
Service Manual – Syrup Warmer SW-1
W C Cilbur urtis ompany nC, i .
Before pouring syrup into this warmer, wash inside to remove any traces of oil, debris or dust.
Use a mild solution of dish soap and water.
Rinse with running water until all soap residue is removed.
1
Produkspesifikasjoner
| Merke: | Wilbur Curtis |
| Kategori: | Ikke kategorisert |
| Modell: | SW-1 |
Trenger du hjelp?
Hvis du trenger hjelp med Wilbur Curtis SW-1 still et spørsmål nedenfor, og andre brukere vil svare deg
Ikke kategorisert Wilbur Curtis Manualer

28 September 2025
27 September 2025

27 September 2025
26 September 2025

26 September 2025
26 September 2025
26 September 2025

26 September 2025
25 August 2025
Ikke kategorisert Manualer
- Thorens
- AENO
- MOOOV
- Asus
- S.M.S.L
- Step2
- CubuSynth
- HyperX
- Signature Hardware
- Helight
- Weston
- Sumiko
- Dash
- Thermarest
- Vestil
Nyeste Ikke kategorisert Manualer

23 Oktober 2025

23 Oktober 2025

23 Oktober 2025

23 Oktober 2025

23 Oktober 2025

23 Oktober 2025

23 Oktober 2025

23 Oktober 2025

23 Oktober 2025

23 Oktober 2025