Atdec TH-31-55-SA-PK Bruksanvisning
Les nedenfor 📖 manual på norsk for Atdec TH-31-55-SA-PK (2 sider) i kategorien veggfeste. Denne guiden var nyttig for 14 personer og ble vurdert med 3.5 stjerner i gjennomsnitt av 7.5 brukere
Side 1/2
TM
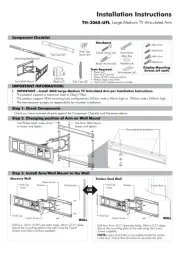
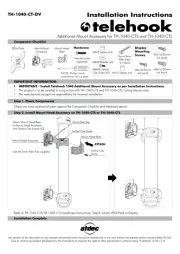
Component Checklist
Due to continuing product development, the manufacturer reserves the right to alter specifications without notice. Published: 24.11.06 c
E Mounting the Display
Installation Instructions
TELEHOOK
31-55 Tilt Wall
31-55” Horizontal Bar
Wall Mount (x2)
31-55” Bracket (Left)
31-55” Bracket (Right)
Slider (x2)
Hex Tool
5mm
Allen Key
M8 Small
Washer (x2)
Wall Plug (x4)
M8 Large
Washer (x4)
M8 x45mm
Screws (x2)
Multi
Washer (x6)
M5 x 16mm
Screw (x6)
M6 x 16mm
Screw (x6)
M8 x 16mm
Screw (x6)
M8 Coach
Screw (x4)
M4 x 16mm
Screw (x6)
M8 Screw Hole
L
M6 Screw Hole
M5 & M4
Screw Hole
C
Step 2
Use the supplied Multi Washer as shown
above. Ensure that the tightest fitting hole in
the washer is used for the specific sized screw.
Note distance X, for use in the
following steps
X
=
=
Note: This operation may
require two persons.
Now that the horizontal bar is
attached to the wall with the
Sliders in place, lift the Display
with brackets attached and
hook the Brackets over the
Sliders. Let the display rest
against the wall.
Step 1
Fit two M8x45mm locking screws into brackets
behind Display. Adjust the Tilt angle of the
Display. Tighten two locking screws with Hex
Tool provided.
WARNING: Do not attempt to adjust
tilt angle without firstly loosening
locking screws. Doing so may damage
product.
M8 Small
Washer
M8x45mm
Screw
Hex Tool
Tighten
-5° to 10° Tilt
TOP
Step 2
Store the Hex Tool
behind the display
Bit Box
Clinch Nuts
Multi Washer
Step 1
Attach left and right brackets to the rear of your display. Select M4, M5, M6 or M8 fasteners to suit your display. Ensure
a minimum of two fasteners are used per bracket. Clinch nuts must be positioned as shown (internally).
Note: The brackets should
rest on the horizontal bar
with the slider between the
bracket.
For added security you may choose to attach a padlock
to one or both brackets to prevent the theft of the
display. It is recommended that the padlock should
have a shackle diameter of 5mm (
3
/
16
”).
Padlock
5mm (
3
/
16
”)
diameter shackle
NOTE:
The manufacturer does
not accept responsibility
for incorrect installation.
Telehook 31-55 Tilt
Wall supports a
maximum weight of
60kgs (132lbs)
TOOLS REQUIRED:
z Power Drill
z 12mm (1/2”) Drill Bit
z 8mm (5/16”) Drill Bit
z Adjustable wrench
IMPORTANT:
Ensure you have received all parts against the component checklist prior to installing.
A Attaching the Brackets to the Display
G Security Option
Clinch Nuts
F Fix the Tilt angle of the Display
Produkspesifikasjoner
| Merke: | Atdec |
| Kategori: | veggfeste |
| Modell: | TH-31-55-SA-PK |
| Maksimal skjermstørrelse: | 22 " |
| Minimum skjermstørrelse: | - " |
| Produktfarge: | Sort |
| Vippevinkelområde: | -5 - 25 ° |
| Panelmonterbart grensesnitt: | 200 x 100,200 x 200,300 x 200,300 x 300,400 x 300,400 x 400,600 x 400 mm |
| Montasjetype: | Vegg |
| Maksimalvekt (kapasitet): | 65 kg |
| Monteringsgrensesnitt, kompatibilitet (min): | 200 x 100 mm |
| Monteringsgrensesnitt, kompatibilitet (maks): | 600 x 400 mm |
| Maksimum distanse til gulv: | 101.6 mm |
Trenger du hjelp?
Hvis du trenger hjelp med Atdec TH-31-55-SA-PK still et spørsmål nedenfor, og andre brukere vil svare deg
veggfeste Atdec Manualer
10 Oktober 2025
10 Oktober 2025
10 Oktober 2025
9 Oktober 2025
9 Oktober 2025
9 Oktober 2025
9 Oktober 2025
9 Oktober 2025
9 Oktober 2025
9 Oktober 2025
veggfeste Manualer
- Rocketfish
- Pyle
- Duronic
- Pelco
- DataVideo
- Kanto
- Icy Box
- Hama
- NeoMounts
- Bauhn
- Toa
- KIMEX
- Nabo
- One For All
- Electro-Voice
Nyeste veggfeste Manualer
12 Oktober 2025
6 Oktober 2025
4 Oktober 2025
2 Oktober 2025
2 Oktober 2025
29 September 2025
29 September 2025
24 September 2025
23 September 2025
22 September 2025