Korg WT-30S Bruksanvisning
Les nedenfor 📖 manual på norsk for Korg WT-30S (2 sider) i kategorien DJ-utstyr. Denne guiden var nyttig for 14 personer og ble vurdert med 4.9 stjerner i gjennomsnitt av 7.5 brukere
Side 1/2

三味線用 / 箏用
WT-30S WT-30K
取扱説明書
このたびは、コルグ邦楽チューナー「調べ」をお買い上げ
いただきまして、ありがとうございます。
安全上のご注意
火災・感 電・人身傷害の危険を防止するには以下の指示を守ってください
警告
○○○○○○○
電池の入れ方
(三味線用/箏用共通)
両脇のPUSHを押しながら、ケースを
開けます。極性に注意して、電池を入れて
ください。
誤動作が発生したときは、電源のオンと
オフを何度か行ってください。それ
でも正常に動作しない場合は、電
池を一旦はずし、再度入れなおして
ください。
※付属の電池は、動作確認用のため、通
常より寿命が短い場合があります。
○○○○○○○○○○○○○○○○○
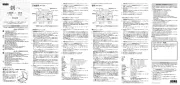
箏用
(WT-30K)
入力端子
ティルト・スリット
※
[電源/発音]スイッチ
[基音/ピッチ]スイッチ
[弦]スイッチ 内蔵マイク
スピーカ
ー
チューニング・ガイド
液晶画面
[調子]スイッチ
−10セント・ガイド
※本体裏側のスリットは、チュ−ナーを傾けて使うためのものです。スリットにカー
ド等をセットしてお使いください(大切なカード類は使用しないでください)。
箏のチューニング
□液晶画面を見ながらチューニングしよう(メーター・モード)
1. 別売オプションのコルグコンタクト・マイクCM-100を使用すると
きは、マイクのプラグを本機の入力端子に接続します。
内蔵マイクを使うときは、入力端子にプラグを接続せずに、手順4で
内蔵マイクを楽器にできるだけ近づけます。
※入力端子にプラグが接続されているときは、内蔵マイクは使用できません。
また、入力端子はモノラル専用です。ステレオ・プラグは使用できません。
2. [電源/発音]スイッチを押し、電源をオンにします。
電源をオンにした後、約20分間音が入力されない場合は、自動的に
オフになります。
3. 必要なときは、調子、基音、弦、ピッチを変更します。
調子を変更するときは[調子]スイッチを押します。[調子]スイッチを
押すたびに、平調子 ➝ 乃木調子 ➝ 雲井調子 ➝ 中空調子 ➝ クロマ
チック ➝ 平調子...と調子が変更されます。選んだ調子は液晶画面の
右下に示されます。
※クロマチックを選択しチューニングするときは、後述の「クロマチック・
チューニング」の項をご覧ください。
基音を変更するときは、[基音/ピッチ]スイッチを押します。神仙C〜
双調Gの範囲で変更できます。選んだ基音は液晶画面の左下に示さ
れます。
弦を変更するときは[弦]スイッチを押します。[弦]スイッチを押すた
びに、1(一) ➝2(二)➝3(三)...➝11(斗) ➝ 12(為) ➝13
(巾) ➝ 自動 ➝ 1(一) ➝ ...と選択できます。選んだ弦は液晶画面
の左上に表示され、メーターの右側に音名が表示されます。
※1弦を、通常より1オクターブ下に合わせるときは、クロマチック・チューニ
ングを行います。
ピッチを 変更するときは[基音/ピッチ]スイッチを1秒以上押します。
液晶画面の左上がピッチ表示に変わり、点滅します。表示の点滅中に
[基音/ピッチ]スイッチを押して、ピッチを 変 更します。
[基音/ピッチ]スイッチを押さないまま3秒経つと、基音表示に戻りま
す。
4.
弦を鳴らしながら
チューニングします。
弦
は1本ずつチューニングし
てください。
メーターが
●
位置(液晶画面中央)を指すように弦を調整します。次
に、チューニング・ガイドの中央ランプが点灯するように調整します。
手順3で弦を「自動」にしたときは、弦を鳴らすと、その音に一番近
い弦名が液晶画面に表示されます。
まず、
合わせたい弦名が表示さ
れるように弦を調整します。次に、メーターが●位置(中央)を指すよ
うに調整します。そして、チューニング・ガイドの中央ランプが点灯す
るように調整します。
※箏の5弦を鳴らしたときは、液晶画面に「1」と表示されます。
−10セント低くチューニングするときは、メーターが−10セント・ガ
イド( )を指すように弦を調整します。
※チューニング時は、他の音がマイクに入らないようにしてください。
□本機の音に合わせてチューニングしよう
(サウンド・モード)
1.箏のチューニングの「液晶画面を見ながらチューニングしよう」の
手順2、3を設定します。
2. [電源/発音]スイッチを1秒以上押すと、1(一)〜13(巾)の音が順
番に鳴ります。
音を固定するときは[弦]スイッチを押します。次の音へ切り替えると
きは[弦]スイッチを押します。
3. 音に合わせて、それぞれの弦をチューニングします。
4. 音を止めるときは[電源/発音]スイッチを押します。
クロマチック・チューニング
□液晶画面を見ながらチューニングしよう(メーター・モード)
1.箏のチューニングの「液晶画面を見ながらチューニングしよう」の
手順3で、調子をクロマチックに設定します。
音名を変更するときは[弦]スイッチを押します。[弦]スイッチを押す
たびに、以下のように音名が変更されます。選んだ音名はメーターの
右側に表示されます。
音名: 自動 ➝ C ➝ C# ➝ D ➝ D
#
➝ E ➝ F ➝ F# ➝ G ➝ G# ➝
A ➝A
#
➝B ➝ 自動 ➝ ...
2. 弦を鳴らしながらチューニングします。
弦
は1本ずつチューニングし
ください。
メーターが
●
位置(液晶画面中央)を指すように弦を調整します。次
に、チューニング・ガイドの中央ランプが点灯するように調整します。
手順1で弦を「自動」にしたときは、弦を鳴らすと、その音に一番近
い音名が液晶画面に表示されます。
まず、
合わせたい音名が表示さ
れるように弦を調整します。次に、メーターが●位置(中央)を指すよ
うに調整します。そして、チューニング・ガイドの中央ランプが点灯す
るように調整します。
※チューニング時は、関係のない音がマイクに入らないようにしてください。
□本機の音に合わせてチューニングしよう
(サウンド・モード)
1.箏のチューニングの「液晶画面を見ながらチューニングしよう」の
手順3で、調子をクロマチックに設定します。
2.
[電源/発音
]スイッチ
を1秒以上押すと、12の
音が順番に鳴ります。
12の音: C (4) ➝ C# ➝ D ➝ D
#
➝ E ➝ F ➝ F# ➝ G ➝ G# ➝ A ➝
A
#
➝ B ➝ C (4) ➝ ...
音を固定するときは[弦]スイッチを押します。次の音へ切り替えると
きは[弦]スイッチを押します。
3. 音に合わせて、それぞれの弦をチューニングします。
4. 音を止めるときは[電源/発音]スイッチを押します。
仕様
音律: 平均律
調子名:
平調子、乃木調子、雲井調子、中空調子、クロマチック
律名: 神仙(二尺 4C
261.63Hz
)
壱越(一尺八寸4D
293.67Hz
)
平調(一尺六寸4E
329.63Hz
)
双調(一尺三寸4G
392.00Hz
)
測定範囲: C1(32.70Hz)〜C8(4186.01Hz)
基準音範囲: F3(174.61Hz)〜D6(1174.66Hz)
チューニング・モード: メーター・モード、サウンド・モード
ピッチ範囲: A=430Hz〜445Hz
測定精度: ±1セント以内
サウンド精度: ±2.1セント以内
接続端子: INPUT(φ6.3 モノラル標準ジャック)
電源: 単4電池2本3V
電池寿命: 約100時間(
マンガン電池、メーター・モード音
声連続入力時)
外形寸法(
WxDxH
):104x64x15mm
重量: 81g(電池含む)
付属品:
取扱説明書、調弦早見表、動作確認用単4電池x2本
オプション: CM-100コンタクト・マイク
※調子、基音、弦、音名、ピッチの設定は、電源をオフにしても記憶しています。ただ
し、電池を交換した場合は、設定が初期化されます。
※仕様および外観は改良のため予告なく変更する場合があります。
○○○○○○○○○○○○○○○○○
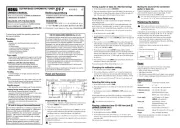
三味線用
(WT-30S)
ティルト・スリット
※
[電源/発音]スイッチ
[本数/ピッチ]スイッチ
[絃]スイッチ 内蔵マイク
チューニング・ガイド
[調子]スイッチ
液晶画面
入力端子
スピーカ
ー
※本体裏側のスリットは、チュ−ナーを傾けて使うためのものです。スリットにカー
ド等をセットしてお使いください(大切なカード類は使用しないでください)。
三味線のチューニング
□液晶画面を見ながらチューニングしよう(メーター・モード)
1. 別売オプションのコルグコンタクト・マイクCM-100を使用すると
きは、マイクのプラグを本機の入力端子に接続します。
内蔵マイクを使うときは、入力端子にプラグを接続せずに、手順4で
内蔵マイクを楽器にできるだけ近づけます。
※入力端子にプラグが接続されているときは、内蔵マイクは使用できません。
また、入力端子はモノラル専用です。ステレオ・プラグは使用できません。
2. [電源/発音]スイッチを押し、電源をオンにします。
電源をオンにした後、約20分間音が入力されない場合は、自動的に
オフになります。
3. 必要なときは、調子、本数、絃、ピッチを変更します。
調子を変更するときは[調子]スイッチを押します。[調子]スイッチを
押すたびに、本調子 ➝ 二上り ➝ 三下り ➝ クロマチック➝ 本調
子 ➝ ...と選択できます。選んだ調子は液晶画面の左下に示されま
す。
※クロマチックを選択しチューニングするときは、後述の「クロマチック・
チューニング」の項をご覧ください。
本数を変更するときは[本数/ピッチ]スイッチ を 押し ます。1本〜12
本半の範囲で変更できます。選んだ本数は液晶画面の左上に表示さ
れます。
絃を変更するときは[絃]スイッチを押します。[絃]スイッチを押すた
びに、一の糸 ➝二の糸 ➝三の糸 ➝ 自動➝一の糸 ➝ ...と選択で
きます。選んだ絃は液晶画面の右下に示され、その上に音名が表示
されます。
ピッチを 変更するときは[本数/ピッチ]スイッチを1秒以上押します。
液晶画面の左上がピッチ表示に変わり、点滅します。表示の点滅中に
[本数/ピッチ]スイッチを押して、ピッチを 変 更します。
[本数/ピッチ]スイッチを押さないまま3秒経つと、本数表示に戻りま
す。
4.
絃を鳴らしながら
チューニングし
ます。絃
は1本ずつチューニングし
てください。
メーターが
●
位置(液晶画面中央)を指すように絃を調整します。次
に、チューニング・ガイドの中央ランプが点灯するように調整します。
手順3で絃を「自動」にしたときは、絃を鳴らすと、その音に一番近
い
絃
名が液晶画面に表示されます。まず、合わせたい
絃
名が表示さ
れるように絃を調整します。次に、メーターが●位置(中央)を指すよ
うに調整します。そして、チューニング・ガイドの中央ランプが点灯す
るように調整します。
※チューニング時は、他の音がマイクに入らないようにしてください。
□本機の音に合わせてチューニングしよう
(サウンド・モード)
1.三味線のチューニングの「液晶画面を見ながらチューニングしよ
う」の手順2、3を設定します。
2. [電源/発音]スイッチを1秒以上押すと、一の糸〜三の糸の音が順番に
鳴ります。
音を固定するときは[絃]スイッチを押します。次の音へ切り替えると
きは[絃]スイッチを押します。
3. 音に合わせて、それぞれの絃をチューニングします。
4. 音を止めるときは[電源/発音]スイッチを押します。
クロマチック・チューニング
□液晶画面を見ながらチューニングしよう(メーター・モード)
1.三味線のチューニングの「液晶画面を見ながらチューニングしよ
う」の手順3で、調子をクロマチックに設定します。
音名を変更するときは[絃]スイッチを押します。[絃]スイッチを押す
たびに、以下のように音名が変更されます。選んだ音名はメーターの
右側に表示されます。
音名: 自動 ➝ C ➝ C# ➝ D ➝ D
#
➝ E ➝ F ➝ F# ➝ G ➝ G# ➝
A ➝A
#
➝B ➝ 自動 ➝ ...
2. 絃を鳴らしながらチューニングします。
絃
は1本ずつチューニングし
ください。
メーターが
●
位置(液晶画面中央)を指すように絃を調整します。次
に、チューニング・ガイドの中央ランプが点灯するように調整します。
手順1で絃を「自動」にしたときは、絃を鳴らすと、その音に一番近
い音名が液晶画面に表示されます。まず、合わせたい音名が表示さ
れるように絃を調整します。次に、メーターが●位置(中央)を指すよ
うに調整します。そして、チューニング・ガイドの中央ランプが点灯す
るように調整します。
※チューニング時は、関係のない音がマイクに入らないようにしてください。
□本機の音に合わせてチューニングしよう
(サウンド・モード)
1.三味線のチューニングの「液晶画面を見ながらチューニングしよ
う」の手順3で、調子をクロマチックに設定します。
2.
[電源/発音
]スイッチ
を1秒以上押すと、12の
音が順番に鳴ります。
12の音: C (4) ➝ C# ➝ D ➝ D
#
➝ E ➝ F ➝ F# ➝ G ➝ G# ➝ A ➝
A
#
➝ B ➝ C (4) ➝ ...
音を固定するときは[絃]スイッチを押します。次の音へ切り替えると
きは[絃]スイッチを押します。
3. 音に合わせて、それぞれの絃をチューニングします。
4. 音を止めるときは[電源/発音]スイッチを押します。
仕様
音律: 平均律
調子名: 本調子、二上り、三下り、クロマチック
本数: 1本〜12本半(
110.00Hz〜213.74Hz
)
測定範囲: C1(32.70Hz)〜C8(4186.01Hz)
基準音範囲:
A2(110.00Hz
)
〜B4(493.88Hz
)
チューニング・モード: メーター・モード、サウンド・モード
ピッチ範囲: A=430Hz〜445Hz
測定精度: ±1セント以内
サウンド精度: ±1セント以内
接続端子: INPUT(φ6.3 モノラル標準ジャック)
電源: 単4電池2本3V
電池寿命: 約100時間(
マンガン電池、メーター・モード音
声連続入力時)
外形寸法(
WxDxH
):104x64x15mm
重量: 81g(電池含む)
付属品:
取扱説明書、調弦早見表、動作確認用単4電池x2本
オプション: CM-100コンタクト・マイク
※調子、本数、絃、音名、ピッチの設定は、電源をオフにしても記憶しています。ただ
し、電池を交換した場合は、設定が初期化されます。
※仕様および外観は改良のため予告なく変更する場合があります。
保証規定(必ずお読みください)
本保証書は、保証期間中に本製品を保証するもので、付属品類は保証の対象に
なりません。保証期間内に本製品が故障した場合は、保証規定によって無償修理
いたします。
1. 本保証書の有効期間はお買い上げ日より1ケ年です。
2. 次の修理等は保証期間内であっても有料修理となります。
・消耗部品(電池、スピーカーなど)の交換。
・お取扱い方法が不適当のために生じた故障。
・天災(火災、浸水等)によって生じた故障。
・故障の原因が本製品以外の他の機器にある場合。
・不当な改造、調整、部品交換などにより生じた故障または損傷。
・保証書にお買い上げ日、販売店名が未記入の場合、または字句が書き替え
られている場合。
・本保証書の提示がない場合。
尚、当社が修理した部分が再度故障した場合は、保証期間外であっても、修理
した日より3ケ月以内に限り無償修理いたします。
3. 本保証書は日本国内においてのみ有効です。
ThiswarrantyisvalidonlyinJapan.
4. お客様が保証期間中に移転された場合でも、保証は引き続きお使いいただけ
ます。最寄りのコルグ営業所、またはサービス・センターまでお問い合わせくだ
さい。
5. 修理、運送費用が製品の価格より高くなることがありますので、あらかじめ最
寄りのコルグ営業所、またはサービス・センターへご相談ください。運送にか
かる往復の費用はお客様の負担とさせていただきます。
本製品の故障、または使用上生じたお客様の直接、間接の損傷につきましては、
弊社はいっさいの責任を負いかねますのでご了承ください。
本保証書は、保証規定により無料修理をお約束するためのもので、これよりお客
様の法律上の権利を制限するものではありません。
■お願い
1. 保証書に販売年月日等の記入がない場合は無効となります。記入できないと
きは、お買い上げ年月日を証明できる領収書等と一緒に保管してください。
2. 保証書は再発行致しませんので、紛失しないように大切に保管してください。
コルグ調べ三味線用/
箏用 保証書
本保証書は上記の保証規定により無料修理を行うことをお約束するもので
す。お買い上げ日から満1年の間に万一故障が発生した場合は、お買い上げ
の販売店に製品と本保証書をご持参の上、修理を依頼してください。
お買い上げ日 年 月 日
販売店名
アフターサービス
アフターサービスについてのご質問、ご相談は、お買い上げの販売店、最寄りの
コルグ営業所、またはサービス・センターへお問い合わせください。
商品のお取り扱いに関するご質問、ご相談は、お客様相談窓口へお問い合わせく
ださい。
お客様相談窓口 TEL03(3799)9086
●サービス・センター:〒143-0001東京都大田区東海5-4-1
明正大井5号営業所コルグ物流センター内
TEL03(3799)9085
● 名古屋営業所:〒466-0825名古屋市昭和区八事本町100-51
TEL052(832)1419
● 大阪営業所:〒531-0072大阪市北区豊崎3-2-1淀川5番館7F
TEL06(6374)0691
●
福岡営業所:〒810-0012福岡市中央区白金1-3-25第2池田ビル1F
TEL092(531)0166
URL: http://www.korg.co.jp/ ©
2003 Printed in China
1
J E
この注意事項を無視した取り扱いをすると、死亡や重
傷を負う可能性が予想されます
・次のような場合には、直ちに電源を切る。
○異物が内部に入ったとき
○製品に異常や故障が生じたとき
修理が必要なときは 、お買い上げの販売店、最寄りのコルグ営 業所、またはサー
ビス・センターへ 修 理を依 頼してください 。
・本製品を分解したり改造したりしない。
・修理/部品の交換などで、取扱説明書に書かれている以外のことは 絶 対にしな
い。
・大音量や不快な程度の音量で長時間使用しない。
万一、聴力低下や耳鳴りを感じたら、専門の医師に相談してください 。
・本製品に異物(燃えやすいもの 、硬貨、針金など)を入れない。
・温度が極端に高い場所(直射日光の当たる場所、暖房機器の近く、発熱する機
器の上など)での使用や保管はしない。
・振動の多い場所で使用や保管はしない。
・ホコリの 多い 場所で使 用や保管はしない。
・風呂場、シャワー 室で使 用 や 保 管 はしない 。
・雨天時の野外などのような湿気の多い場所で、使用や保管はしない。
・本製品の上に液体の入ったもの(水や薬品等)を置かない。
・本製品に液体をこぼさない。
・濡れた手で本製品を使用しない。
注意
この注意事項を無視した取り扱いをすると、傷害を負
うまたは物理的損害が発生する可能性があります
・正常な通気が妨げられない所に設置して使用する。
・ラジオ、テレビ、電子機器などから十分に離して使用する。
ラジオやテレビ等に 接 近して使用すると、本製品が雑音を受けて誤動作する場
合があります 。また 、ラジオ、テレビ等に 雑 音 が 入ることがあります 。
本製品をテレビ等の横に設置すると、本製品の磁場によってテレビ等 の故 障の
原因になることがあります。
・外装のお手入れは、乾いた柔らかい布を使って軽く拭く。
・長時間使用しないときは、電池の液漏れを防ぐために電池を抜く。
・電池は幼児の手の届かないところへ 保 管する。
・スイッチ やツマミなどに 必 要以上の力を加えない。
故障の原因になります 。
・外装のお手入れに、ベンジンやシンナー系の液体、コンパウンド質、強燃性のポ
リッシャーは 使 用しない。
・不安定な場所に置かない。
Produkspesifikasjoner
| Merke: | Korg |
| Kategori: | DJ-utstyr |
| Modell: | WT-30S |
Trenger du hjelp?
Hvis du trenger hjelp med Korg WT-30S still et spørsmål nedenfor, og andre brukere vil svare deg
DJ-utstyr Korg Manualer
5 August 2025
5 August 2025
5 August 2025
5 August 2025
5 August 2025
5 August 2025
5 August 2025
5 August 2025

5 August 2025
5 August 2025
DJ-utstyr Manualer
- Soundcraft
- QTX
- Victrola
- Festo
- Eliminator Lighting
- Reloop
- Fun Generation
- Apogee
- BeamZ
- Velleman
- Native Instruments
- AlphaTheta
- Omnitronic
- Ortofon
- Adam Hall
Nyeste DJ-utstyr Manualer
15 Oktober 2025

12 Oktober 2025
12 Oktober 2025
12 Oktober 2025

9 Oktober 2025
8 Oktober 2025

8 Oktober 2025

7 Oktober 2025

7 Oktober 2025

7 Oktober 2025