BlueBuilt BBSK001W Bruksanvisning

Les nedenfor 📖 manual på norsk for BlueBuilt BBSK001W (6 sider) i kategorien Ikke kategorisert. Denne guiden var nyttig for 29 personer og ble vurdert med 4.5 stjerner i gjennomsnitt av 2 brukere

Side 1/6
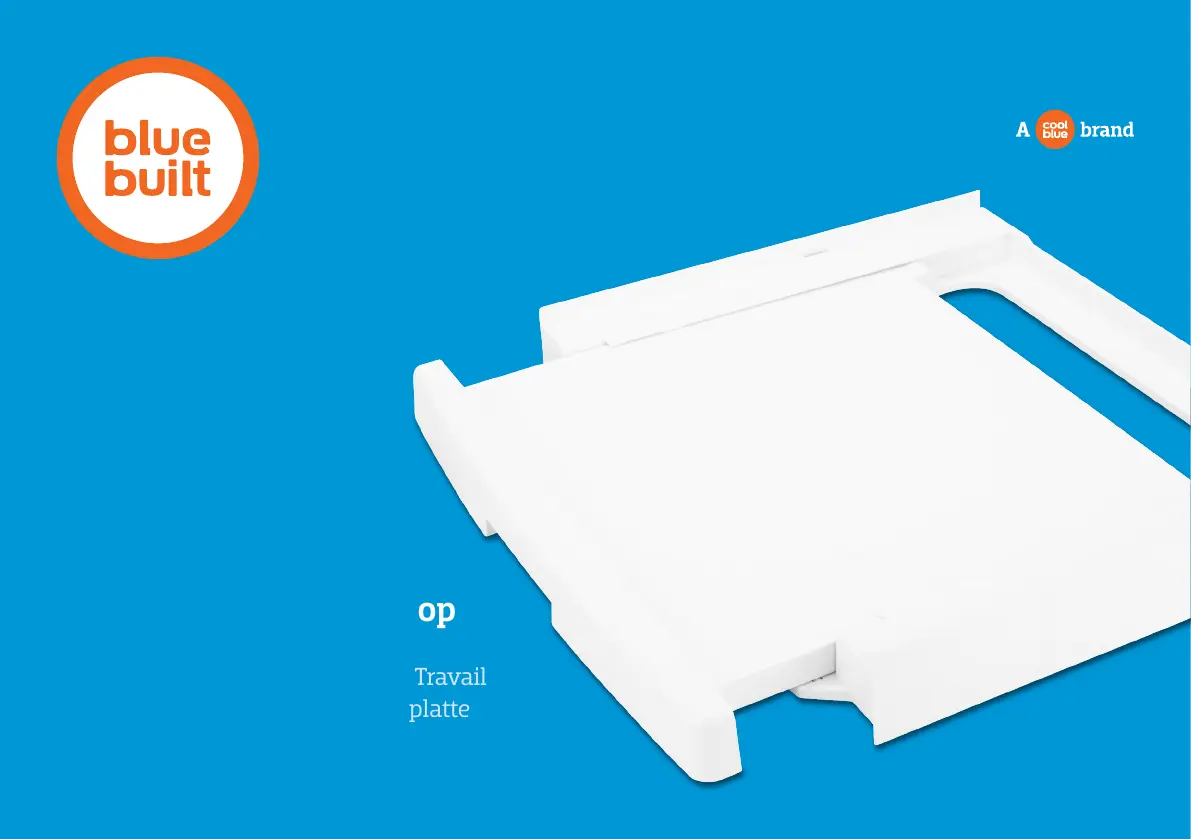
Stacking Kit with Worktop
Tussenstuk met Werkblad
Kit de Superposition avec Plan de Travail
Zwischenbaurahmen mit Arbeitsplatte
FLYING START.
Whoooo.
935259 - BBSK001W V1.0
EN
EN
12
1
6
7
4 5
8
In the box:
1
Stacking kit
2
Strap
3
Ratchet
4
4 plastic strips
5
4 wide anti-slip stickers
6
4 narrow anti-slip stickers
7
Plastic beschermkap
INSTALL STACKING KIT.
Uplifting.
15 minutes 2 people 2 coffees
From your own toolbox:
8
Spirit level
2
3
STEP 6.
Move the lever of the ratchet
3
up and
down and tighten the strap around your
washing machine and dryer. en place
the protective cover
7
on the ratchet.
STEP 3.
STEP 1.
STEP 4.
STEP 2.
STEP 5.
Take the strap
2
underneath the middle
of the washing machine. en pull on the
strap from the bottom to the top through
the opening on the left side.
Press the 4 plastic strips
4
to the bottom
corners of the stacking kit. Attach the
narrow anti-slip stickers
6
to them. Flip
the stacking kit
1
and place it on the
middle of the washing machine.
Attach the wide anti-slip stickers
5
to
the corners of the stacking kit
1
. Place
your dryer on the middle of the stacking
kit. Don’t the leg stands fit in the corners?
Unscrew them from your dryer.
Roll the strap
2
with the lever of the
ratchet
3
facing outwards. Feed the
strap from top to bottom through the
opening on the right side.
Open the ratchet
3
. Put the strap
2
in the opening in the middle and pull it
through the ratchet completely. Tighten
the strap at the top or on the side of the
dryer.
CHECKLIST.
Does the tick.
Spirit level.
Make sure the washing
machine is level before you
place the stacking kit.
Load capacity worktop.
Don’t place laundry baskets
heavier than 10kg on the
worktop.
Do you have a question?
Coolblue.nl/en/
customer-service
Coolblue.be/en/
customer-service
Coolblue isn’t liable for any
injury, damage, or arguments
with your partner caused by a
wrong installation.
e worktop is only suitable for
folding laundry and supporting
your laundry basket. If it’s used
in the wrong way, the warranty
is no longer valid.
32
12
1
6
7
4 5
8
2
3
In de doos:
1
Tussenstuk
2
Spanband
3
Ratel
4
4 kunststof stroken
5
4 brede antislip delen
6
4 smalle antislip delen
7
Plastic beschermkap
TUSSENSTUK INSTALLEREN.
Ik zit erbovenop.
15 minuten 2 personen 2 koffie
Uit eigen doos:
8
Waterpas
NL
STAP 6.
Beweeg de hendel van de ratel
3
naar
boven en beneden en span de spanband
strak om je wasmachine en droger heen.
Plaats daarna de beschermkap
7
over
de ratel.
STAP 3.
STAP 1.
STAP 4.
STAP 2.
STAP 5.
Haal de spanband
2
in het midden
onder de wasmachine door. Trek daarna
de spanband van onder naar boven door
de gleuf aan de linkerzijde.
Druk de 4 kunststof stroken
4
in de
hoeken aan de onderkant van het
tussenstuk. Plak hier de smalle antislip
stroken
6
op. Draai het
tussenstuk
1
om en plaats deze midden
op de wasmachine.
Plak de brede antislip stickers
5
op
de hoeken van het tussenstuk
1
.
Plaats je droger op het midden van het
tussenstuk. Passen de voetjes niet in de
hoeken? Schroef ze dan van je droger af.
Rol de spanband
2
met de hendel van
de ratel
3
naar de buitenkant. Steek de
spanband van boven naar beneden door
de gleuf aan de rechterzijde.
Open de ratel
3
. Steek de
spanband
2
in de middelste gleuf en
trek deze in zijn geheel door de ratel heen.
Span de spanband aan de boven- of
zijkant van de droger aan.
CHECKLIST.
Vink handig.
Waterpas.
Zet de wasmachine
waterpas voor je het
tussenstuk plaatst.
Draaggewicht werkblad.
Plaats geen wasmanden
zwaarder dan 10 kilo op het
werkblad.
Heb je een vraag?
Coolblue.nl/klantenservice
Coolblue.be/nl/
klantenservice
Coolblue is niet aansprakelijk
voor enig letsel, schade of
gekibbel met je vriend(in),
veroorzaakt door een onjuiste
installatie.
Het werkblad is uitsluitend
geschikt voor het opvouwen van
was en het ondersteunen van je
wasmand. Bij verkeerd gebruik
vervalt de garantie.
NL
54

Produkspesifikasjoner

Merke: BlueBuilt
Kategori: Ikke kategorisert
Modell: BBSK001W

Trenger du hjelp?

Hvis du trenger hjelp med BlueBuilt BBSK001W still et spørsmål nedenfor, og andre brukere vil svare deg


Ikke kategorisert BlueBuilt Manualer

Ikke kategorisert Manualer

Nyeste Ikke kategorisert Manualer